


Migrating a WordPress site comes down to four jobs: copying the site's files and database to the new hosting, updating the database details in the wp-config.php file, testing the site with the hosts file before it goes live, and finally pointing the DNS records to the new server. If the domain name stays the same, the URLs in the database are left alone; if the domain changes, the URLs are updated with a tool that does not break serialized data, such as wp search-replace, and the old URLs are 301 redirected.
In short: migrating a WordPress site
- You don't need to reinstall WordPress to move it; a site consists of two parts, the files and the database, and both are moved together.
- When you change WordPress hosting while keeping the same domain, no search and replace is needed; you only update the
DB_NAME,DB_USER,DB_PASSWORDandDB_HOSTvalues inwp-config.php. - If the domain changes, the URLs are replaced with a tool that understands serialized data, such as
wp search-replace; theguidcolumn is left untouched. - For a zero-downtime site migration, the new server is tested first with the hosts file, DNS is changed last, and the old hosting is kept running for a while.
- If you lower the DNS TTL value in advance, the change propagates faster; Google recommends doing this at least a week ahead.
- Email accounts do not move with WordPress; mailboxes and the MX, SPF and DKIM records are planned separately.
- A 301 redirect is only needed when URLs change (a new domain, subdomain or directory); the Change of Address tool in Search Console is used only when the domain or subdomain changes.
What types of WordPress site migration are there?
The type of migration determines which steps you follow. WordPress.org's official Migrating WordPress guide also separates the scenarios by whether the URL changes.
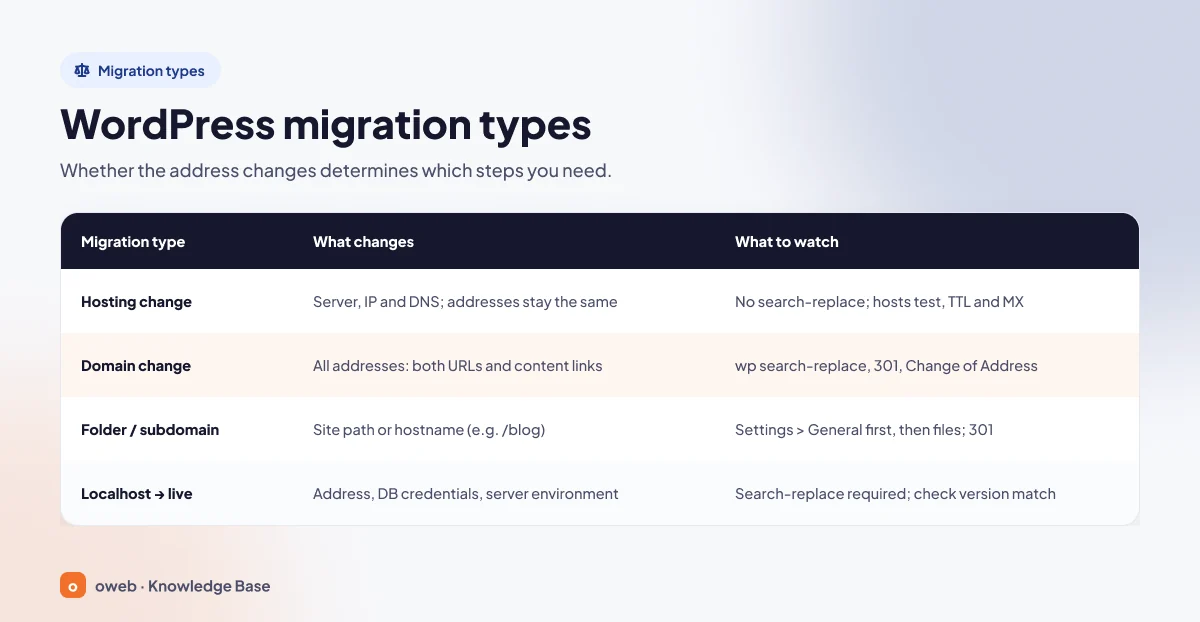
| Migration type | What changes? | What to watch out for |
|---|---|---|
| Hosting change (same domain) | Server and IP address, database details, DNS records; URLs stay the same | No search and replace needed; hosts file testing, TTL and an email (MX) plan |
| Domain change | All URLs: WordPress Address, Site Address, links in content | Search and replace that handles serialized data, 301 redirects, Search Console Change of Address |
| Subdirectory or subdomain | The site's path or hostname (example.com/blog, blog.example.com) | First the two addresses on the Settings > General screen, then the files; permalinks are saved again and a 301 redirect is added from the old path |
| Localhost to live | URL (https://example.com instead of http://localhost/site), database details, server environment | Search and replace is required; check wp-config.php and version compatibility |
The manual steps in this guide are based on a hosting change; for a WordPress domain name change, the search and replace, 301 redirect and Search Console steps are added to the same steps.
Moving to a subdirectory or subdomain
Take a full backup first. When moving to another directory on the same server, the order is reversed. First, on the Settings > General screen, you save the "WordPress Address (URL)" and "Site Address (URL)" fields for the new location, move the files without opening the site, then log in via /wp-admin and save the permalinks again; this recreates the .htaccess file in the same place as index.php. If you are moving to the root, back up any index.php and .htaccess files already there first.
Next, update the media links in your content for the new path with wp search-replace, fix menu links that contain the old directory, and add a 301 redirect from the old path to the new one. Moving to a subdomain changes the hostname, so it is treated like a domain change.
Moving from localhost to live
Moving WordPress from localhost to hosting is a migration in which the URL changes: http://localhost/site becomes https://example.com. The file and database steps are the same; wp-config.php is updated with the live database details, and then you enter your local URL as the first value in the wp search-replace command. Some migration plugins that work through their own servers (for example, Migrate Guru) do not support migrating from localhost.
Preparing before the migration
Complete the following four preparations before migration day.
Take a full backup
A WordPress backup consists of two parts: the database and the files. When you download the WordPress folder, the database is not included in that copy. Store the backup outside the old hosting; the methods are covered in the WordPress backup guide. In cPanel, partial backups (Home Directory and databases) in the Files > Backup interface can be restored by the user, whereas a full account backup taken with "Download a Full Account Backup" can only be restored by the hosting provider.
Lower the DNS TTL value
TTL (Time To Live) specifies how many seconds a DNS record is cached by resolvers. If the value is high, some visitors will keep going to the old server even after you change the record. In its guide to changing hosting, Google recommends lowering the TTL to a low value, such as a few hours, at least a week before the move. In cPanel, the default TTL for records is 14400 seconds (4 hours).
The TTL is lowered wherever the domain's DNS records are currently managed; the change is made at whichever provider your nameservers point to (the registrar, Cloudflare or your hosting). If DNS is managed in cPanel, open the record list under Domains > Zone Editor with "Manage" and edit the relevant record with "Edit". The new value takes effect only after the old TTL expires, so do this days in advance.
Check PHP and database version compatibility
On the old site, the "Server" and "Database" sections of the Tools > Site Health > Info screen show the versions. On the new hosting, choose the same or a newer version that is compatible with your theme and plugins. As of November 2026, the WordPress.org requirements page recommends PHP 8.3 and MySQL 8.4 or MariaDB 10.11 or higher. In cPanel, the PHP version is selected in the Software > MultiPHP Manager interface.
There is one known incompatibility: utf8mb4_0900_ai_ci, the default collation for utf8mb4 in MySQL 8.0 and later, is not recognized by older MariaDB versions, and the import stops with an "Unknown collation" error. MariaDB added these collations as aliases in version 11.4.5. If you get this error, ask your provider whether a compatible database version is available on the new hosting; always keep a copy of the dump before editing it by hand.
Plan your email accounts and DNS records
When you move WordPress, email accounts do not move automatically. If your email service is on the old hosting, you need to recreate the mailboxes on the new hosting and transfer the messages; if you use an external email provider, you keep the MX records exactly as they are. If you are going to change nameservers, the entire DNS zone moves to the new provider. Create the MX, SPF and DKIM (TXT) records in the new zone in advance, and keep a complete list of the existing records.
On sites that take orders, registrations or comments, records created between the first export and the DNS change do not carry over to the new server automatically. Plan the migration for low-traffic hours; just before the DNS change, put the site into maintenance mode and transfer the database once more. Because the tables already exist in the new database on the second transfer, use the "Custom" method in phpMyAdmin and tick the "Add DROP TABLE" option, or use wp db export / mysqldump (these dumps include DROP TABLE statements by default). If the domain is changing, repeat the wp search-replace step after the import; copy the wp-content/uploads folder again as well for images uploaded in the meantime.
Which migration method suits whom?
There are several ways to reach the same result. The choice depends on the size of the site and the kind of access you have to the server.
| Method | Requirements | Best for | Caution |
|---|---|---|---|
| Manual with cPanel and phpMyAdmin | Panel access on both hosts (File Manager, phpMyAdmin) | Small and medium-sized sites without SSH access | Hidden files and upload limits; delete the archives when you are done |
| WP-CLI and SSH | SSH access and WP-CLI on the server | Large sites, domain changes | Run the commands on the copy on the new hosting |
| Migration plugin | Admin dashboard access on the old and new sites | Those who don't want to deal with technical steps | The package size may hit the hosting's upload and time limits |
| Hosting provider support | The access details the provider asks for | Those who want to leave the job to an expert | Scope varies by company; ask your provider whether migration help is offered |
Manual WordPress site migration, step by step
The steps below cover the scenario of moving a WordPress site to another host while keeping the same domain. Until DNS changes, visitors see the working site on the old server; if something goes wrong, there is nothing to roll back.
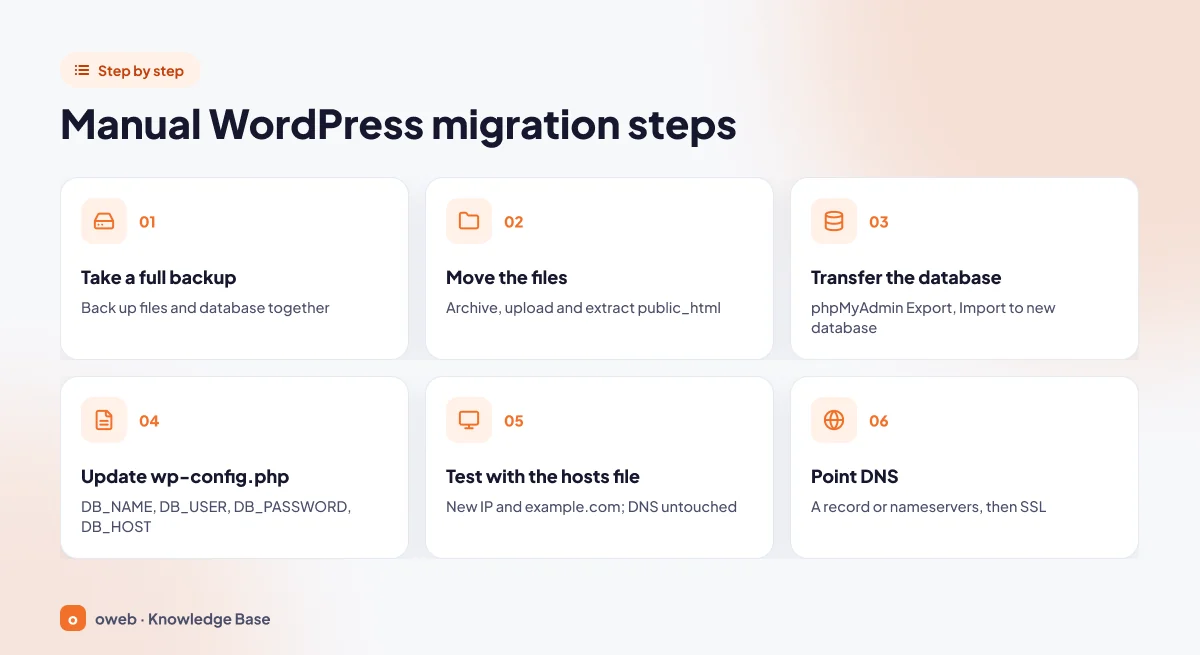
- Take a current full backup.
- Archive the files and move them to the new hosting.
- Export the database and import it on the new hosting.
- Update the
wp-config.phpfile. - Test the site with the hosts file.
- Point DNS, install SSL and save the permalinks again.
Steps 5 and 6 are covered under their own headings after the domain change section.
Step 1: Take a current full backup
If days have passed since your preparation backup, take a new one and keep a copy untouched. Don't change the site on the old hosting during the migration; it is your fallback plan.
Step 2: Archive the files and move them to the new hosting
On hosts that use cPanel, WordPress files are usually in the public_html folder; on other panels, the folder name may be different. If the folder contains subfolders belonging to other sites, select only the files of the site you are moving. Transferring thousands of files one by one is slow and error-prone; turn the files into a single archive.
With cPanel File Manager
- On the old hosting, in the Files > File Manager interface, open "Settings" and enable "Show Hidden Files (dotfiles)"; otherwise
.htaccesswill not be included in the selection. - Select the site files in
public_html, archive them with "Compress" and download the archive. After downloading, delete the archive from the old hosting too; because it also contains thewp-config.phpfile, anyone who knows its URL can download it. - If the new
public_htmlcontains the provider's default files or a ready-made WordPress installation, remove or back them up first; extraction can overwrite files with the same names. Then upload the archive with "Upload" and unpack it with "Extract"; cPanel File Manager does not support uploading folders. - Delete the archive file from the
public_htmlfolder on the new hosting as well.
With FTP or SFTP
If there is no file manager, download the site files with an FTP client and upload them to the new hosting. Make sure hidden files are shown, and use SFTP or FTPS instead of plain FTP; FTP sends your password unencrypted.
With SSH
This is the fastest route for large sites. Create the archive outside public_html so it cannot be downloaded over the web; the dot at the end of the first tar command includes hidden files as well:
# On the old host
cd ~
tar -czf site-files.tar.gz -C public_html .

# On the new host, after uploading the archive to the home directory
tar -xzf site-files.tar.gz -C public_html
Step 3: Export the database and import it on the new hosting
Migrating a WordPress database has three stages: exporting on the old hosting, creating an empty database and user on the new hosting, and importing the file.
In cPanel, the Databases > Database Wizard ("MySQL Database Wizard" in older versions) creates the database and a password-protected user in turn; selecting "ALL PRIVILEGES" in the privileges step grants the user all privileges on the database. If the prefix is enabled, account_ (your account name) is added to the start of the names; note down the full names. Don't create the database from within phpMyAdmin; cPanel cannot associate it with your account, and backups and restores will cause problems. The details are covered in the how to create a MySQL database article.
With phpMyAdmin
- In phpMyAdmin on the old hosting, select the WordPress database (its name is the
DB_NAMEvalue in the oldwp-config.php). - On the "Export" tab, export using the "Quick" method and SQL format; a
.sqlfile is downloaded. - On the new hosting, select the empty database, choose the file on the "Import" tab, confirm that the format is SQL and import it.
Button names may vary by version and language. phpMyAdmin also accepts compressed dumps (.sql.gz, .zip); for large databases, or if you hit the upload limit, use the command line.
With WP-CLI or the command line
# On the old host, in the directory where WordPress is installed
wp db export ~/site.sql

# On the new host, after editing wp-config.php in step 4
wp db import ~/site.sql
wp db import does not create the database itself; the empty database and a correct wp-config.php must already be in place. Writing the dump to your home directory (~/) prevents it from being downloaded over the web. If WP-CLI is not available, use the mysqldump and mysql commands; the user and database names differ between the two hosts:
# On the old host
mysqldump --no-tablespaces -h localhost -u old_user -p old_database > ~/site.sql

# On the new host
mysql -h localhost -u account_wpuser -p account_wpdb < ~/site.sql
The --no-tablespaces option lets you take a dump without the PROCESS privilege, which is usually not available on shared hosting. DROP TABLE statements are added to mysqldump dumps by default.
Step 4: Update the wp-config.php file
Back up the wp-config.php file on the new hosting and replace the database lines with the new details. Use straight single quotes; curly (typographic) quotes cause a PHP error.
define( 'DB_NAME', 'account_wpdb' );
define( 'DB_USER', 'account_wpuser' );
define( 'DB_PASSWORD', 'strong-password' );
define( 'DB_HOST', 'localhost' );
On most shared hosting, DB_HOST is localhost; if your provider gives a different hostname or port, enter that instead. Leave the DB_CHARSET, DB_COLLATE and $table_prefix lines as they were. The prefix must match the prefix in the table names, and changing the character set (utf8mb4 on most current installations) can corrupt non-ASCII characters (see the wp-config.php documentation).
How do you update URLs if the domain changes?
This section is only for migrations where the URL changes (a new domain, subdomain, subdirectory or localhost). If your domain stays the same, skip ahead to testing with the hosts file.
"WordPress Address (URL)" is the address where the core files are located, while "Site Address (URL)" is the address visitors type into the browser. In most installations the two are the same, and they are stored in the siteurl and home rows of the wp_options table in the database. These two rows are only the start; links in content, media paths and plugin settings also carry the old URL.
Why does search and replace in the SQL file break the site?
Some themes and widgets store their settings in PHP's serialized data format, together with the character count of the string:
s:23:"https://old-example.com";If you open the dump in a text editor and replace the URL with the 22-character https://example.com, the count stays at 23; WordPress cannot read the entry and the settings appear to have been reset.
Don't change URLs in the .sql file with a text editor or with a plain UPDATE ... REPLACE() query. Use a tool that understands serialized data, and take a database backup first.
How do you use wp search-replace?
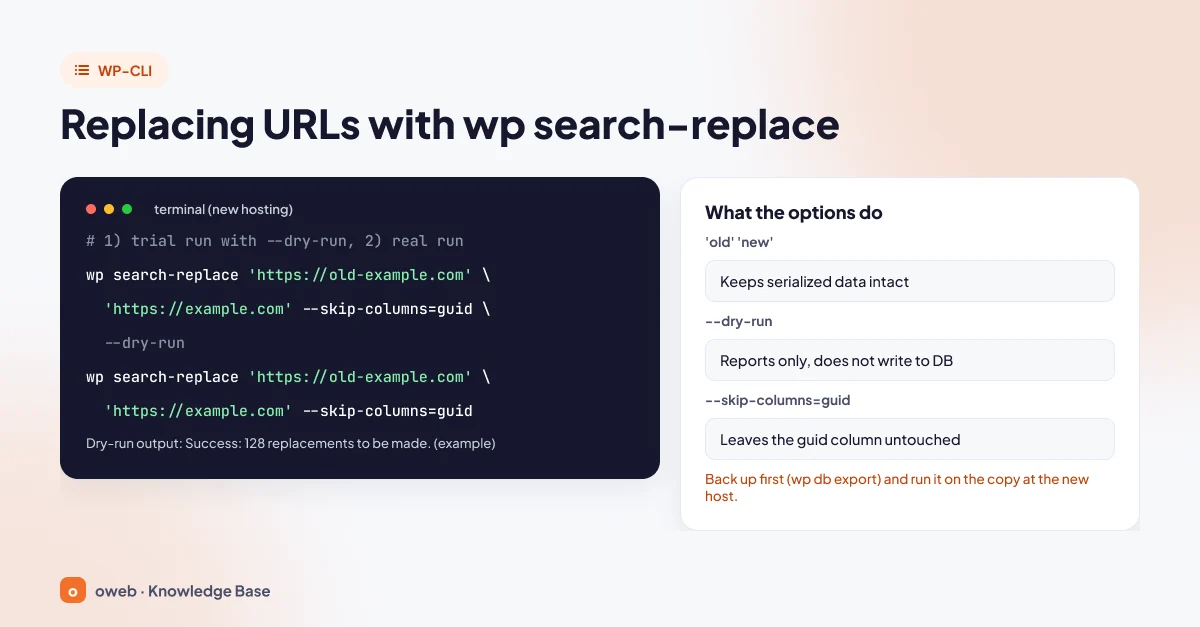
wp search-replace is a WP-CLI command that replaces one string with another in the database; it works without breaking serialized data and by default scans all tables registered with WordPress. Run the command on the copy on the new hosting, after importing the database and updating the wp-config.php file; don't run it on the old live site. Connect to the new hosting via SSH, change to the WordPress directory, take a backup first, then do a trial run:
# Backup
wp db export ~/backup.sql

# 1) Dry run first: does not write to the database
wp search-replace 'https://old-example.com' 'https://example.com' --skip-columns=guid --dry-run

# 2) Real run
wp search-replace 'https://old-example.com' 'https://example.com' --skip-columns=guid

# If you use a persistent object cache
wp cache flush--dry-run: Runs the entire operation and shows the report, but does not save the changes to the database; the output ends in the form "Success: 128 replacements to be made." (the number is an example).--skip-columns=guid: Skips theguidcolumn; if this permanent identifier changes, RSS readers treat old posts as new.--all-tables-with-prefix: Also includes plugin tables that are not registered with WordPress but use the same prefix.--precise: Uses PHP on all columns; it is slower but more reliable with complex serialized data.
If the old site also has URLs starting with http:// or containing www, run the command separately for each variant. Then, on the Settings > General screen, confirm that both addresses start with https:// and have no trailing slash. All options are listed in the WP-CLI search-replace documentation.
The old URL may also linger in transients, and search and replace tools can't always catch them. Because WordPress regenerates this data when needed, the official guide says it is safe to delete them on the migrated copy. After taking a backup, you can run the following query in phpMyAdmin (change the table name if your table prefix is not wp_):
DELETE FROM `wp_options` WHERE option_name LIKE '%\_transient\_%';What if you don't have SSH access?
If you can log in to the admin dashboard, the Better Search Replace plugin (Tools > Better Search Replace) does the same job; it supports serialized data and offers a "dry run" option. If you can't log in to the dashboard, temporarily hard-code the two main addresses in wp-config.php. These lines don't change links in content, and as long as they are defined, the two fields on the Settings > General screen cannot be edited:
define( 'WP_HOME', 'https://example.com' );
define( 'WP_SITEURL', 'https://example.com' );
Once you are logged in, update the URLs in your content with Better Search Replace.
How do you test the site on the new hosting without changing DNS? (Step 5: the hosts file)
Testing a site with the hosts file relies on making the domain resolve to the new server on your own computer only, without touching the DNS records. When resolving a domain, the operating system checks the hosts file first. While visitors see the old site, you browse the new copy under the real domain.
- Find the IP address of the new hosting in your panel.
- On Windows 10 and 11, run Notepad as an administrator and open the
C:\Windows\System32\drivers\etc\hostsfile. On macOS and Linux, the file is at/etc/hostsand is edited with administrator privileges (sudo). - Add a line at the end of the file with the IP address and domain names separated by spaces, then save it.
- Reopen your browser and browse the site.
# WordPress migration test - delete this line when done
203.0.113.10 example.com www.example.com
Replace 203.0.113.10 with your own server's IP address. Check inner pages, the admin login, images, special characters, forms and, if you have them, the cart and checkout steps. Place test orders with a test payment method; form and order notifications may send real emails, and if you do a final database transfer, these records will be deleted too. If the new server doesn't have a certificate yet, the browser may show a certificate warning; this is normal at this stage. When testing is finished, delete the line and flush the DNS cache on Windows:
ipconfig /flushdnsHosts File Editor in Microsoft PowerToys does the same job through an interface and backs up the hosts file.
How do you point DNS and take the site live? (Step 6)
If testing goes smoothly, take the site live. On sites that take orders, registrations or comments, put the old site into maintenance mode just before changing the DNS records, export the database one last time and import it on the new hosting, and also copy the files uploaded in the meantime (wp-content/uploads). Leaving the old site in maintenance mode until propagation is complete prevents orders that land on the old server from being lost. After that, there are two ways to update the DNS records.
Should you change the A record or the nameservers?
- A record only: DNS management stays with the current provider; you change the domain's A record (and the
wwwA record if it is separate, and any AAAA record) to the new server's address. Ifwwwis a CNAME record, you don't need to change it separately. The MX and TXT records themselves don't change; however, if the MX record points to the domain itself or tomail.example.com, email delivery also switches to the new server along with the A record. In that case, create the mailboxes on the new hosting in advance or, if email is staying on the old server, point the MX record to a separate name that resolves to the old IP address. If your SPF record contains the old server's IP address, add the new one. - Nameservers: The entire DNS zone moves to the new hosting. Before changing them, confirm that the A, AAAA, MX, TXT and CNAME records are ready in the new zone.
Propagation time is not fixed; it depends on the previous TTL of the records. A nameserver change usually takes longer, because the time is largely determined by the TTL of the delegation (NS) records in the domain extension's registry, which you cannot lower (the default TTL of NS records in cPanel zones is also 86400 seconds). Assume both servers will receive visitors for a day or two. In cPanel, the A record is updated in the Zone Editor with "Manage", "Edit" and "Save Record".
Do you need to reinstall SSL after the migration?
Yes; the certificate is installed on the old server, so it also has to be installed on the new one. Free domain-validated certificates can only be validated once the domain resolves to the new server, so they are usually issued after the DNS change. In cPanel, monitor the status on the Security > SSL/TLS Status screen; once the certificate is installed, set up a redirect from HTTP to HTTPS ("Force HTTPS Redirect" on the Domains screen in cPanel). If you can't afford even a brief certificate warning, ask your provider whether the existing certificate can be installed in advance.
How do you refresh permalinks?
On the Settings > Permalinks screen, click the "Save Changes" button without changing anything. This refreshes the rewrite rules and recreates the .htaccess file on Apache servers. On the command line, wp rewrite flush only refreshes the rules; to have it write the .htaccess file as well, you need the --hard option (single sites only) and a mod_rewrite entry in the WP-CLI configuration. If the file is missing, the easiest way is the "Save Changes" button in the admin dashboard.
When should you shut down the old hosting?
First, delete any .sql dumps and archives left in the web directory on both servers; anyone who knows their URL can download these files. WordPress recommends permissions of 755 for folders, 644 for files and 440 or 400 for wp-config.php; don't use 777. Don't shut down the old hosting right away. Google recommends keeping the old server running until the traffic it receives drops to zero. If something goes wrong, you can point the DNS record back to the old IP address; rolling back also takes as long as the TTL, and you will need to transfer any records created on the new server in the meantime separately.
How do you migrate WordPress with a plugin?
A WordPress migration plugin turns the files and database into a single package and unpacks it on the new site; it usually handles the URL change itself as well. It is practical for small and medium-sized sites without SSH access; the larger the package, the more likely it is to hit the hosting's upload and time limits. Because plugin features change from version to version, the information in the table is based on the plugin pages as of November 2026.
| Plugin | How does it work? | What to know |
|---|---|---|
| All-in-One WP Migration | Exports the site to a single .wpress file; a clean WordPress and the plugin are installed on the new hosting and the file is imported | The import size is determined by the hosting's upload limit |
| Duplicator | Turns the files and database into a single backup package | According to the plugin page, it can also be installed to an empty location without WordPress |
| UpdraftPlus | Restores a backup to another host or domain with its built-in search and replace engine | According to the plugin page, migration is also possible with the free version |
| Migrate Guru | Performs the transfer through its own servers and rewrites URLs automatically | WordPress must be installed on the destination; localhost is not supported. The plugin page states a limit of sites up to 200 GB and 5 migrations per user per month |
Migrating with All-in-One WP Migration
- Install the plugin on the old site and download the site as a single
.wpressfile from the export screen. - Install a clean WordPress and the same plugin on the new hosting.
- Upload the
.wpressfile from the All-in-One WP Migration > Import screen; the plugin updates the URLs and serialized data itself. - If the file exceeds the upload limit shown on the Import screen, ask your hosting provider to raise the limit, use the plugin's paid Unlimited Extension add-on, or switch to the manual method.
The preparation, hosts file testing and DNS steps stay the same with a plugin.
WordPress's built-in Tools > Export tool does not perform a full migration. It produces an XML (WXR) file containing posts, pages, comments and users; themes, plugins, media files and settings are not included in this file.
Post-migration checklist
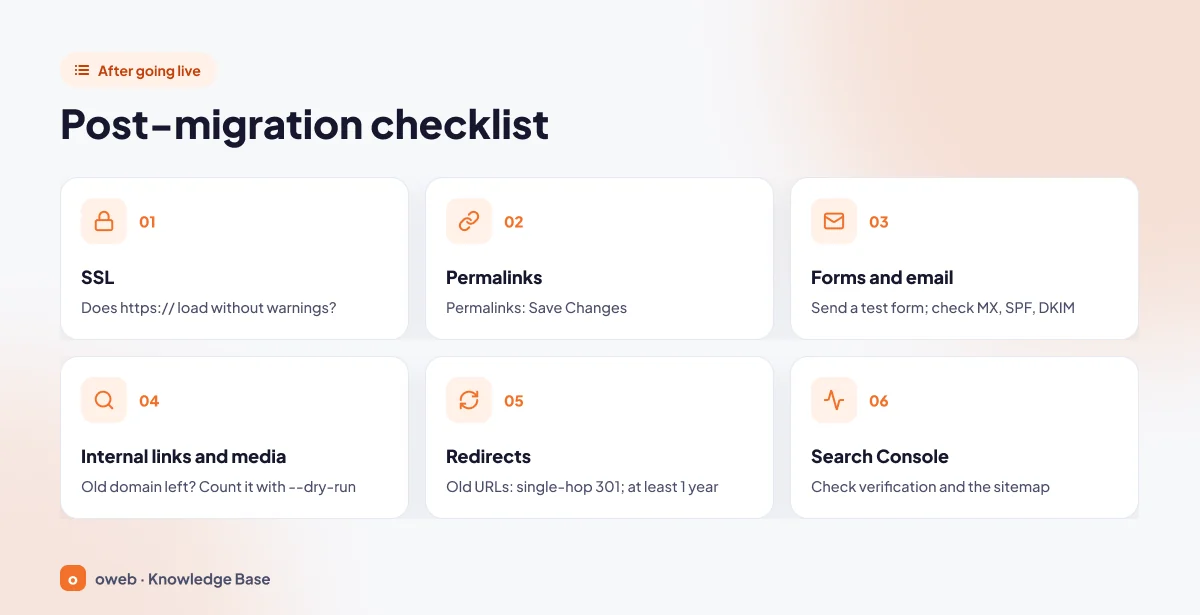
- SSL: Does the site open over
https://without warnings, and are HTTP requests redirected to HTTPS? - Permalinks: Do post, page and category URLs open?
- Forms and email: Submit a test form; confirm that notifications arrive and that the MX, SPF and DKIM records are correct.
- Internal links and media: Do images load, and is the old domain still present anywhere? To count remaining old URLs, run the
wp search-replacecommand again with--dry-run. - Redirects: If URLs changed, do the old URLs go to their new counterparts in a single 301 step?
- Search Console: Does verification work, and does the sitemap open? If the domain changed, verify the new property, submit the sitemap and use the Change of Address tool.
Add items specific to your site as well: scheduled tasks (cron), payment integrations, analytics codes, and cache and CDN settings.
Common errors and how to fix them
Most post-migration errors come down to a few familiar causes. The table below shows where to look first; details follow below the table.
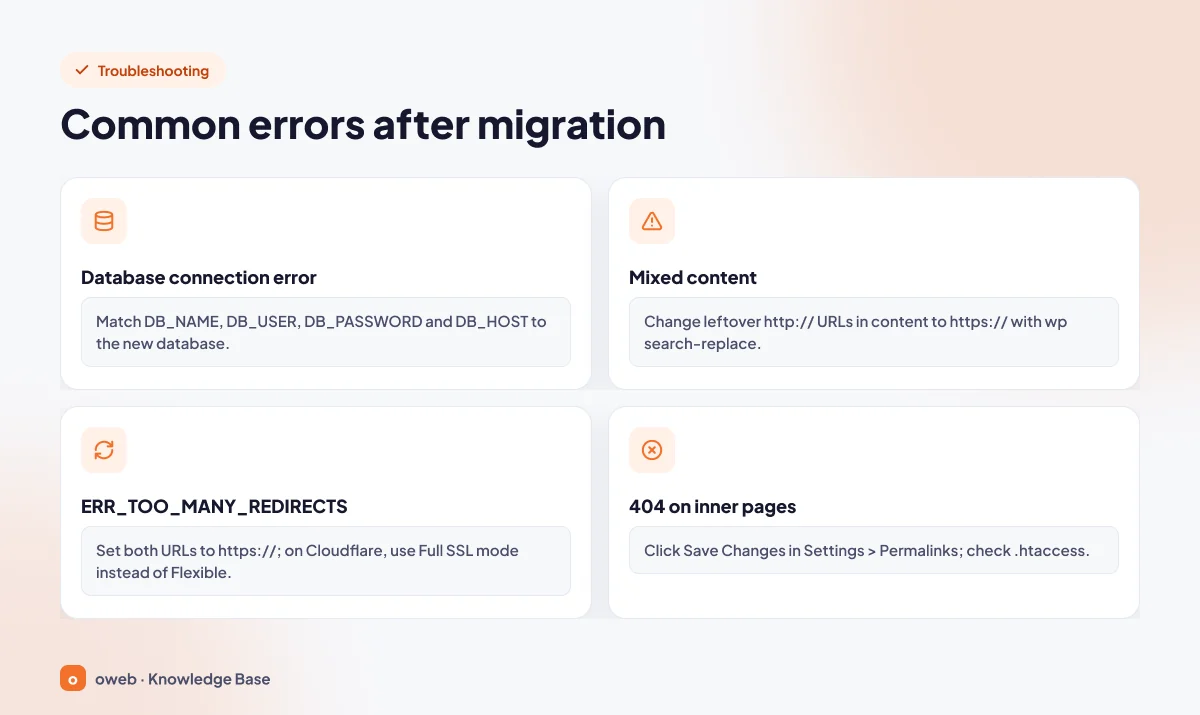
| Error | Likely cause | First fix |
|---|---|---|
| Error establishing a database connection | The wp-config.php details don't match the new database | Match the four database values with the details in your panel |
| Mixed content | URLs left with http:// in content | Take a backup and replace the URLs with https:// |
| ERR_TOO_MANY_REDIRECTS | Addresses left as http://, or Flexible SSL mode in Cloudflare | Set both addresses to https:// and choose Full SSL mode |
| 404 on inner pages | Rewrite rules not working, .htaccess missing | Save the permalinks again |
| Garbled special characters | Export or import with a different character set | Re-import the clean backup with the same character set |
| 500 error or "There has been a critical error on this website." | .htaccess, .user.ini or cache files left over from the old server | Check the error log and disable the old directives |
Database connection error
After a migration, the "Error establishing a database connection" message is usually caused by wp-config.php. The database name was entered without the prefix, the password is wrong, the user was not granted privileges on the database, or DB_HOST is different. Compare the four values with the details in your panel; other causes are covered in the WordPress database connection error guide.
Mixed content
If a page loaded over HTTPS requests some resources over http://, mixed content occurs. Browsers upgrade image, video and audio requests to HTTPS, and block resources such as scripts, stylesheets and iframes. The permanent fix for a mixed content problem is to correct the URLs in the database. Take a backup first and try the command with --dry-run:
wp db export ~/backup.sql
wp search-replace 'http://example.com' 'https://example.com' --skip-columns=guid --dry-run
wp search-replace 'http://example.com' 'https://example.com' --skip-columns=guid
If the site is served with www, run the same command for http://www.example.com as well.
Redirect loop (ERR_TOO_MANY_REDIRECTS)
A redirect loop usually has one of two causes. The first is an address mismatch: the WordPress Address and Site Address have been left as http:// while the server redirects all requests to HTTPS. The second is a CDN or reverse proxy. According to Cloudflare's documentation on redirect loops, if the SSL mode is "Flexible", Cloudflare connects to the server over HTTP, the server redirects to HTTPS and a loop forms; if the server has a certificate, choose "Full" or "Full (strict)". Behind a reverse proxy, the following block is added to the wp-config.php file before the "That's all, stop editing" line:
if ( isset( $_SERVER['HTTP_X_FORWARDED_PROTO'] ) && strpos( $_SERVER['HTTP_X_FORWARDED_PROTO'], 'https' ) !== false ) {
    $_SERVER['HTTPS'] = 'on';
}
After fixing the settings, clear this site's cookies in your browser. A step-by-step solution is in the ERR_TOO_MANY_REDIRECTS guide.
404 errors on inner pages
If the home page opens but inner pages return a 404 error, the rewrite rules are not working. First, save the permalinks again. If that doesn't fix it, check whether the .htaccess file was moved; because it is a hidden file, it may not have been included in the archive. If the file is missing, recreate it with WordPress's default rules:
# BEGIN WordPress
<IfModule mod_rewrite.c>
RewriteEngine On
RewriteRule .* - [E=HTTP_AUTHORIZATION:%{HTTP:Authorization}]
RewriteBase /
RewriteRule ^index\.php$ - [L]
RewriteCond %{REQUEST_FILENAME} !-f
RewriteCond %{REQUEST_FILENAME} !-d
RewriteRule . /index.php [L]
</IfModule>
# END WordPress
This block is for a single site installed at the root of the domain; if WordPress is in a subdirectory, create the file by saving the permalinks instead of writing it by hand. Nginx servers don't read .htaccess; the server configuration must include the line try_files $uri $uri/ /index.php?$args;.
Garbled special characters
If meaningless symbols appear instead of accented or other non-ASCII letters, the data was written or read with a different character set during the transfer:
- The
DB_CHARSETandDB_COLLATElines must be the same as in the oldwp-config.php; if they are not in the old file, don't add them. - A dump taken with
>redirection in Windows PowerShell is encoded in UTF-16 and won't import correctly; use the--result-file=site.sqloption with themysqldumpcommand.
Rather than trying to repair corrupted data, re-import the clean backup with the correct settings.
White screen or 500 error
If the site returns a 500 error or shows the message "There has been a critical error on this website.", settings left over from the old server may not match the new environment. Back up the files and try the following in order: disable the PHP version lines added by the old server in .htaccess by putting a # at the start of them, fix old directory paths in the .user.ini file, and temporarily rename the advanced-cache.php and object-cache.php files under wp-content instead of deleting them. The server's error log shows the exact cause.
How do you avoid losing SEO?
A hosting change made without changing the domain or URL structure does not count as a URL move for search engines; no 301 redirect or Change of Address notification is required. What preserves rankings is the site responding without interruption, at the same URLs and over HTTPS. Google notes that a temporary drop in crawl rate right after the move is normal. Check that the Search Console verification file or tag is present on the new copy, and that any noindex and robots.txt blocks added during testing have been removed.
301 redirects and the Change of Address tool if URLs changed
If URLs changed, send every old URL to its new counterpart with a permanent (301) redirect; don't redirect them all to the home page, and, according to Google's guide to site moves with URL changes, avoid redirect chains. If the domain changed, the following rule can be added to the top of the .htaccess file on the Apache server hosting the old domain:
RewriteEngine On
RewriteCond %{HTTP_HOST} ^(www\.)?eskialanadi\.com$ [NC]
RewriteRule ^(.*)$ https://example.com/$1 [R=301,L]
When a directory changes, the old paths are 301 redirected to the new paths using the same logic. Google generally recommends keeping redirects in place for at least a year.
If the domain or subdomain changed, use the Change of Address tool in the Settings section of the old property in Search Console. The Change of Address tool is not used for hosting changes, moving to HTTPS or directory changes within the same domain. The old and new properties must be owned by the same Google account; because the tool doesn't move subdomains such as www automatically, submit a separate notification for each variant. Renew the old domain for at least another year, and keep a valid certificate on it so the redirect also works for HTTPS requests. Ranking fluctuations lasting a few weeks are normal.
Frequently asked questions
How long does a WordPress site migration take?
It depends on the size of the site and the method. On small sites, copying the files and database is quick; the real wait comes from DNS propagation. An A record change takes at most as long as the record's previous TTL; in cPanel this value is 4 hours by default and can be shortened by lowering it in advance.
Will the site go down during the migration?
If done in the right order, the site won't go down. Until the new server has been tested, DNS points to the old server; during propagation, both servers respond. On sites that take orders, keep the old site in maintenance mode during this period. Downtime is usually caused by changing the DNS records too early or by the SSL certificate not being ready.
How long does a nameserver change take to propagate?
There is no fixed time; it depends on the previous TTL of the records. In cPanel, the default values are 14400 seconds (4 hours) for records and 86400 seconds for NS records. With a nameserver change, assume both servers will receive traffic for a day or two.
Do I need to transfer my domain when changing hosting?
No. Domain registration and hosting are separate services; the domain can stay with its current registrar, and only the DNS records or nameservers are updated.
Are email accounts migrated too?
Not automatically. Mailboxes are created on the new hosting, and old messages are moved with an email client or a migration tool. If your email is with an external provider, keeping the MX records is enough.
How long should a 301 redirect be kept?
Google generally recommends keeping redirects in place for at least a year. If the Change of Address tool was used, the redirects must stay in place for at least 180 days; if possible, leave them permanently.
What is the best plugin for migrating WordPress?
There is no single right answer; the choice depends on the size of your site and your access. All-in-One WP Migration offers a simple single-file workflow but depends on the hosting's upload limit. Migrate Guru moves large sites through its own servers but doesn't support localhost, while Duplicator and UpdraftPlus combine backup and migration.
Why isn't the guid column changed in WordPress?
The guid is each post's permanent identifier and is used mainly by RSS readers. If it is changed, old posts are shown to readers again as if they were new. That is why --skip-columns=guid is used in the wp search-replace command even when the domain changes.
Will my hosting company migrate the site for me?
The scope of migration support varies from company to company. Ask your new provider whether it offers migration help and what information it needs from you. Oweb customers can open a support ticket for more information.
Conclusion
Migrating a WordPress site is a predictable job when done in the right order: backup, files, database, wp-config.php, testing with the hosts file and, last of all, DNS. If the domain doesn't change, don't touch the URLs in the database; if it does, add the wp search-replace, 301 redirect and Search Console steps.
If you are looking for a new hosting service, you can explore Oweb's WordPress hosting plans and open a support ticket whenever you get stuck.
