


Backing up WordPress means copying the two parts of your site, the files (wp-content, wp-config.php, .htaccess) and the database, and storing them away from the server. You can take a backup from your hosting control panel, by hand (files with File Manager or FTP, the database with phpMyAdmin), with WP-CLI commands or with a plugin. Whichever method you choose, don't rely on a backup until you have tested restoring it.
Quick summary: backing up WordPress
- A full WordPress backup has two parts: the files and the database. If one is missing, the site will not come back complete.
- There are four methods: the hosting control panel (cPanel Backup and Backup Wizard, Plesk Backup Manager), a manual backup, WP-CLI and a backup plugin.
- Tools > Export only writes your content to an XML file. It does not include themes, plugins or media files, so it is not a full backup.
- According to the WordPress documentation, sites with little new content should be backed up weekly and busy sites daily. Always take a backup before updates and migrations.
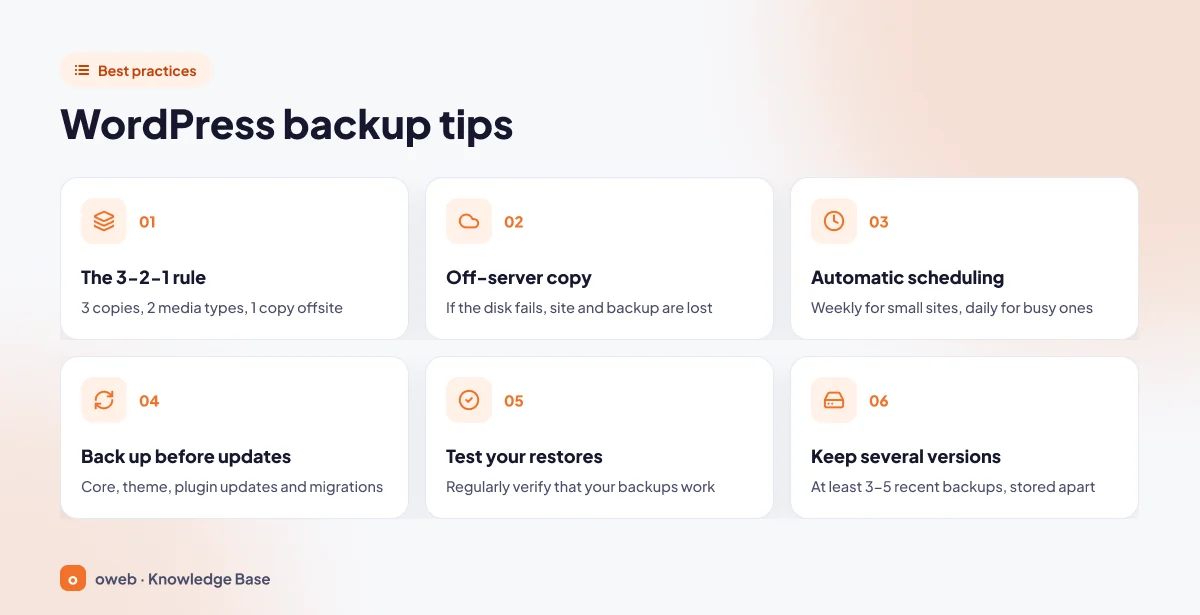
- The 3-2-1 rule: 3 copies, on 2 different storage media, with 1 copy off-site. Keep at least 3-5 recent backups.
- When restoring, upload the files first and then the database. Test the backup in a separate staging environment first.
- A cPanel full account backup (Full Backup) cannot be restored automatically from the cPanel interface; from the interface you can only restore partial backups yourself.
What should a WordPress backup include?
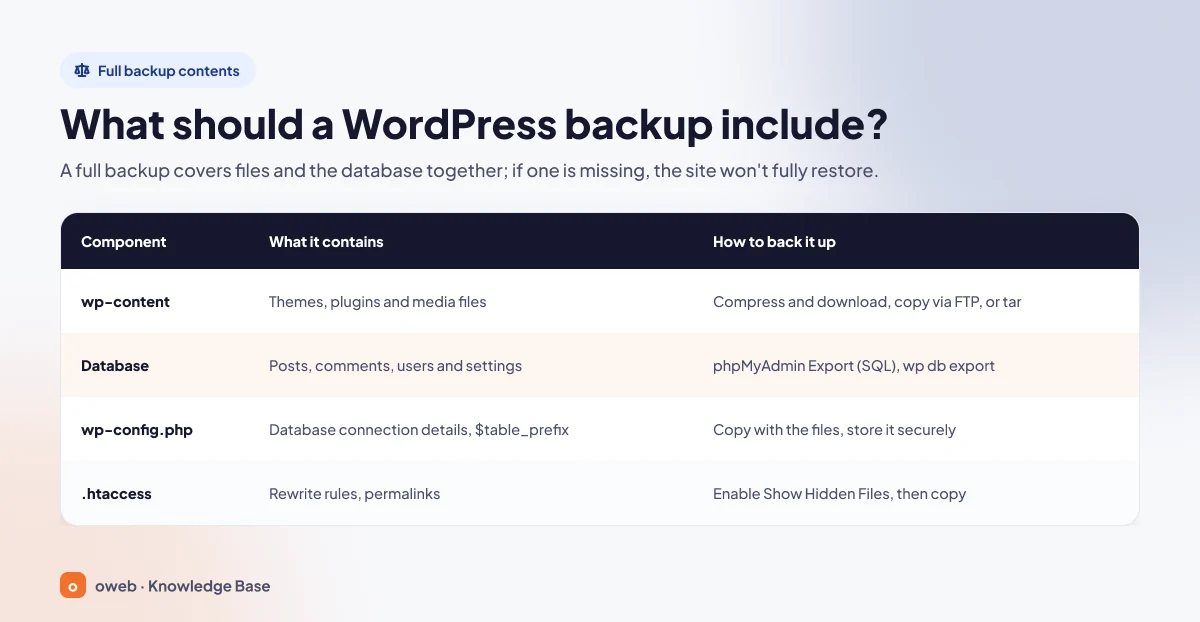
WordPress lives in two separate places: themes, plugins and images are files on disk, while posts, pages and settings are stored in a MySQL or MariaDB database. That is why downloading the WordPress directory does not copy the database; a database backup is taken separately by exporting it to a .sql file. The official WordPress backup documentation also states that both parts are needed to fully restore a typical site.
| Component | What it contains | How to back it up |
|---|---|---|
| wp-content | Themes, plugins and uploaded media files (uploads); the content unique to your site | Compress and download in File Manager, copy via FTP or archive with tar |
| Database (MySQL/MariaDB) | Posts, pages, comments, links, users and settings; tables start with the wp_ prefix by default | phpMyAdmin > Export, wp db export or mysqldump |
| wp-config.php | Database connection details (DB_NAME, DB_USER, DB_PASSWORD, DB_HOST) and $table_prefix; located in the WordPress root directory | Copied along with the files; because it contains a password, the backup must be stored securely |
| .htaccess | Apache rewrite rules and permalinks (the # BEGIN WordPress ... # END WordPress block) | It is a hidden file; make it visible, then copy it with the other files |
WordPress core files can be replaced by downloading them again from wordpress.org, but wp-config.php is not in the download package; it is created during installation. The safest approach, as the official guidance recommends, is to back up the entire WordPress directory, including all subdirectories and the .htaccess file.
WordPress backup methods: which one suits you?
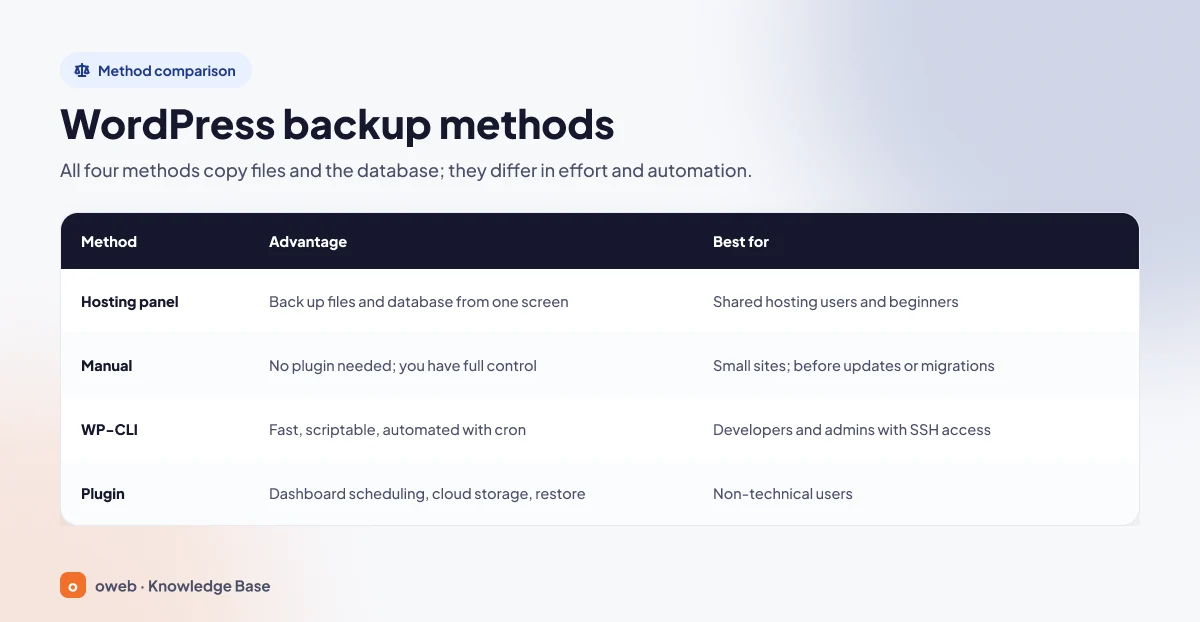
All four ways to back up a WordPress site produce the same result: a copy of the files and the database. They differ in how much effort they take and how far they can be automated. The table below expands on the summary in the image with points to watch out for.
| Method | Advantage | Watch out for | Best for |
|---|---|---|---|
| Hosting control panel (cPanel Backup and Backup Wizard, Plesk Backup Manager) | Files and database are backed up from one screen; Plesk lets you set schedules and remote storage | A backup that stays on the same server is not real protection; a cPanel full backup cannot be restored automatically from the cPanel interface | Shared hosting users and beginners |
| Manual (File Manager or FTP + phpMyAdmin) | No plugin needed; you have full control over what is backed up | Because it is done by hand, it is easy to forget; slow on large sites | Small sites; one-off backups before an update or migration |
| WP-CLI (wp db export + tar) | Fast, scriptable and can be automated with cron | Requires SSH access and command-line knowledge | Developers and server administrators with SSH access |
| Plugin (e.g. UpdraftPlus, Duplicator, BackWPup, WPvivid) | Scheduling, sending to cloud storage and restoring from the admin dashboard | If WordPress won't load, you can't reach the plugin either; some features are paid | Non-technical users; anyone who wants automatic backups |
A practical choice: for a quick copy before an update, use the hosting control panel or the manual method; for daily protection, use scheduled backups; and if the WordPress admin dashboard won't open, again use the hosting control panel or the manual method.
How to back up WordPress from cPanel and Plesk
The hosting control panel is the simplest place to start because it backs up the files and the database from the same screen. Which tools you see depends on the features your hosting provider has enabled and the theme it uses.
cPanel backup: Backup and Backup Wizard
In the cPanel control panel, backups are taken from the Backup interface in the Files section. The Backup Wizard interface is a wizard that walks you through the same tasks step by step.
Partial backups (Partial Backups)
- Log in to cPanel and open the Backup interface in the Files section.
- Under "Partial Backups", select your WordPress database under the "Download a Database Backup" heading ("Download a MySQL Database Backup" in older interfaces); the backup downloads as a compressed
.gzfile. If you are not sure which database it is, check theDB_NAMEvalue inwp-config.php. - Use "Download a Home Directory Backup" to download your home directory as a
.tar.gzarchive.
The home directory backup covers every file in your account, not just WordPress, so it can be large. You can restore partial backups yourself from the "Restore a partial backup" section on the same page; what this affects is explained in the restore section below.
Full backup (Full Backup) and its limitation
The "Download a Full Account Backup" button opens the "Generate a Full Backup" screen. Choose one of the destinations "Home Directory", "Remote FTP Server", "Remote FTP Server (passive mode transfer)" or "Secure Copy (SCP)" and click "Generate Backup" to start. The resulting .tar.gz archive contains account data such as the home directory, database dumps, email forwarders and DNS zones.
The critical point is this: according to the cPanel documentation, a full backup cannot be restored automatically from the cPanel interface. Your hosting provider does this through WHM; otherwise, you have to extract the archive and upload its files by hand. Use full backups when moving to another server or for long-term retention, and partial backups for a quick rollback. If you chose "Home Directory" as the destination, the archive stays on the same server; download it and delete it from the server, otherwise it fills your quota and provides no protection.
As of November 2026, in cPanel's new optional Meridian theme, backups are in the Backups tab of the Files hub and the button is called "Generate Full Backup". The screen you see depends on the theme your provider has chosen.
Backing up with Plesk Backup Manager
- Go to Websites & Domains > Backup Manager > Back up.
- The domain configuration is always included in the backup. For WordPress, make sure the "Databases" box stays checked; leave the "Mail messages" box checked or uncheck it as needed.
- In the "Type" field, choose "Full" or "Incremental" (the first backup is always full), and in the "Store in" field, choose where the backup will be kept.
- When the process finishes, click the backup and use "Download" to save it to your computer.
For automatic backups, check the "Activate this backup task" box in the "Schedule" section of the same screen and choose the frequency and time. If the "Keep backup files for" field is left empty, backups are kept indefinitely and use up your disk quota. Through "Remote Storage Settings" you can define remote storage such as FTP(S), Amazon S3, Google Drive or Microsoft OneDrive; which ones are offered depends on the server, and storing scheduled backups in cloud storage is a paid feature. For details, see Plesk's documentation on creating backups.
Backups made with "Back up / Restore" in WP Toolkit are stored in the wordpress-backups folder in the site's home directory, that is, on the same server. According to the Plesk documentation, the restore point created before an update is not a backup; each new one overwrites the previous one.
Hosting-side backups, even where they are offered, do not replace your own copies. As the Plesk documentation also points out, if the server disk fails, the backups can be lost along with the site data.
Manual WordPress backup: 6 steps without a plugin
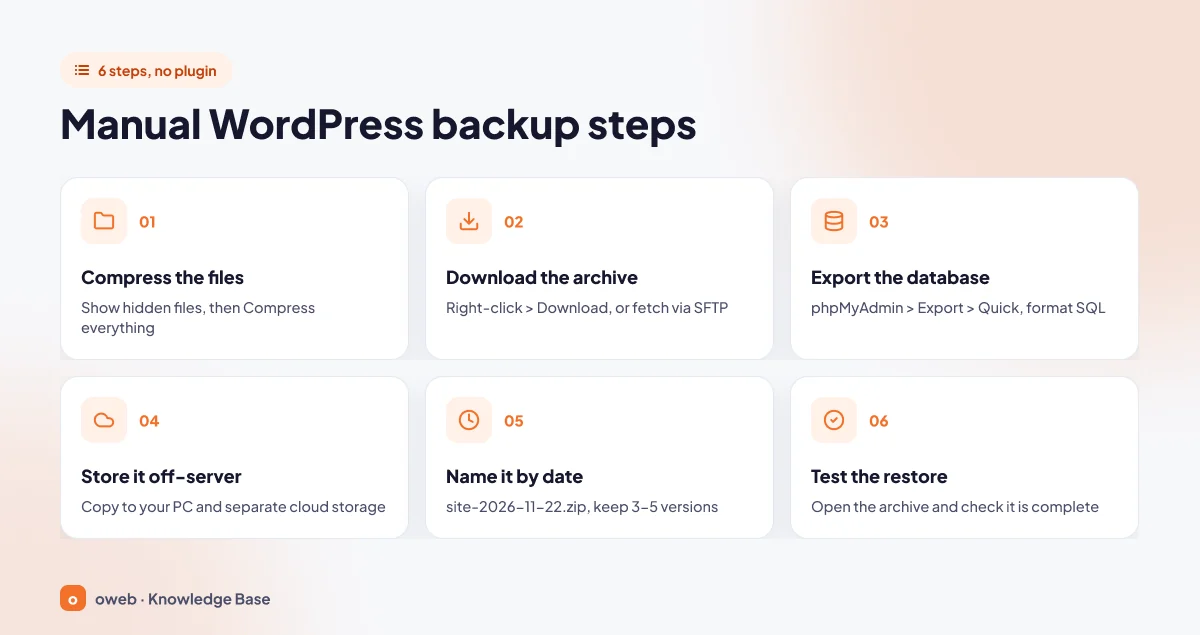
You don't need any plugin to back up WordPress by hand, and this method works even when the admin dashboard won't open. The steps are described for cPanel; menu names differ in other panels, but the logic is the same.
1. Compress the files
Go to Files > File Manager and open the directory where WordPress is installed (usually public_html in cPanel and httpdocs in Plesk). .htaccess is hidden because its name starts with a dot; first make it visible via Settings > "Show Hidden Files (dotfiles)" > Save. Then select all files and folders, right-click and use "Compress" to turn them into a single archive (.zip, .Gz or .Bz2). Downloading thousands of small files one by one is slow and increases the risk of missing files; a single archive solves this.
2. Download the archive to your computer
Right-click the archive and choose "Download". If you use an FTP client, connect via SFTP or FTPS where possible; with plain FTP, your username and password travel unencrypted. Once the download finishes, delete the archive from the server: a backup left in the web directory can be downloaded by anyone who guesses its name.
3. Export the database with phpMyAdmin
To back up the WordPress database, open Databases > phpMyAdmin in cPanel and select the WordPress database in the left column. There are two ways to export the database with phpMyAdmin.
Quick export
On the "Export" tab, leave the export method set to "Quick" and the format set to SQL, then click the "Export" button at the bottom of the page. In older phpMyAdmin versions this button is labeled "Go". All tables download as an uncompressed .sql file. According to the WordPress documentation, a backup taken this way should be restored into a database with no tables, because the file does not contain DROP TABLE statements to remove the old tables. If you plan to restore the backup over the existing database, use the Custom method.
Custom export
If the database is large (for compression) or other software uses the same database, switch to "Custom". If the database contains only WordPress, leave the table selection as it is (all selected); if it also holds tables from other software, select only those starting with your own prefix (wp_ by default). For compression, choose "gzipped", then check the "Add DROP TABLE / VIEW / PROCEDURE / FUNCTION / EVENT / TRIGGER statement" box. This statement ensures that on restore the old tables are dropped and recreated from the backup. All the steps are described in the WordPress database backup documentation.
The WordPress documentation recommends treating the files and the database as a single backup set from the same moment, and backing up the database first and the files second. The practical benefit is that every image a database record points to is also in the file archive taken afterwards. On a site where content is added constantly, do step 3 first; on a quiet site, running the two tasks back to back is enough.
4. Store the backup off-site
Put the archive and the .sql file both on your computer and in separate cloud storage. If the backup lives only in your hosting account, any problem affecting the account affects the backup too.
5. Name the files with dates
Names like site-2026-11-22.zip and database-2026-11-22.sql show which archive and which database dump belong to the same backup moment. Don't overwrite an old backup with a new one; keep at least 3-5 recent versions.
6. Test the restore
Extract the archive into a separate subdirectory, import the .sql file into an empty database and confirm that the site loads; the details are in the restore section.
Backing up WordPress with WP-CLI: wp db export
If you have SSH access and WP-CLI is available on the server (check with wp --info), you can take the same backup with a few commands. The wp db export command uses the connection details in wp-config.php to export the database to a .sql file with mysqldump; you don't need to type the password separately.
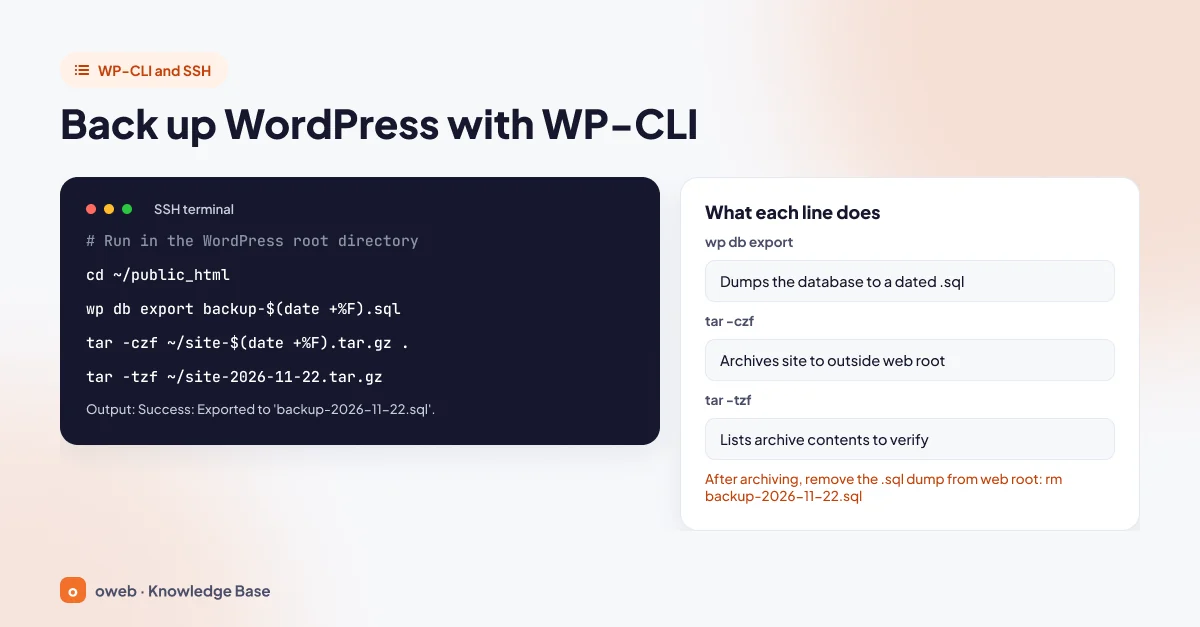
cd ~/public_html
wp db export backup-$(date +%F).sql
tar -czf ~/site-$(date +%F).tar.gz .
tar -tzf ~/site-2026-11-22.tar.gz
cd ~/public_html: Switches to the directory where WordPress is installed.wp db export: Writes the database to a dated file; the$(date +%F)expression adds the date in the 2026-11-22 format. If it succeeds, you will see the lineSuccess: Exported to 'backup-2026-11-22.sql'.tar -czf: Compresses the entire current directory (including wp-content, wp-config.php, .htaccess and the .sql file you just created) with gzip into a single archive. The archive is written under~/, that is, outside the web directory. If the directory contains old backups or cache folders, you can leave them out of the archive with the--excludeoption.tar -tzf: Lists the contents of the archive; if you see the files, the archive is readable. If the output is long, usetar -tzf ~/site-2026-11-22.tar.gz | headto view only the first lines.
In this workflow, the .sql file is briefly written to the web directory. Delete it with rm backup-2026-11-22.sql right after the archive is created; a dump containing all your content and user data must not remain downloadable from a browser. Also download the archive via SFTP and move it off the server.
The restore counterparts of these commands are tar -xzf ~/site-2026-11-22.tar.gz and wp db import backup-2026-11-22.sql, run from inside the WordPress directory (cd ~/public_html). Both overwrite the existing files and database without asking, so back up the current state first. When the archive is extracted, the .sql file reappears in the web directory; delete it with rm backup-2026-11-22.sql once the import is done.
You can set up automatic backups by putting the commands in a script file and scheduling it with cron. Because the % character has a special meaning in a crontab line, put dated commands in a script rather than directly in the line; store the date in a variable in the script and don't forget the line that deletes the dump:
#!/bin/bash
DATE=$(date +%F)
cd ~/public_html || exit 1
wp db export "backup-$DATE.sql" || exit 1
tar -czf "$HOME/site-$DATE.tar.gz" .
rm -f "backup-$DATE.sql"
Transfer the resulting archives off the server regularly and delete old ones; archives piling up in your home directory fill your quota and don't count as off-site copies.
If WP-CLI is not available, you can take the same dump with mysqldump. The host, user and database name are the DB_HOST, DB_USER and DB_NAME values in wp-config.php; the command prompts for the password separately. On servers running MariaDB, the tool may be called mariadb-dump. The example below compresses the dump and writes it outside the web directory:
mysqldump -h localhost -u db_user -p database_name | gzip > ~/backup-$(date +%F).sql.gzWhat to look for in a WordPress backup plugin
There is no single "best" plugin: UpdraftPlus, BackWPup and WPvivid suit those who want both scheduling and remote storage in the free version, while Duplicator is good for one-off packaging and migration. A WordPress backup plugin lets you handle scheduling, sending to cloud storage and restoring from the admin dashboard. The information below comes from the plugins' wordpress.org pages and is accurate as of November 2026; it may change from version to version.
| Plugin | Scheduling in the free version | Remote storage in the free version |
|---|---|---|
| UpdraftPlus | Yes (from every 2 hours to monthly) | Dropbox, Google Drive, Amazon S3, FTP and others |
| BackWPup | Yes (hourly, daily, weekly, monthly) | Dropbox, FTP, Amazon S3, Microsoft Azure and others |
| WPvivid | Yes (from every 12 hours to monthly) | Dropbox, Google Drive, Amazon S3, OneDrive, DigitalOcean Spaces, FTP, SFTP |
| Duplicator | No (Pro version only) | Duplicator Cloud only (Dropbox, Google Drive, OneDrive, Amazon S3, FTP/SFTP in the Pro version only) |
Whichever plugin you choose, the setup follows the same logic:
- Install and activate the plugin from the WordPress admin dashboard.
- Choose a schedule for the files and the database; you can back up the database more often.
- Connect remote storage, and confirm the backup has left the server by seeing the file in that storage.
- Start the first backup manually and download a copy to your computer.
- Test the restore in a staging environment, not on the live site.
When choosing, keep these points in mind:
- Check that the plugin backs up both the files and the database and can restore both together.
- Always enable remote storage. If the backup stays only in a folder under
wp-content, it is lost along with the server. - Know the limits of the free version: in All-in-One WP Migration, importing a
.wpressfile is limited by your host's upload size limit, and scheduled backups are paid. Installing an old version or modifying plugin files to get around the limit creates a security risk; don't do it. - The plugin runs inside WordPress; if the site won't load, you can't reach the plugin either. The WordPress documentation also recommends supplementing automatic backups with an occasional manual backup to make sure the process actually works.
Why "Tools > Export" is not a full backup
When you click the "Download Export File" button on the Tools > Export screen of the admin dashboard, WordPress creates an XML file. According to the WordPress Tools > Export Screen documentation, this file contains posts, pages, custom post types, comments, custom fields, categories, tags, custom taxonomies and users.
This file is a content export; it does not include the themes, plugins, the actual media files in wp-content/uploads, or the wp-config.php and .htaccess files that are essential to get a site running. Only the image URLs are written; the files are copied from the old site during import. If the old site is unreachable, the images won't come across either. This feature is suitable for moving content to another site, but it cannot be used as a full backup.
How often should you back up WordPress, and where should you store backups?
Back up sites with little new content weekly, busy sites daily, and back up separately before every update and migration. Store backups not only in your hosting account but also on your computer and in separate cloud storage, keeping at least 3-5 recent versions.
Backup frequency
| Situation | When to back up |
|---|---|
| Small site with few new posts | Once a week |
| Busy site with lots of new content | Every day |
| Core, theme or plugin update; site migration | Every time, before you start |
These guidelines are the recommendations in the WordPress documentation. To adapt them to your own site, ask yourself: "What would happen if I lost everything entered since the last backup?" On a site that takes orders or member registrations, the database changes much faster than the files, so it makes sense to back up the database more often and the files less often.
Back up before updates and migrations
Core, theme and plugin updates change files and sometimes the database structure. The WordPress updating documentation recommends starting with a backup, and the warning on the update screen says the same: "Important: Before updating, please back up your database and files." The same rule applies to migrations; don't start a WordPress site migration without first backing up the old site's files and database.
The 3-2-1 rule and off-site copies
As defined in the "Data Backup Options" paper prepared for US-CERT, the 3-2-1 rule is: keep 3 copies of every important file (1 primary and 2 backups), store the copies on 2 different storage media, and keep 1 copy in a different physical location. For WordPress, this means the live site, a copy on your computer or an external drive, and a copy in separate cloud storage. The WordPress documentation also recommends keeping at least 3-5 recent backups in different locations, so if the latest backup is corrupt or the problem started before it was taken, you still have an older version.
Automatic backups
Manual backups can be forgotten; the lasting solution is scheduling. You can use Backup Manager > Schedule in Plesk, the scheduling setting in plugins, or, if you have SSH access, a WP-CLI script run by cron. In cPanel, automatic account backups only run if your hosting provider has enabled them.
Securing backup files
A backup contains the database password (wp-config.php), user email addresses and password hashes; in other words, it holds personal data. Don't leave backups in the web directory, enable two-factor authentication on your cloud account, encrypt the archive where possible and delete unnecessary old copies. On sites that store member or customer data, backups also contain personal data under data protection laws such as KVKK in Turkey or the GDPR; decide how long you will keep them. For other steps to protect your site, see the WordPress security guide.
How to restore WordPress from a backup
When you restore WordPress from a backup, the order is the reverse of the backup: files first, then the database. Before you start, take a copy of the site's current state, even if it is broken; a restore overwrites every change made after the backup date.
1. Restore the files
In File Manager, use "Upload" to upload the archive to the WordPress directory and "Extract" to unpack it. You can also restore a home directory backup downloaded from cPanel through the "Restore a partial backup" section of the Backup interface. However, because this backup covers every file in your account, the process reverts not just WordPress but every file with the same name in the home directory, including email folders and any other sites, to the state in the backup. If you only need the WordPress files, extract the archive on your computer and upload only the relevant folder.
If the Plesk backup is not in the Backup Manager list, upload it first with "Upload"; then click the backup and use "Selected objects" to choose only the components you need. Plesk overwrites existing objects with the same name without asking.
2. Import the database with phpMyAdmin
- Select the target database in phpMyAdmin. Choosing the wrong database can wipe another site's data; compare the database name with the
DB_NAMEvalue inwp-config.php. - If your backup was taken with the Quick method, the file contains no DROP TABLE statements; if the target database already has tables with the same names, the import stops with a "table already exists" error. In that case, first export the current database to a separate
.sqlfile, then drop the tables or import the backup into an empty database. If you checked the DROP TABLE box with the Custom method, or took the backup withwp db exportormysqldump, the old tables are dropped and recreated during the import. - Open the "Import" tab, choose your backup file and confirm that the format is SQL. A compressed file's name must end with the format and compression extension, such as
.sql.gz. - Click the "Import" button ("Go" in older versions) and wait for the success message.
If the file is large, the upload may be cut off partway. According to phpMyAdmin FAQ 1.16, this is caused by PHP's upload_max_filesize, post_max_size, max_execution_time and memory_limit limits. Try these options, starting with the simplest:
- Compress the dump with gzip and upload it that way.
- If you don't have SSH access, restore the
.gzdatabase backup downloaded from cPanel, without extracting it, through the "Restore a partial backup" section of the Backup interface or the "Restore" step of Backup Wizard ("Choose File", then "Upload"). - If you have SSH access, use the
wp db import backup-2026-11-22.sqlcommand. This command expects an uncompressed.sqlfile; extract a.gzfile withgunzipfirst.
If the database name, user or password has changed, update the wp-config.php file; otherwise the site will show a database connection error.
3. Test the backup in a staging environment (restore drill)
An untested backup is just an assumption. The cPanel documentation also recommends restoring backups to an isolated subdirectory first. Run this drill a few times a year and after every major change:
- Create a subdomain (for example test.example.com, where example.com stands for your own domain) and an empty database; for the steps, see the MySQL database creation guide. Password-protect the subdomain's directory; otherwise the copy may show up in search engines as duplicate content.
- Extract the archive into this subdomain's directory and enter the new database details in the test copy's
wp-config.phpfile. If you skip this, the test copy connects to your live database andwp db importoverwrites the live data. - In the same file, above the "That's all, stop editing!" line, add the two lines given below this list that define the test URL; then import the
.sqlfile into the empty database. - Log in and check posts, forms and, if there is one, the checkout step. On sites that send orders or emails, make sure the test copy doesn't send notifications to real users. If inner pages return a 404 error, save the changes on the Settings > Permalinks screen.
- Verify the images separately: because image URLs in posts are stored in the database with the live domain, images may load from the live site, so pages can look fine even if the images are missing from the backup. Check that the files are in the backup by looking at the
wp-content/uploadsfolder in the test directory. - Note how long the restore took, then delete the test copy along with its database.
define( 'WP_HOME', 'https://test.example.com' );
define( 'WP_SITEURL', 'https://test.example.com' );
If the subdomain doesn't have an SSL certificate yet, write the URLs with http://. If the site is moving permanently to another domain, don't run a plain find and replace on the database; serialized data will break. Instead, use WP-CLI's wp search-replace command, trying it first with the --dry-run option.
Common problems after a restore
| Symptom | Likely cause | Solution |
|---|---|---|
| The site shows a database connection error | The details in wp-config.php don't match the new database | Correct the DB_NAME, DB_USER, DB_PASSWORD and DB_HOST values |
| The home page loads, but inner pages return a 404 error | .htaccess wasn't included in the backup or wasn't restored | Save the changes on the Settings > Permalinks screen |
| The import stops partway | PHP upload and execution time limits | A compressed file, restoring from the control panel or wp db import |
| The import stops with a "table already exists" error | The dump has no DROP TABLE statements and the database isn't empty | Back up and drop the existing tables, or use an empty database |
| Images don't appear | wp-content/uploads wasn't included in the archive | Check the file backup and upload the folder again |
Common WordPress backup mistakes
- Backing up only one part: Files alone or the database alone will not bring the site back.
- Leaving the backup on the same server: A failure or attack that hits the server destroys the backup too.
- Forgetting the backup in the web directory: .zip, .sql or .wpress files in
public_htmlcan be downloaded from outside. - Skipping hidden files: If
.htaccessisn't visible when you select files, it won't be included in the backup. - Keeping a single backup: If a new backup overwrites the old one, the broken state of the site may be the only copy you have.
- Never testing a restore: A corrupt archive or incomplete dump is only noticed when you need it.
- Restoring without saving the current state: If you restore the wrong backup, there is no copy to go back to.
- Not monitoring automatic backups: When storage fills up or the remote storage connection drops, backups can stop without anyone noticing.
Frequently asked questions
Can I back up WordPress without a plugin?
Yes. You can take a full backup without a plugin by downloading the files with File Manager or FTP and the database with phpMyAdmin, or by using your hosting control panel's backup tool.
What is the best WordPress backup plugin?
There is no single right answer; choose based on your needs. If you want scheduling and remote storage in the free version, UpdraftPlus, BackWPup and WPvivid offer both together. Duplicator is handy for one-off packaging and migration. Whichever you choose, enable remote storage and test a restore at least once.
Where should WordPress backups be stored?
Off the server and in more than one place: on your computer or an external drive, and in separate cloud storage. Don't leave backups in the web directory (public_html); they can be downloaded from outside. Keep at least 3-5 recent versions so that you can go back to an older one if the latest backup is corrupt.
Do I need my own backups if my hosting company already takes backups?
Yes. The scope, retention period and access terms of provider-side backups are not under your control. The WordPress documentation also recommends backing up your own files separately, even if the entire server is backed up.
Is backing up only the wp-content folder enough?
No. This folder contains themes, plugins and images; posts, pages, users and settings are in the database. In addition, the wp-config.php and .htaccess files sit outside wp-content.
What is the difference between a cPanel full backup and a partial backup?
A full backup collects the whole account into a single archive; it cannot be restored automatically from the cPanel interface, so your provider does it through WHM, or you extract the archive and upload the files by hand. Partial backups (home directory, database) are downloaded separately, and you can restore them yourself from the Backup or Backup Wizard screen.
What should I do if the backup file is too large for phpMyAdmin?
The import runs into PHP's upload and execution time limits. Compress the file with gzip and upload it, restore the cPanel database backup from the "Restore a partial backup" section, or, if you have SSH access, use the wp db import command.
Can I take a backup if I can't log in to the admin dashboard?
Yes. The hosting control panel, the manual method and WP-CLI don't need the WordPress admin dashboard. If the site is showing errors, take a backup of its current state using one of these methods before you try to fix anything.
How can I tell whether a backup is sound?
Check that the archive opens (for example, that it lists with tar -tzf), that the .sql file isn't empty and that it contains tables such as wp_posts and wp_options with the default prefix. The definitive proof is restoring the backup to a staging environment and seeing the site load.
Conclusion
The short answer to "How do I back up a WordPress site?" is this: back up the files and the database together, keep at least one copy off the server, refresh your backups regularly and test them by restoring. The smallest step you can take today is to take a full backup with the manual method and download it to your computer; then set up automatic backups and add a restore drill to your calendar. If you are looking for infrastructure, take a look at Oweb's WordPress hosting page, and for questions about your account, open a support ticket.
