


Creating a MySQL database takes three steps: create the database, create a database user, and connect that user to the database by granting privileges. On a hosting account you can do this in a few minutes from Manage My Databases in cPanel (formerly MySQL Databases) or the Databases screen in Plesk. On your own server you use the CREATE DATABASE, CREATE USER and GRANT commands.
Quick summary
- To connect a site to a database you need three things: a database, a database user and the privileges granted to that user on that database.
- In cPanel the path is Databases > Manage My Databases (MySQL Databases before version 120); for your first database, the Database Wizard is quicker.
- cPanel usually adds your account username and an underscore to the beginning of names (
account_site,account_wp, whereaccountis your account username); use this full name in your connection settings. - In Plesk the path is Websites & Domains > Databases; the database and the user are created in the same form.
- On the command line the order is:
CREATE DATABASE,CREATE USER,GRANT ALL PRIVILEGES ON veritabani.*. - Connection details: the host is usually
localhost, the default port is3306, plus the database name, username and password. - Use utf8mb4 as the character set for new databases.
- Common errors: 1045 (wrong username or password), 1049 (wrong database name), 2002 (the database server cannot be reached).
Menu names and commands in this guide follow the official documentation for cPanel, Plesk Obsidian, phpMyAdmin 5.2 and MySQL/MariaDB. Names used in older panel versions are given in parentheses.
What are a MySQL database, a user and privileges?
Control panels show three separate steps because MySQL keeps these three concepts independent of each other. Creating one does not create the others automatically.
Database
A database stores your site's posts, members, orders and settings in tables. Applications such as WordPress create their own tables during installation; your job is to prepare an empty database.
Database user
Your site connects to the database with a username and password. In MySQL an account name takes the form 'user'@'host'; the 'account_wp'@'localhost' account only accepts connections coming from the same server. This account is separate from your control panel login and your email accounts.
Privileges
According to the MySQL documentation, a newly created account has no privileges. To read and write data or create tables, it must be granted privileges with GRANT. The "add user to database" step in the control panel does exactly this behind the scenes.
Does the difference between MySQL and MariaDB change the steps?
No. Many hosting servers run MariaDB instead of MySQL. According to the MariaDB vs. MySQL compatibility documentation, MariaDB's client protocol is compatible with MySQL, and MySQL connectors, including PHP's, work without modification. The steps in this guide apply to both. The differences mostly show up in default collation names and become noticeable when you move backups between servers.
What are the ways to create a MySQL database?
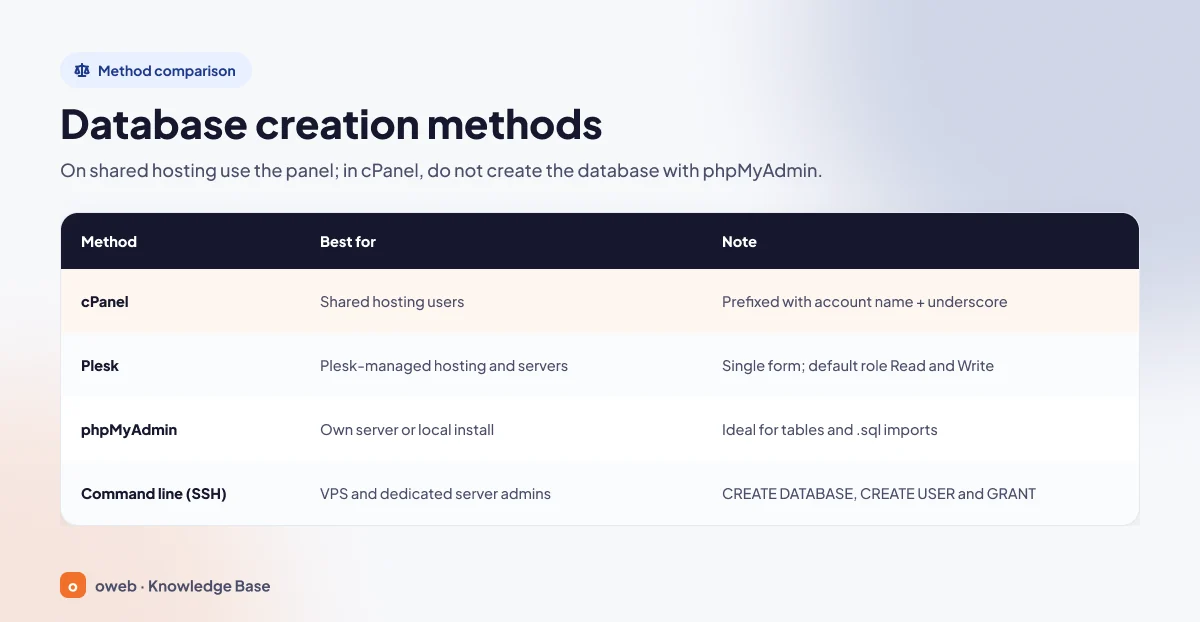
The right choice depends on your access level on the server: on shared hosting, use the control panel; the command line is for servers where you have administrator (root) access.
| Method | Best for | Note |
|---|---|---|
| cPanel (Manage My Databases / Database Wizard) | Shared hosting users | Names get an account username + underscore prefix; Database Wizard is recommended for your first database. |
| Plesk (Websites & Domains > Databases > Add Database) | Hosting plans and servers with Plesk | The database and user are created in one form; the default role is Read and Write. |
| phpMyAdmin | Users with their own server or a local installation | Ideal for creating tables and importing .sql files; do not create databases and users with phpMyAdmin in cPanel. |
| Command line (SSH, mysql client) | VPS and dedicated server administrators | CREATE DATABASE, CREATE USER and GRANT commands; administrator privileges are required. |
If you install WordPress with your control panel's auto-installer, the database is usually created for you. You need to create the database yourself when you install manually, migrate a site or add a second application to your account.
How to create a MySQL database in cPanel
On accounts that use the cPanel control panel, you create a database from a single screen. Since cPanel & WHM version 120 the screen has been called Manage My Databases; in older versions and many guides it appears as MySQL Databases. Both are the same tool.
The labels below are the English names from the official Manage My Databases documentation; if your panel uses another language, the labels may differ depending on the translation. If you are creating your first database, the Database Wizard section below does the same job in one flow. Here are the steps to create a MySQL database in cPanel:
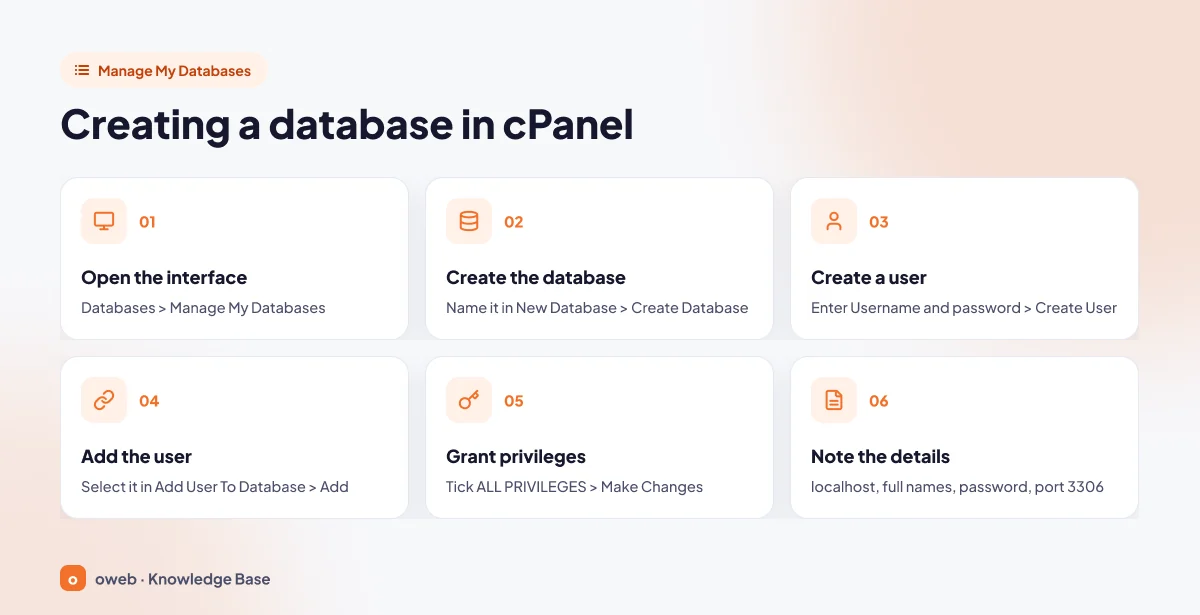
1. Open the database interface
Log in to cPanel and click the Manage My Databases icon in the Databases section. If you cannot see the icon at all, your hosting provider may have disabled the feature.
2. Create the database
- Type a short name for the database in the New Database field (for example,
site). - Click Create Database.
- On the next screen, click Go Back. The new database appears in the Current Databases table.
Why is a name prefix (kullanici_) added?
If your provider has enabled database prefixing, your account username and an underscore appear in front of the New Database field. The system adds this to the name automatically: if you type site, the actual name becomes account_site. This keeps database names from different accounts on the same server from clashing. Always use the full, prefixed name in your site's configuration file.
Name length and character rules
- A database name can be up to 64 characters long; with prefixing enabled, the limit is 63 characters, including the prefix and underscore. Each underscore counts as two characters.
- Names cannot contain
/,",'or backticks (`). - Usernames, including the prefix, are limited to 32 characters on MySQL 5.7 and later, and to 47 characters on MariaDB.
- Choose short names made of lowercase letters and digits; avoid spaces and non-ASCII characters.
3. Create the database user
In the add-user section of the same page, create a database user as follows:
- Type a name in the Username field (for example,
wp; the full name becomesaccount_wp). - Enter and confirm a password. The Password Generator button creates a strong password; a green Strength meter means the minimum strength requirement is met.
- Click Create User, then the Go Back link.
Save the password in a password manager as soon as you create it. cPanel does not show this password again; if you forget it, you must set a new one with Change Password in the Current Users table and update your site's configuration file as well.
4. Add the user to the database
This step is often skipped, and when it is, the site cannot connect to the database.
- In the Add User To Database section, select the user (
account_wp) and the database (account_site) from the menus. - Click Add. The MySQL Account Maintenance screen opens.
5. Grant privileges: ALL PRIVILEGES
On this screen you choose the user's privileges. To grant all of them, select the ALL PRIVILEGES checkbox, click Make Changes and then the Go Back link.
When you grant privileges to a database user, ALL PRIVILEGES may sound broad, but its scope is limited to that single database. It suits applications such as WordPress that change the table structure during installation and updates. For a tool that only reads reports, select the checkboxes individually and grant, for example, only the SELECT privilege.
To change privileges later, click the username in the Privileged Users column of the Current Databases table.
6. Note the connection details
The details your site needs are: host localhost, database account_site, user account_wp, the password you saved and, if required, port 3306.
A shorter route: Database Wizard
cPanel recommends the wizard for your first database and user. The tool is under Databases > Database Wizard; before version 120 it was called MySQL Database Wizard.
Database Wizard steps
- Type the name in the New Database field and click Next Step.
- Enter the Username and password, then click Create User. In the wizard, usernames can only contain letters and digits.
- Select the privilege checkboxes or ALL PRIVILEGES, then finish with Next Step.
How it differs from Manage My Databases
The wizard links the user to the database automatically, so there is no Add User To Database step and less room for error during the first setup. To change passwords, edit privileges, rename or delete, you go back to the Manage My Databases screen. Details are in the cPanel Database Wizard documentation.
How to create a database in Plesk
In the Plesk panel, the database and the user are created in the same form; there is no separate "add user to database" step. To create a database in Plesk:
- Open Websites & Domains > Databases and click Add Database.
- Type the name in the Database name field; in the Related site field you can choose the site the database belongs to.
- Select the Create a database user checkbox and fill in the Database user name and password fields. The Generate button creates a random password.
- Save with OK.
In Plesk a database must have at least one user assigned; otherwise it cannot be accessed. Roles take the place of the ALL PRIVILEGES checkbox here: new users are created with the Read and Write role by default, and Read Only and Write Only roles are also available. Roles are edited under Databases > User Management.
For the host, port and user details, click the Connection Info link in the database tools. Button and form field labels (for example, Add Database) may vary slightly between Plesk versions; current information is in the Plesk Obsidian database documentation.
How to create tables and import a .sql file in phpMyAdmin
phpMyAdmin is a web interface for managing what is inside a database: you can create tables, run queries, and import and export backups. In cPanel it opens from the Databases > phpMyAdmin icon; in Plesk, from the phpMyAdmin link in the database tools.
Can you create a database with phpMyAdmin?
Yes, on your own server or a local installation. On the Databases tab, under Create database, type the name in the Database name field, choose a collation from the Collation list and click Create. On shared hosting you will usually see the No privileges to create databases message in the same place, because your account does not have server-wide permission to create databases.
Do not create databases and users with phpMyAdmin on cPanel accounts. According to the cPanel documentation, phpMyAdmin does not map databases to the account, which prevents backups and restores from working. Create the database and user in the control panel, and manage their contents with phpMyAdmin.
How do you create a table in phpMyAdmin?
Select your database in the left menu. In the Create new table section, fill in the Table name and Number of columns fields and click Create; on the next screen, define the columns and click Save.
How do you import a .sql file in phpMyAdmin?
- First select the target database in the left menu; you should see the database name in the page header.
- Open the Import tab and choose your file in the Browse your computer field.
- Leave Format set to SQL; check the file's character set in the Character set of the file field.
- Click the Import button at the bottom of the page.
If you are importing into a database that already contains data, back it up first. Compressed files are accepted too, but the file name must end in .sql.zip or .sql.gz. If uploads of large files stop halfway, the cause is usually PHP's upload_max_filesize, post_max_size, memory_limit and max_execution_time limits; in that case the phpMyAdmin FAQ recommends splitting the file or importing it from the command line.
How to create a MySQL database from the command line
This method is for a VPS, a dedicated server or a local development environment where you have administrator access. Connect over SSH and open the mysql client. Do not type the password after the -p option; the client will prompt for it separately. A password typed into the command can be visible to other users in the process list.
mysql -u root -pOn MariaDB 10.4 and later, the root account is authenticated by the operating system identity (unix_socket) in a default installation; on these servers you open the client with sudo mariadb and no password is requested. MySQL packages on some Linux distributions similarly require sudo mysql.
Next, create the database with the CREATE DATABASE command, then define the user and the privileges in order. In the example, exampledb, exampleuser and StrongPassword are placeholders; replace them with your own names and a long, unique password generated in a password manager.
CREATE DATABASE exampledb
  CHARACTER SET utf8mb4
  COLLATE utf8mb4_unicode_ci;

CREATE USER 'exampleuser'@'localhost'
  IDENTIFIED BY 'StrongPassword';

GRANT ALL PRIVILEGES ON exampledb.* TO 'exampleuser'@'localhost';

SHOW GRANTS FOR 'exampleuser'@'localhost';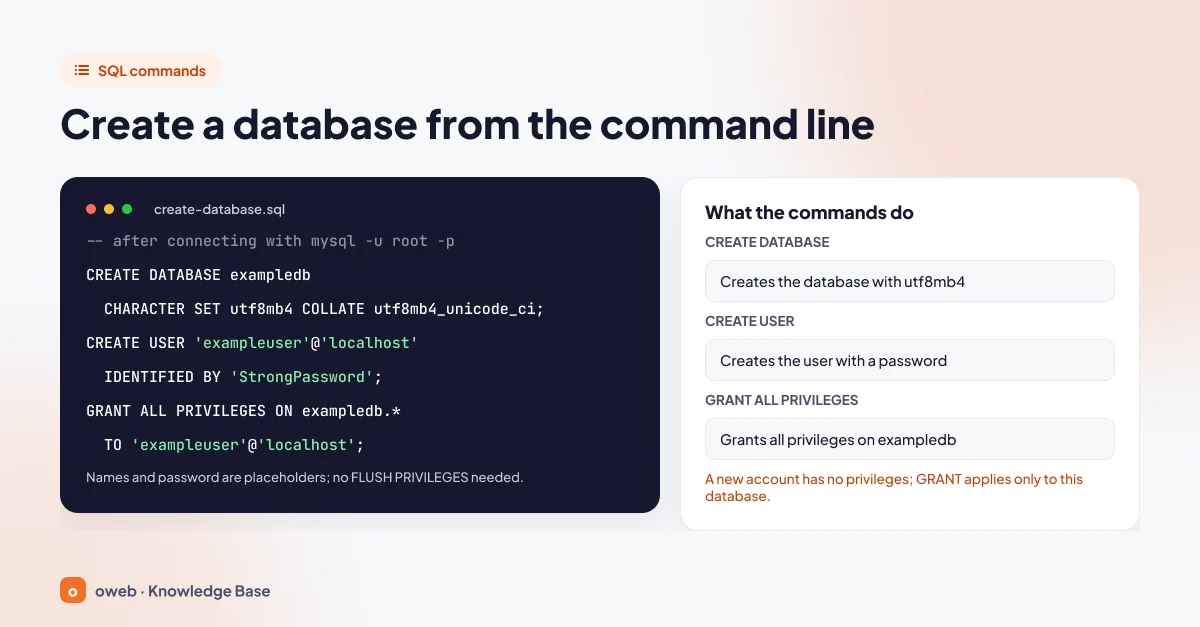
- CREATE DATABASE: Creates a database named
exampledbwith the utf8mb4 character set and the utf8mb4_unicode_ci collation. If a database with the same name exists, you get error 1007; addingIF NOT EXISTSprevents this. - CREATE USER: Creates the
exampleuseraccount with its password; it can only connect vialocalhost. The username and host are quoted separately. - GRANT ALL PRIVILEGES: Gives this user all privileges on the
exampledbdatabase only. The right to pass privileges on to others (GRANT OPTION) and server-wide privileges such as FILE are not included. - SHOW GRANTS: Lists the granted privileges, for verification.
Pay attention to four details:
- The
GRANT ... IDENTIFIED BYpattern found in older guides causes a syntax error on MySQL 8.0 and later (MariaDB still accepts it); the approach that works on both is to runCREATE USERfirst and thenGRANT. FLUSH PRIVILEGESis not needed afterGRANT; the server loads changes made with account management statements immediately.- If the database name contains an underscore (such as
account_site), that character acts as a wildcard inGRANT; for an exact match, wrap the name in backticks and escape the underscore as\_:GRANT ALL PRIVILEGES ON `kullanici\_site`.* TO ... - The
CREATE USERstatement may be saved, including the password, to the~/.mysql_historyfile; keep this in mind on shared servers.
The full syntax is in the MySQL CREATE DATABASE and GRANT documentation.
What are the MySQL database connection details?
An application needs five pieces of information to connect to a database. Here are the MySQL database connection details with example values:
| Detail | Example | Description |
|---|---|---|
| Host (server name) | localhost | Used when the site and the database are on the same server; DB_HOST in WordPress. |
| Database name | account_site | In cPanel, use the full name with the account username + underscore prefix; DB_NAME in WordPress. |
| Username | account_wp | The user added to the database and granted privileges; DB_USER in WordPress. |
| Password | The password you saved when creating the user | Cannot be viewed in the panel later; reset it if forgotten. DB_PASSWORD in WordPress. |
| Port | 3306 | Default port for MySQL and MariaDB; required for remote connections, usually omitted for localhost. |
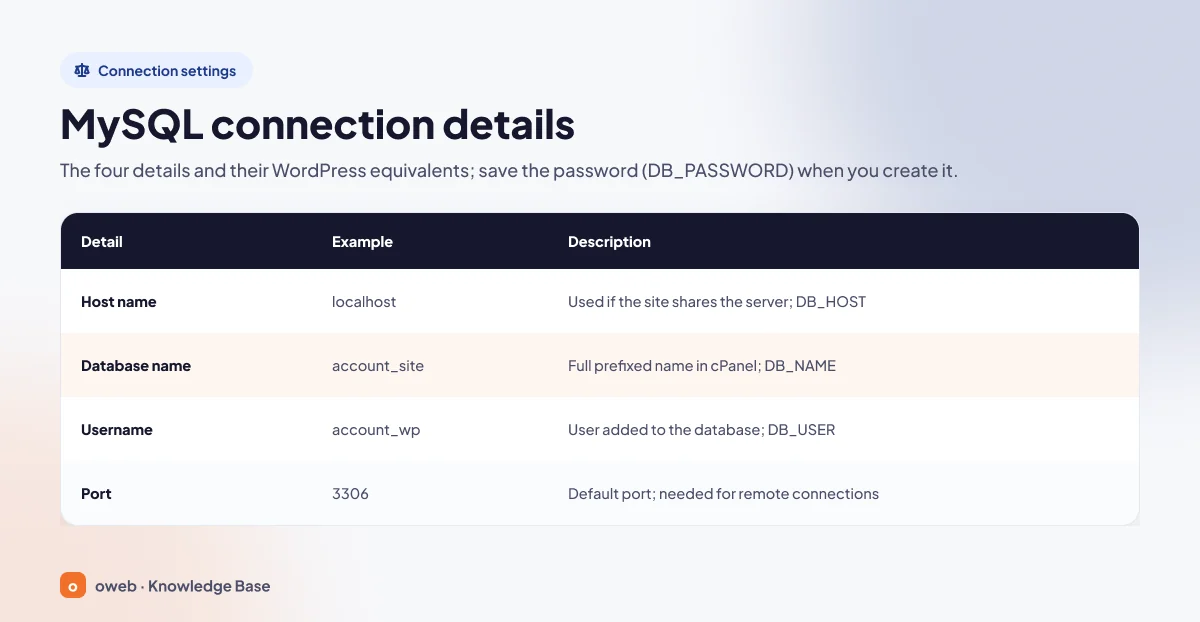
On most hosting accounts the host is localhost, because the web server and the database run on the same machine. On Linux, when you specify localhost, the client connects through a socket file instead of a network port, so no port is needed. If the database is on a separate server, use the address shown in the Remote Database Host section in cPanel or in the Connection Info window in Plesk.
How do you test the database connection?
Testing the new user and database before connecting your site helps you catch errors early. If you have SSH access, run this command and enter the password:
mysql -u account_wp -p account_siteIf the client prompt (for example, mysql>) appears, the username, password and privileges are correct; type exit to leave. If you get error 1045, 1044 or 1049, see the errors section below. Without SSH, open phpMyAdmin from the panel and check that the database is listed in the left menu; this confirms the database exists, but not every panel tests the user's password this way.
How do you add database details to wp-config.php for WordPress?
The WordPress installer asks for these details and writes them to the wp-config.php file. If you edit the file manually, make a copy first, then update only the first four lines (DB_NAME, DB_USER, DB_PASSWORD, DB_HOST) with your own values:
define( 'DB_NAME', 'account_site' );
define( 'DB_USER', 'account_wp' );
define( 'DB_PASSWORD', 'StrongPassword' );
define( 'DB_HOST', 'localhost' );
define( 'DB_CHARSET', 'utf8mb4' );
define( 'DB_COLLATE', '' );
The last two lines are the defaults for new installations. Do not touch the DB_CHARSET and DB_COLLATE lines on a live site; the WordPress documentation says these values should normally not be changed, and a wrong value can make special characters display incorrectly.
According to the WordPress documentation, DB_HOST is usually localhost, but not always; if a different port is required, add it after the host name with a colon (for example, db.yourdomain.com:3307). As of November 2026, the WordPress server requirements page recommends MySQL 8.4, MariaDB 10.11 and PHP 8.3 or newer; if needed, see our guide to changing your PHP version. The rest of the installation is covered in the WordPress installation documentation.
What is utf8mb4 and why should you use it?
The character set determines how text is encoded for storage, and the collation determines how it is sorted and compared. The MySQL documentation recommends the utf8mb4 character set for new applications. It uses up to four bytes per character and can store every Unicode character. The older utf8 name is actually utf8mb3: it uses at most three bytes, cannot store supplementary characters such as emoji, and is being deprecated.
Default values vary by server:
- On current MySQL versions (8.4 and later), the default character set is utf8mb4 and the default collation is utf8mb4_0900_ai_ci.
- On MariaDB versions before 11.6, the defaults are latin1 and latin1_swedish_ci; from 11.6 onwards they are utf8mb4 and utf8mb4_uca1400_ai_ci.
Because hosting servers may still run older MariaDB versions, explicitly specifying CHARACTER SET utf8mb4 is the safest option. utf8mb4_unicode_ci is a portable collation, available in both MySQL and MariaDB; utf8mb4_general_ci is slightly faster but less accurate for sorting and comparison. A backup taken with the utf8mb4_0900_ai_ci collation introduced in MySQL 8.0 can trigger an "Unknown collation" (1273) error on a server that does not recognise it (for example, MySQL 5.7 or MariaDB versions older than 11.4.5).
For databases created in the control panel, the table character set is determined by the application that runs the installation; since version 4.2, WordPress uses utf8mb4 if the server supports it.
How do you enable remote MySQL access?
In normal use, only your site on the same server connects to the database. If you need to connect from a tool on your computer or from another server, you must set up remote access.
- cPanel: On the Remote Database Access screen (Remote MySQL before version 120), type the IP address or hostname that will connect in the Host field of the Add Access Host section and click Add Host.
%is a wildcard; allowing a wide range exposes your database unnecessarily. - Plesk: In the database user's Access Control section, choose Allow local connections only, Allow remote connections from any host or Allow remote connections from. According to the Plesk documentation, remote access is usually open to any host by default; if you do not need it, switch to local connections only. These options appear only if your subscription has the Remote access for database users permission; if the server firewall blocks MySQL connections, this setting alone is not enough.
For remote connections, use the server's hostname or IP address instead of localhost as the host, and 3306 as the port. If your domain sits behind a CDN or proxy, yourdomain.com will not reach the database server; use the server address shown in the panel. Set up the connection over SSL/TLS or through an SSH tunnel so that data does not travel unencrypted over the internet.
If you try to connect from an address that is not allowed, you get error 1130 ("Host ... is not allowed to connect to this MySQL server"). If the firewall keeps port 3306 closed, the panel permission alone is not enough. Details are in the cPanel Remote Database Access documentation.
How do you back up a MySQL database?
Always take a backup before renaming or deleting a database or importing a .sql file into it. There are three practical ways:
- cPanel Backup: On the Files > Backup screen, under Partial Backups, click the database name in the Download a Database Backup section; the backup downloads as a
.gzfile. Restores are done from the same screen (cPanel Backup documentation). - Plesk: Export Dump on the Websites & Domains > Databases screen creates an SQL dump and saves it as a ZIP file; restore it with Import Dump.
- mysqldump: If you have SSH access, you can take a logical backup from the command line.
mysqldump -u account_wp -p --no-tablespaces account_site > backup.sql

mysql -u account_wp -p account_site < backup.sql
The first command takes the backup and the second restores it. The --no-tablespaces option prevents the error that occurs on shared hosting because the PROCESS privilege is not available. This dump does not include a CREATE DATABASE statement, so the target database must already exist when you restore. On MariaDB the same tool is called mariadb-dump.
Run the restore command only when you need to. A dump file taken with the default settings contains a DROP TABLE statement before each table; tables with the same name in the target database are dropped and recreated as they are in the backup, and any data added after the backup is lost.
MySQL database connection errors and fixes
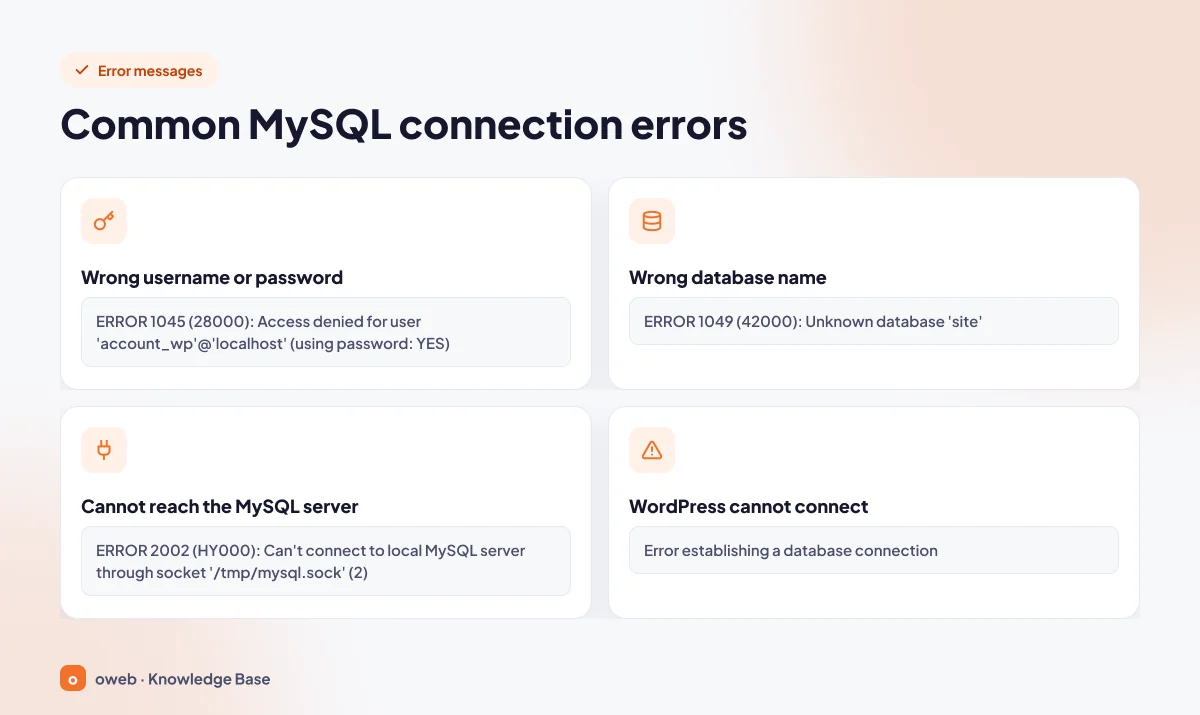
Connection errors are usually caused by one of the five connection details being entered incorrectly; the error number tells you where to look first.
| Error | Meaning | First check |
|---|---|---|
| 1045 | Wrong username or password | Enter the username with its prefix and reset the password in the panel. |
| 1044 | The user has no privileges on this database | Add the user to the database and grant privileges. |
| 1049 | The database name is wrong or missing its prefix | Copy the name from the Current Databases table. |
| 2002 | The database server cannot be reached | Check the host name; if the service is down, contact your provider. |
| 1130 | The address you are connecting from has no remote access permission | Check Remote Database Access in cPanel or Access Control in Plesk. |
ERROR 1045 (28000): Access denied for user
The full message looks like Access denied for user 'account_wp'@'localhost' (using password: YES). The username or password is wrong, or this user is not allowed to log in from the address you are connecting from; using password: NO means no password was sent at all. Check that you entered the username with its prefix; if in doubt, change the password in the panel and enter the new one in your configuration file.
ERROR 1044 (42000): Access denied for user ... to database
In this message, which looks like Access denied for user 'account_wp'@'localhost' to database 'account_site', the username and password are correct but the user has no privileges on that database; repeat the step of adding the user to the database.
ERROR 1049 (42000): Unknown database
No database with this name exists. On hosting accounts, the most common cause is leaving out the prefix: it should be account_site, not site. A typo or a deleted database gives the same result; copy the name from the Current Databases table.
ERROR 2002 (HY000): Can't connect to local MySQL server through socket
The client could not reach the database server. According to the MySQL documentation, this error usually means the server is not running or the wrong socket file or port is being used. If the host name is correct, the database service may have stopped; on shared hosting only your provider can fix this. For remote connections, the equivalent error appears with code 2003.
WordPress: Error establishing a database connection
WordPress shows this message when it cannot connect to the database using the details in wp-config.php; on sites in other languages, the message appears in translated form. Check the following in order:
- Do the DB_NAME, DB_USER, DB_PASSWORD and DB_HOST values exactly match the details in the panel?
- Has the user been added to the database and granted privileges?
- Is the database server running, and could your account's database quota be full?
The first two are in your hands; for the third, contact your provider. If you suspect corrupted tables, back up the database first, then try the Check Database and, if necessary, Repair Database tools in the Modify Databases section of the Manage My Databases screen in cPanel.
MySQL database security tips
- A separate user for each site: If one site's password leaks, the damage stays limited to that database.
- Only the privileges needed: MySQL security guidelines advise against granting more privileges than necessary; give read-only tools read privileges only.
- Strong, unique passwords: Use the panel's password generator, and do not reuse your panel login password for a database user.
- Keep remote access closed: If you need it, allow a single IP address instead of
%; port 3306 should not be open to untrusted addresses.
Frequently asked questions
I can't find the MySQL Databases icon in cPanel. Where is it?
In current versions the screen is called Manage My Databases and is located in the Databases section. MySQL Database Wizard has also been renamed Database Wizard, and Remote MySQL is now Remote Database Access.
Can the prefix at the beginning of the database name be removed?
No, the prefix is a server setting controlled by the hosting provider. All you need to do is use the full name, such as account_site, in your connection settings.
I forgot my database user's password. What should I do?
cPanel does not show the current password; set a new one with Change Password in the Current Users table and update your site's configuration file (wp-config.php in WordPress). In Plesk, open the database user's page and generate a new password.
Is the MySQL host always localhost?
On most shared hosting accounts, yes; if the database is on a separate server, use the address shown in the panel.
What is the default MySQL port?
The default port for MySQL and MariaDB is 3306. When connecting with localhost on the same server, you usually don't need to specify the port.
Is FLUSH PRIVILEGES required after GRANT?
No. After account management statements such as CREATE USER and GRANT, the server reloads privileges immediately. FLUSH PRIVILEGES is only needed when the grant tables are edited directly, which is not a recommended method.
Why does phpMyAdmin show "No privileges to create databases"?
Because on shared hosting your account does not have server-wide permission to create databases. Create the database in your control panel and use phpMyAdmin only to manage its contents.
How many databases can I create on a hosting account?
It depends on your hosting plan's database quota; you can find the limit in the plan features or by asking your provider.
How do I delete or rename a database?
In cPanel, use the Rename and Delete options in the Actions column of the Current Databases table. Deletion is permanent and cannot be undone; renaming ends active connections and requires you to update your configuration file manually. Take a backup before either operation.
Conclusion
Whichever tool you use, creating a MySQL database follows the same logic: create the database, define a user, grant privileges and enter the connection details in your application completely and correctly. When you hit connection errors, a forgotten prefix and a skipped privilege step are among the first things to check.
If you are looking for infrastructure for your site, take a look at Oweb web hosting plans. If you are an Oweb customer and get stuck connecting to your database, opening a support ticket with the full text of the error message will speed up the fix.
