


The short answer to how to install WordPress: you set up a domain name and a hosting account, then install WordPress either in a few clicks with the one-click installer in your hosting panel (Softaculous or WP Toolkit) or manually by uploading the files and creating a database. Either way, you choose the site title and the administrator account yourself: in a short form in the automatic installer, or on the WordPress installation screen in a manual install.
This WordPress installation guide is based on the current WordPress release and the official documentation as of November 2026. The methods go from easiest to most advanced. Button and field names are given in quotes, as they appear in the English WordPress and control panel interfaces.
Quick summary: installing WordPress
- What you need: a domain name, a hosting account that supports PHP and MySQL/MariaDB, and ideally an SSL certificate installed in advance.
- Recommended server environment: PHP 8.3 or higher; MySQL 8.4 or higher, or MariaDB 10.11 or higher; HTTPS support.
- Easiest method: Softaculous or WP Toolkit in your hosting panel. The tool creates the database and the wp-config.php file for you.
- A manual install has six steps: download the package, upload the files, create a database, edit wp-config.php, run the installer and log in.
- Time: according to the WordPress documentation, a manual install takes less than five minutes in most cases.
- Right after installation: set permalinks to "Post name", confirm HTTPS works, and set up backups and updates.
What do you need before installing WordPress?
WordPress is an open-source content management system written in PHP that stores its content in a MySQL or MariaDB database. So before you start building a site with WordPress, you need three things in place: the site's address, a server to hold the files, and the right software versions. This guide covers the WordPress.org software that you install on your own hosting. WordPress.com is a separate service that hosts the same software for you.
Domain name
The domain name is the address visitors use to reach your site. If you don't have one yet, you can pick one on our domain search and registration page. Your domain has to point to your hosting provider's nameservers, or to your hosting account's IP address through a DNS A record. Until this is done, the installation address won't open in the browser.
Hosting
Hosting is the server space that holds your WordPress files and database. Your hosting provider gives you a control panel (cPanel, Plesk, etc.) and FTP details. If you're looking for a suitable plan, take a look at our WordPress hosting options.
WordPress PHP and MySQL/MariaDB requirements
As of November 2026, the WordPress.org requirements page recommends the following environment:
| Component | Recommended | Lowest working version |
|---|---|---|
| PHP | 8.3 or higher | 7.4 (end of life) |
| Database | MySQL 8.4+ or MariaDB 10.11+ | MySQL 5.5.5 (end of life) |
| Web server | Apache (with the mod_rewrite module for permalinks) or Nginx | Any server that supports PHP and MySQL |
| Connection | HTTPS support | – |
WordPress runs on the lowest versions, but they no longer get security updates, so don't use them for a new site. WordPress 7.0 dropped support for PHP 7.2 and 7.3 completely, so the "PHP 7.2 is enough" advice in older guides no longer holds. Security support for PHP 8.2 also ends on December 31, 2026, according to the php.net schedule. For a new install, choose PHP 8.3, 8.4 or 8.5. PHP 8.6 came out on November 19, 2026, but it isn't listed in the WordPress PHP compatibility table yet, so it's safer to wait before using it on a live site.
You can check and change the PHP version in your hosting panel's PHP version setting. In cPanel this is usually MultiPHP Manager, and on servers running CloudLinux it is usually a screen like Select PHP Version. Which one you see depends on your hosting provider. If your PHP version is too old, the installation stops before it starts. You'll see a one-line warning with no heading ("Your server is running PHP version … but WordPress … requires at least …"). It shows the PHP version on the server and the minimum version WordPress requires.
Enable the SSL certificate before you install. The right order is: point the domain to the server, install the certificate, then install WordPress at the https:// address. That way your administrator password never travels over an unencrypted connection, and you won't need to change the site address later. To learn what a certificate does, read our article What is an SSL certificate?
WordPress installation methods: which one should you choose?
All four methods install the same WordPress. They differ in how much of the work you do yourself and what access you need (control panel, FTP or SSH).
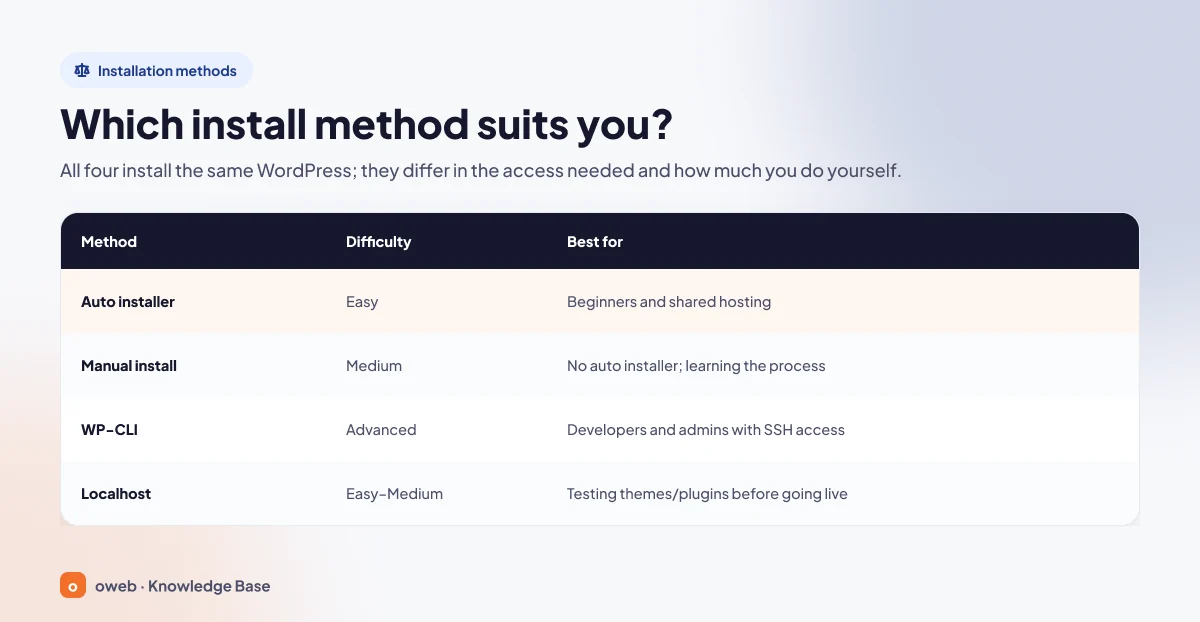
| Method | Difficulty | Best for |
|---|---|---|
| One-click installer (Softaculous, WP Toolkit) | Easy | Beginners and shared hosting users |
| Manual install (File Manager/FTP + database) | Medium | Users whose hosting has no one-click installer, and those who want to learn the process and control every setting |
| WP-CLI | Advanced | Developers and server administrators with SSH access, and anyone setting up many sites |
| Localhost (Studio, Local, XAMPP) | Easy–Medium | Anyone who wants to try a site, or test themes and plugins, before going live |
The difficulty ratings are our own. If you're unsure and your panel has a one-click installer, use it. If it doesn't, or if you want to choose the database name, table prefix and file location yourself, go with a manual WordPress installation.
How to install WordPress with a one-click installer
One-click installers download the files, create the database and its user, write the wp-config.php file and run the installation screen for you. All you do is fill in a form. Which installer you get depends on your hosting provider and control panel.
How to install WordPress in cPanel
The quickest way to install WordPress in cPanel is a one-click installer: open Softaculous or WP Toolkit, choose your domain, set an admin username and password, and click "Install". If your account has neither tool, you can do the manual install below with File Manager and the Database Wizard.
Installing WordPress with Softaculous
Softaculous is an add-on for panels such as cPanel, Plesk and DirectAdmin that installs hundreds of applications, WordPress included. According to the Softaculous documentation, installing WordPress with Softaculous takes these steps:
- Log in to your hosting control panel and click the Softaculous icon.
- Search for WordPress and click "Install".
- In the "Choose Installation URL" section, choose your domain. If your installer shows a protocol option and SSL is installed, choose the one starting with https://.
- Leave the "In Directory" field empty. If it has a value (e.g. wp), the site is installed at yourdomain.com/wp.
- Fill in "Admin Username", "Admin Password" and "Admin Email", and choose your site language from the "Select Language" list.
- Click "Install" at the bottom of the page.
If Softaculous is installed on DirectAdmin or Plesk, the form will most likely have similar fields, though the icon may be in a different place in the panel.
Installing with WP Toolkit in cPanel
WP Toolkit is available in cPanel & WHM version 102 and later, but your hosting provider may have turned it off. According to the cPanel documentation, you'll find it under cPanel > Home > Domains > WP Toolkit.
- Open WP Toolkit and click "Install".
- To keep the default settings, click "Install" straight away. If you prefer, first change these settings: installation directory (default: public_html), site title, language, admin username and password, database name and table prefix.
- If you're offered a plugin set when installation finishes, you can accept it or skip it.
Installing with WP Toolkit in Plesk
In Plesk, WP Toolkit runs as an extension. According to the Plesk documentation, you just go to the "WordPress" section and click "Install". If you confirm the form as it is, the latest WordPress version is installed with default settings. Before confirming, you can change the admin user details, WordPress version, database name and automatic update settings if you want.
What to watch for with a one-click install
- Administrator account: The forms come filled in with default values. Instead of a predictable name like "admin", choose a username of your own and a strong password.
- Existing files: If there's another site in the target directory, back it up first. According to the cPanel documentation, each root directory should hold only one WordPress installation. Otherwise, the .htaccess files may conflict.
Manual WordPress installation step by step
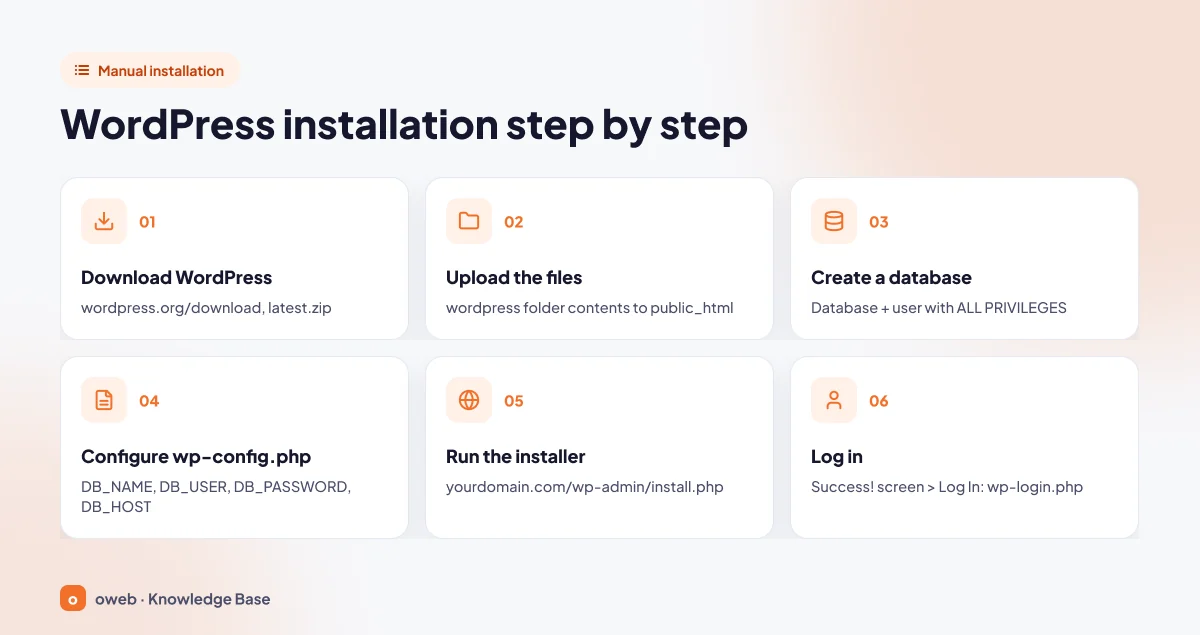
In a manual install, you do yourself what the one-click installer does in the background. The WordPress.org installation guide breaks the process into five steps. We add logging in and walk through installing WordPress step by step in six parts.
If the target directory (e.g. public_html) holds the files of a working site, back up the files and the database before you start. Files with the same name (e.g. index.php) will be overwritten.
1. Download WordPress
Download the package from wordpress.org/download. Localized packages are available from the WordPress locale sites, for example tr.wordpress.org/download for Turkish. Only get WordPress from these official sources, because packages distributed on other sites may have been modified. When you unzip the file, you get a single folder named "wordpress".
2. Upload the files with File Manager or FTP
There's one rule when uploading WordPress files: if the site should load at the root of your domain, put the contents of the "wordpress" folder in the web root (document root), not the folder itself. In cPanel, the root directory of the main domain is public_html. Other panels may use a different name.
Uploading with File Manager
- Open File Manager in cPanel and go to public_html.
- Upload the zip file with "Upload" on the toolbar.
- Select the file and unzip it with "Extract". A "wordpress" folder is created inside public_html.
- Open the folder, select all the files and use "Move" to move them into public_html. Then delete the empty "wordpress" folder and the zip file.
Uploading with FTP
Unzip the file on your computer, connect to the server with an FTP client such as FileZilla, and transfer all the files inside the "wordpress" folder to the root directory. If your client has an option that converts file names to lowercase, turn it off. If your hosting provider supports it, use an encrypted connection (SFTP or FTPS) instead of plain FTP.
3. Create a database and user
WordPress keeps your posts, settings and users in a database. So you need an empty database and a user with all privileges on it. In cPanel, the quickest way to create a WordPress database is the Database Wizard (cPanel > Home > Databases > Database Wizard; in older versions it is called MySQL Database Wizard):
- Type a name in the "New Database" box and click "Next Step".
- Fill in the "Username" and password fields. Generate the password with Password Generator and save it somewhere safe.
- On the privileges screen, tick "ALL PRIVILEGES" and finish the wizard.
On most cPanel accounts, your account name is added as a prefix to the database name and the username (e.g. accountname_wp). You'll need to enter this full name in the next step. If you leave out the prefix, WordPress can't connect to the database.
The cPanel documentation says not to create databases and users with phpMyAdmin, because ones created that way aren't mapped to your account and aren't included in backups. In Plesk, you do the same under Websites & Domains > Databases (depending on the version, the button is "Add Database" or "Add New Database"). For details, see our how to create a MySQL database guide.
4. Configure wp-config.php
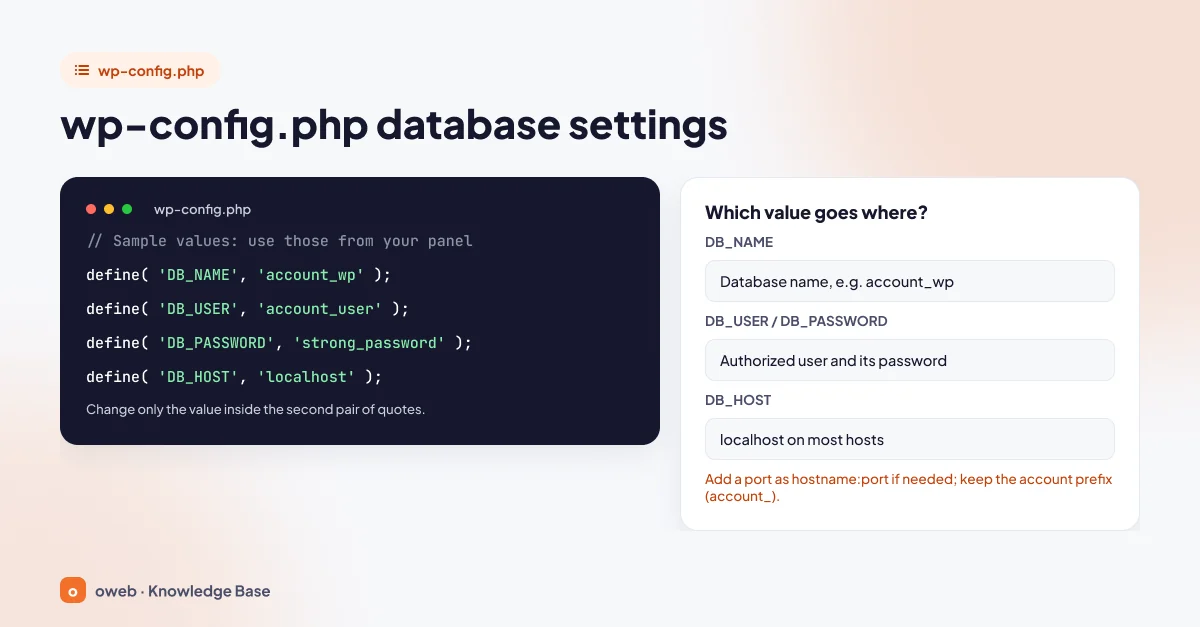
wp-config.php is the file that tells WordPress how to connect to the database, and it isn't included in the package you download. You have two options: skip this step and enter the details in the browser form in the next step (WordPress creates the file), or create the file by hand. To do it by hand, rename wp-config-sample.php in the root directory to wp-config.php and edit these four lines:
define( 'DB_NAME', 'database_name' );
define( 'DB_USER', 'username' );
define( 'DB_PASSWORD', 'password' );
define( 'DB_HOST', 'localhost' );
The values above are the placeholders from the Turkish package. In the English package they read database_name_here, username_here and password_here. Only change the value inside the second pair of quotes. Don't delete the single quotes or the semicolon at the end of each line. If your password contains a single quote (') or a backslash (\), you have to put a backslash in front of it. It's easiest to generate a password without these two characters.
| Constant | What to enter |
|---|---|
DB_NAME | The full name of the database you created (e.g. accountname_wp). |
DB_USER | The user assigned to that database with all privileges (e.g. accountname_wpuser). |
DB_PASSWORD | That user's password. |
DB_HOST | The database server. On most hosting it's localhost. If not, your hosting provider will tell you. If you need a port, use the hostname:port format. |
The same file has eight security keys and salts (AUTH_KEY ... NONCE_SALT). If you're creating the file by hand, paste the lines generated at https://api.wordpress.org/secret-key/1.1/salt/ into that section. The browser installer generates them on its own. Don't touch the DB_CHARSET (utf8mb4) and DB_COLLATE (empty) lines. If you want to change the table prefix in the $table_prefix = 'wp_'; line, use only letters, numbers and underscores, and do it before installation.
5. Run the installer
- Open
https://yourdomain.com/wp-admin/install.phpin your browser. - If you haven't created wp-config.php, the "Before getting started" screen appears first. Click "Let's go!".
- Fill in "Database Name", "Username", "Password", "Database Host" and "Table Prefix", click "Submit", then click "Run the installation".
- Fill in the fields on the "Welcome" screen and click "Install WordPress".
With the English package, the first screen is language selection. Localized packages usually skip this step. We explain what to enter in each field in the "Fields on the installation screen" section below. In particular, leave the Search engine visibility box unchecked on a live site.
6. Log in to the dashboard
When installation is complete, you'll see the heading "Success!" and the text "WordPress has been installed. Thank you, and enjoy!". The "Log In" button takes you to https://yourdomain.com/wp-login.php. Once you log in with your username and password, the dashboard (/wp-admin/) opens. If you forget your password, use the "Lost your password?" link on the same screen.
Fields on the installation screen: what to enter in the 5-minute install
The welcome text calls this WordPress installation screen the "famous five-minute WordPress installation process", and it only asks for five things. You can change the site title, email address and visibility setting later from the dashboard. The username can't be changed from the profile screen, so choose it carefully from the start.
| Field | What to enter and what to watch for |
|---|---|
| Site Title | The name of your site. It appears in the theme and the browser tab. |
| Username | The name of the administrator account. Only letters, numbers, spaces, underscores, hyphens, periods and the @ symbol are allowed. Choose a name that's hard to guess instead of "admin". |
| Password | The field comes filled in with a strong random password. Save it in a password manager. If you enter a weak password, make it stronger instead of ticking the "Confirm use of weak password" box that appears. |
| Your Email | Password reset links and site notifications go to this address. Check the spelling twice. |
| Search engine visibility | The "Discourage search engines from indexing this site" box. Leave it unchecked on a live site. |
If you tick the visibility box, WordPress asks search engines not to index your site. Visitors can still reach the site, but it may not show up in Google. Only tick it while you're building the site, and untick it under Settings > Reading when you go live.
Installing WordPress with WP-CLI
WP-CLI is a tool for managing WordPress from the command line. If you have SSH access and WP-CLI is installed on the server (check with wp --info), installing WordPress with WP-CLI takes just a few commands. The database user must already exist, because wp config create checks the credentials. On shared hosting (cPanel, Plesk), create the database and its user in the panel first. Then run these commands in the site's root directory (the cd command on the first line moves you to the root directory):
cd ~/public_html
wp core download --locale=tr_TR
wp config create --dbname=account_wp --dbuser=account_wpuser --prompt=dbpass
wp core install --url=https://example.com --title="Site Title" --admin_user=admin [email protected] --locale=tr_TR--prompt=dbpassasks for the password on screen, so it isn't saved in your shell history.wp config createchecks the credentials and generates wp-config.php. If you don't pass--dbhost, localhost is used. By default, this command writes utf8 in the DB_CHARSET line. You can add--dbcharset=utf8mb4if you want.- If you don't pass
--admin_passwordtowp core install, WP-CLI generates a random password and prints it on screen. Save it right away.--locale=tr_TRsets the site language to Turkish in this example. Leave it out to use the default, en_US. wp db create: the WP-CLI documentation describes the install in four commands and puts this one betweenwp config createandwp core install. It creates the database using the details in wp-config.php, so it only works on servers where the database user is allowed to create databases (e.g. your own VPS). Skip it on shared hosting, where it may fail with a permissions error.
Each command ends with a line starting with "Success:". The last line should be "Success: WordPress installed successfully."
Installing WordPress on your computer (localhost)
If you want to try WordPress without buying a domain and hosting, you can do a WordPress localhost installation. The site then only opens on your own computer and can't be reached over the internet. We explain the concept in our article What is localhost?
Ready-made local tools
- WordPress Studio and Local: Desktop apps that create a local site in a few clicks. This is the easiest route.
- XAMPP: A free bundle with Apache, MariaDB and PHP. You do the same steps as a manual install, on your own computer.
- WordPress Playground: The official sandbox that runs WordPress in your browser without installing anything.
Installing WordPress with XAMPP
To install WordPress on localhost with XAMPP, follow these steps in order:
- Start the Apache and MySQL modules from the XAMPP Control Panel window.
- Copy the "wordpress" folder into the
xampp\htdocsdirectory and rename it to site. - Create an empty database at
http://localhost/phpmyadmin/. - Open
http://localhost/site/and complete the installation screen (if you didn't rename the folder, the address is http://localhost/wordpress/). The database user is root, the password is empty and the host is localhost.
Because the root user comes without a password, use XAMPP only as a development environment. It isn't suitable for hosting a live site.
What to do after installing WordPress
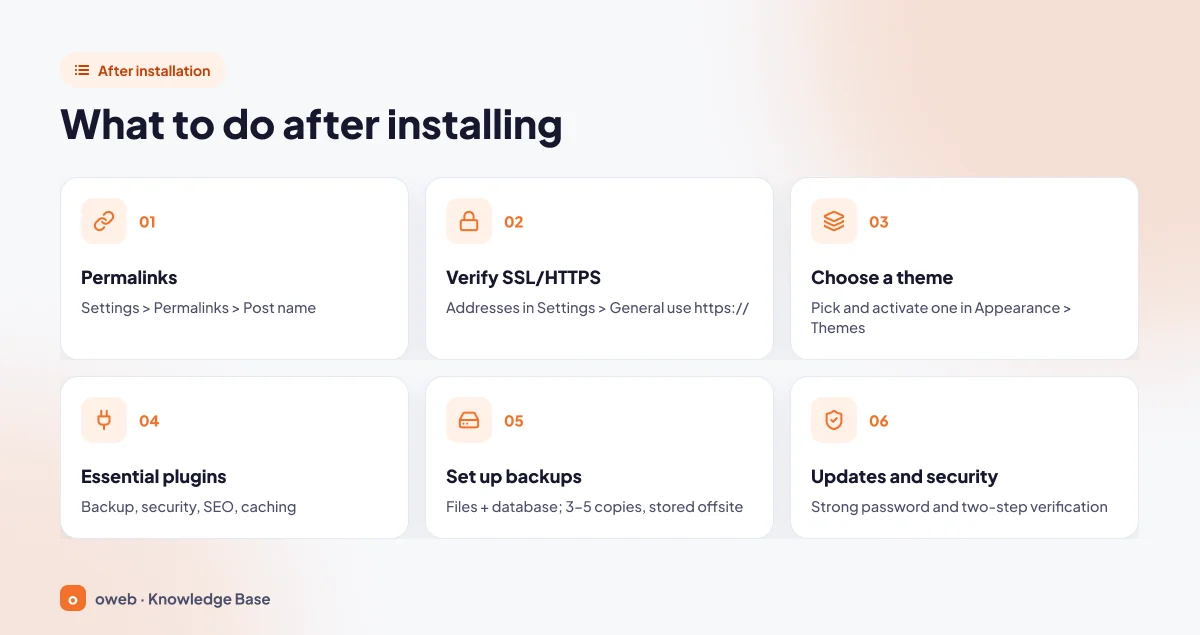
Once installation is done, the site works. Still, before you add content, finish these six post-installation WordPress tasks.
1. Set up permalinks
Under Settings > Permalinks, select "Post name" whatever structure is selected after installation, and click "Save Changes". This makes addresses look like yourdomain.com/post-title/. According to the WordPress documentation, readable permalinks work better for both visitors and search engines. Changing the structure later also changes the addresses of published posts, so set this up first.
2. Confirm SSL/HTTPS
Under Settings > General, the addresses in "WordPress Address (URL)" and "Site Address (URL)" should start with https://. If Tools > Site Health shows the warning "Your website does not use HTTPS", install the certificate in your hosting panel first, then use the "Update your site to use HTTPS" button on the same screen. For details, see the WordPress HTTPS documentation.
3. Choose a theme
Go to Appearance > Themes > "Add New Theme" and find a theme. Click "Install", then "Activate". Keep a default theme (e.g. Twenty Twenty-Five) installed, because it's useful when troubleshooting.
4. Install essential plugins
Under Plugins > "Add New Plugin", install only the ones you need. For most sites, one backup plugin, one security plugin, one SEO plugin and a caching plugin that suits your server are enough. Get plugins from the WordPress.org directory or from well-known developers.
5. Set up backups
A full backup has two parts: the files and the database. The WordPress backup documentation recommends weekly backups for sites that rarely change and daily backups for busy ones. It also recommends keeping at least three to five recent backups in different locations (the server, cloud storage, your own computer). Make a backup before updates as well.
6. Review updates and security
On new installs, the Dashboard > Updates screen says "This site is automatically kept up to date with each new version of WordPress." Keep your plugins and themes up to date too. Then:
- Use a strong password for the administrator account and turn on two-factor authentication with a plugin.
- On shared hosting, you can set the permissions of wp-config.php to 440 or 400. If the site stops loading after this change, or a plugin reports that it can't write to the file, set them back to 640 or 644. When you need to edit the file, set it to 644 temporarily and tighten it again when you're done.
- Under Settings > Reading, check that the visibility box is unchecked.
- Delete the default "Hello world!" post and the "Sample Page".
Common WordPress installation errors and how to fix them
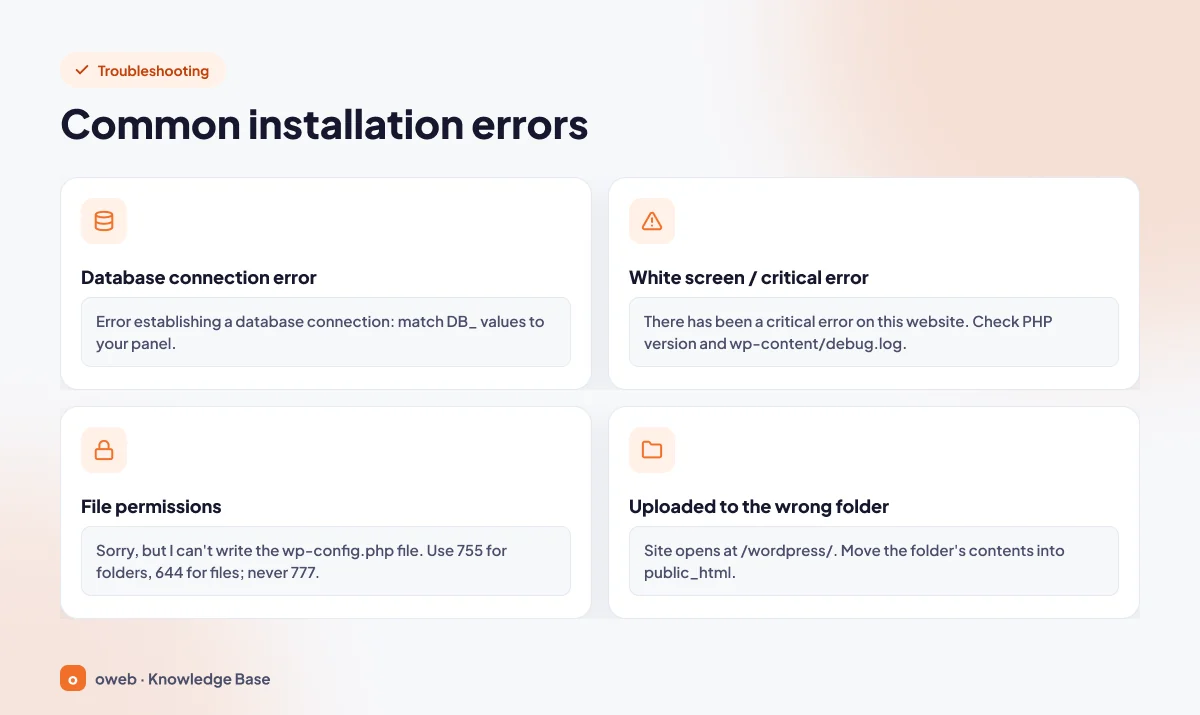
These four problems come up most often during installation. For each one, start with the simplest check. For details, see the WordPress common errors documentation.
When troubleshooting, download a copy of wp-config.php or .htaccess to your computer before you edit it. A single missing quote or semicolon can take the whole site down.
WordPress database connection error
Message: "Error establishing a database connection". This database connection error means WordPress can't connect to the database with the details in wp-config.php. Check the following in order:
- Do the DB_NAME, DB_USER and DB_PASSWORD values match the details in your panel exactly? Don't forget the account prefix (accountname_).
- Is the user assigned to the database with all privileges? The message "Can't select database" means the connection to the server works but the database can't be accessed.
- Is DB_HOST correct? On most hosting it's localhost. If you're not sure, ask your hosting provider.
If the details are correct, the database server may not be responding. We cover every possible cause in our WordPress database connection error guide.
WordPress white screen or "critical error" message
If the page loads completely blank or says "There has been a critical error on this website.", PHP has stopped with an error. During installation, the most likely causes are incompletely uploaded files and an incompatible PHP version. First check that your PHP version is at least 7.4 (8.3+ recommended), then upload the files again. If the cause is still unclear, change the WP_DEBUG line in wp-config.php as shown below, add the other two lines under it, and read the wp-content/debug.log file:
define( 'WP_DEBUG', true );
define( 'WP_DEBUG_LOG', true );
define( 'WP_DEBUG_DISPLAY', false );
Once you've found the problem, set WP_DEBUG back to false and delete wp-content/debug.log. This file can usually be read from a browser.
WordPress file permissions problem (755 and 644)
Message: "Unable to write to wp-config.php file." This means the installer doesn't have permission to write to the directory. The safest fix is to copy the text shown on screen, create wp-config.php by hand and click "Run the installation". For a permanent fix, correct the file permissions in File Manager or your FTP client according to the official recommendations:
| Item | Recommended permission |
|---|---|
| Directories | 755 (or 750) |
| Files | 644 (or 640) |
| wp-config.php (shared hosting) | 440 or 400 |
Never set any directory to 777. This permission lets everyone on the server write to that directory.
Files uploaded to the wrong directory
WordPress doesn't show a specific message in this case. The signs are: the site loads at yourdomain.com/wordpress/ instead of yourdomain.com, or the domain shows a directory listing or your hosting provider's default page. This happens when the "wordpress" folder itself was uploaded instead of its contents. The fix depends on whether you've already run the installation screen:
- If you haven't run the installation screen yet: just move all the files inside the "wordpress" folder to the root directory (public_html).
- If you completed the installation at /wordpress/: WordPress has saved that address in the database, so if you only move the files, the site keeps redirecting to the old address. Back up the files and the database first. Then, under Settings > General, remove /wordpress from "WordPress Address (URL)" and "Site Address (URL)" and click "Save Changes". Without trying to open the site, move the files to the root directory and log in at yourdomain.com/wp-login.php. For details, see the WordPress migration documentation.
- If the site is brand new and empty: deleting the folder and the database tables and reinstalling in the root directory gives the same result.
To move hidden files (such as .htaccess) too, turn on "Show Hidden Files (dotfiles)" under Settings in File Manager. If the directory listing still appears and your server runs Apache, add the line DirectoryIndex index.php to the .htaccess file in the root directory.
Other installation messages
- "There doesn't seem to be a wp-config.php file.": Let the installer create it with the "Create a Configuration File" button, or create it by hand from wp-config-sample.php.
- "Requirements Not Met": The PHP or MySQL version on the server is too old. Upgrade PHP in your panel or contact your hosting provider.
- Raw <?php code on the page: PHP isn't running properly. Report it to your hosting provider.
- "Already Installed": Installation has already been completed. Log in at yourdomain.com/wp-login.php. To start from scratch, use an empty database or a different table prefix.
- "Headers already sent" warnings: When wp-config.php was edited, a space was left before the <?php line, a syntax error was introduced, or the file was saved with a BOM.
Frequently asked questions
Is installing WordPress free?
Yes. WordPress is open-source software that you can download free from wordpress.org. What you pay for is the domain name and hosting. You can also buy premium themes or plugins if you want.
How long does it take to install WordPress?
With a one-click installer, it usually takes a few minutes. In a manual install, transferring the files over FTP takes the longest. The database and the installation screen are quick.
Which PHP version does WordPress need?
The recommended version is PHP 8.3 or higher. WordPress runs on PHP 7.4 at minimum. WordPress 7.0 dropped support for PHP 7.2 and 7.3. As of November 2026, choosing PHP 8.3, 8.4 or 8.5 is the safest option for a live site.
Where is wp-config.php, and what if it's missing?
wp-config.php sits in the root directory with the WordPress files, and it isn't included in the downloaded package. If it's missing, the installer creates it for you, or you can rename wp-config-sample.php and enter the database details by hand.
How do I log in to the WordPress dashboard?
Open yourdomain.com/wp-login.php or yourdomain.com/wp-admin/ in your browser. Fill in "Username or Email Address" and "Password", then click "Log In".
How do I install WordPress in another language?
For a manual install, download the localized package from your language's WordPress site (for example tr.wordpress.org/download for Turkish), and the interface comes in that language from the start. In Softaculous, choose the language from the "Select Language" list. In WP Toolkit, choose it in the language setting. With WP-CLI, use the --locale parameter (e.g. --locale=tr_TR).
Can I install WordPress without hosting?
Yes. You can install it on your computer (localhost) or try it in your browser with WordPress Playground. To make the site reachable on the internet, though, you need a domain name and a hosting account.
How do I install WordPress in a subfolder or on a subdomain?
For a subfolder (subdirectory), rename the "wordpress" folder to the name you want (e.g. blog) and upload it inside the root directory. The installation address becomes https://yourdomain.com/blog/wp-admin/install.php. For a subdomain, upload the files to that subdomain's own root directory.
Should I change the table prefix (wp_)?
It isn't required, but if you'll run more than one WordPress site in the same database, give each install a different prefix. Some one-click installers, such as Plesk WP Toolkit, may suggest a prefix other than wp_ in the installation form. Don't change the prefix by hand after installation, or the site will think it isn't installed.
Conclusion
If you follow the right order, a WordPress installation is quick: set up the domain and hosting, enable SSL, then use a one-click installer or the six-step manual install. A site where you set up permalinks, HTTPS, backups and updates from day one causes far fewer problems later. If you get stuck on a step, compare the message on screen with the errors section in this guide. If you're an Oweb customer and can't solve the problem, you can open a support ticket.
