


Speeding up a WordPress site means measuring how fast the site really is, then working through the changes that bring the biggest gains, in order: moving to a supported PHP version, turning on page caching, shrinking images, removing unnecessary plugins and serving static files through a CDN. If you re-measure after every change and keep only the settings that actually help, the site gets faster without breaking.
Quick summary
- Targets: LCP of 2.5 seconds or less, INP of 200 milliseconds or less, CLS of 0.1 or less. Google looks at these values at the 75th percentile of real visits, separately for mobile and desktop.
- INP replaced FID on March 12, 2024; guides that still talk about FID are out of date.
- PageSpeed Insights and Search Console are all you need for measurement; field data covers the last 28 days.
- WordPress.org recommends PHP 8.3 or newer.
- Use only one page caching plugin at a time.
- Lazy loading has been part of WordPress core since version 5.5; it should not be applied to the LCP image.
- Take a backup before changing files, the database or DNS records.
Why does WordPress site speed matter?
On a slow page, visitors wait, and visitors who wait often leave without buying. In the case studies collected by web.dev, Vodafone measured an 8% increase in sales after improving its LCP by 31%, and the BBC reported losing an additional 10% of users for every extra second of load time. These figures belong to those sites and are not a guarantee, but they show the direction.
What are Core Web Vitals? LCP, INP and CLS thresholds
Google summarizes page experience with three metrics called Core Web Vitals:
| Metric | What it measures | Good | Poor |
|---|---|---|---|
| LCP (Largest Contentful Paint) | Loading performance: how long it takes for the largest image, text block or video in the viewport to appear on screen | 2.5 seconds or less | Over 4 seconds |
| INP (Interaction to Next Paint) | Responsiveness: the delay before the screen updates after clicks, taps and key presses | 200 milliseconds or less | Over 500 milliseconds |
| CLS (Cumulative Layout Shift) | Visual stability: how much page elements shift unexpectedly (a unitless score) | 0.1 or less | Over 0.25 |
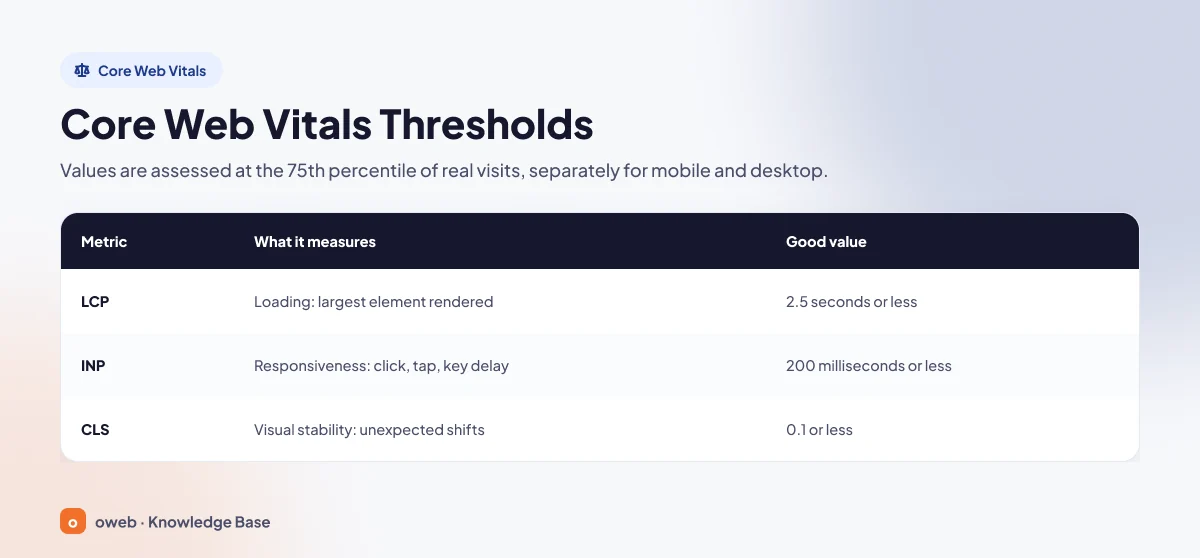
If all three metrics are in the good range at the 75th percentile, the page passes the Core Web Vitals assessment. TTFB, the time until the first byte of the response reaches the browser, is not one of the three, but it is the first part of LCP; the target is 0.8 seconds or less, and anything over 1.8 seconds is considered poor.
As of November 2026, the thresholds in Google's official documentation have not changed. Articles claiming stricter values, such as 150 milliseconds for INP, are not based on any official source.
Does site speed affect Google rankings?
Yes, but it is not decisive on its own. Google states that Core Web Vitals are used by its ranking systems; Google's page experience documentation also says that good scores do not guarantee top positions and that relevance of content comes first. Speed will not rescue weak content, but it can make a difference between pages of similar quality.
How do you measure WordPress site speed?
Three free tools are enough for a WordPress speed test: PageSpeed Insights shows the page's lab score and real-user data from the last 28 days (LCP, INP, CLS, TTFB); the Search Console Core Web Vitals report groups the same field data across the whole site; and the WordPress Site Health screen reports caching and PHP issues. WordPress speed optimization without measurement is just guesswork.
PageSpeed Insights and Lighthouse
PageSpeed Insights at pagespeed.web.dev shows two kinds of data. The top section is real-user data from the last 28 days, taken from the Chrome User Experience Report (CrUX); if the page does not get enough visits, data for the whole site is shown instead, and if the site as a whole does not have enough data either, this section stays empty. The bottom section is a lab result produced by Lighthouse loading the page on a single device under fixed network conditions.
A PageSpeed Insights score of 90-100 in the lab section is considered good, 50-89 “needs improvement” and 0-49 poor. The result can vary by a few points from test to test; look at the trend across several runs rather than a single measurement.
Search Console Core Web Vitals report
The Core Web Vitals report in Search Console shows the same field data across the whole site. It groups similar pages into URL groups and labels each group Good, Need improvement or Poor, separately for mobile and desktop. After fixing an issue, clicking the Validate fix button starts a 28-day monitoring period.
The difference between lab data and field data
A lab test runs in a controlled environment, usually with an empty cache and no real interaction; field data comes from real visitors on different devices and connections. According to the web.dev guide to lab and field data, Google recommends using field data to prioritize and lab data to debug.
Because INP requires real user interaction, it cannot be measured in the lab; Total Blocking Time (TBT) is tracked instead. This difference is also the usual reason behind “my site is fast for me but my score is low”: the mobile test simulates a fixed environment that is often slower than your own device and connection.
WordPress Site Health screen
The Status tab under Tools > Site Health in the admin dashboard reports an outdated PHP version, the status of page caching and persistent object caching, and oversized autoloaded options (autoload data). The page cache test considers a server response time under 600 milliseconds acceptable.
Run your tests while logged out or in a private window. Logged-in users do not see the public page cache served to visitors, and the admin toolbar loads extra files, so the result will not reflect what visitors see.
Why do WordPress sites load slowly?
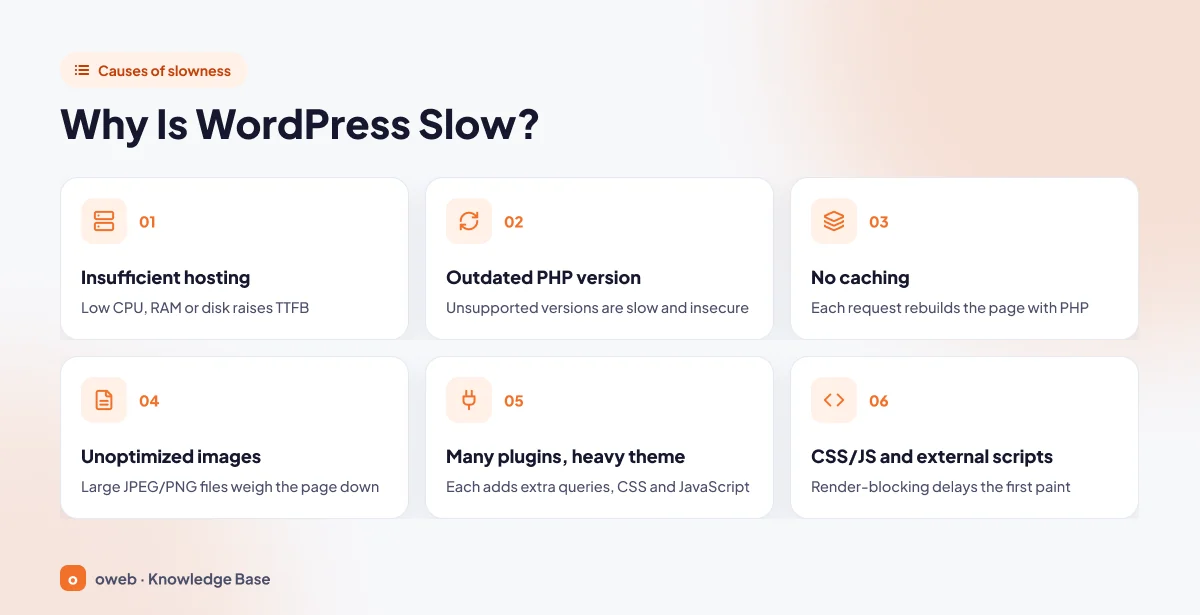
Behind the complaint “WordPress is slow” there is usually one or more of these six causes:
- Insufficient hosting resources: If CPU, RAM and disk are not enough, server response time (TTFB) goes up.
- Outdated PHP version: Versions that are no longer supported are both slower and less secure.
- No caching: Every visit makes PHP and the database build the page from scratch.
- Unoptimized images: Large, uncompressed JPEG and PNG files weigh the page down.
- Too many plugins and a heavy theme: Each one brings extra queries, CSS and JavaScript.
- Render-blocking CSS/JS and third-party scripts: Ads, analytics, embeds and external fonts delay the first paint.
A database that bloats over time (revisions, expired transients, growing autoload data) also belongs on this list. You can work out which cause applies to you from your measurement results:
| Symptom | Likely cause | Where to start |
|---|---|---|
| High TTFB (over 0.8 seconds) | No page cache, outdated PHP, insufficient resources, bloated database | Steps 2, 3 and 8 |
| High LCP (over 2.5 seconds) | Large hero image, render-blocking CSS, high TTFB | Steps 3, 4 and 7 |
| High INP (over 200 milliseconds) | Heavy JavaScript, page builder overhead, third-party scripts | Steps 5, 7 and 10 |
| High CLS (over 0.1) | Images and embeds without dimensions, late-loading fonts | Steps 4 and 10 |
Steps to speed up a WordPress site
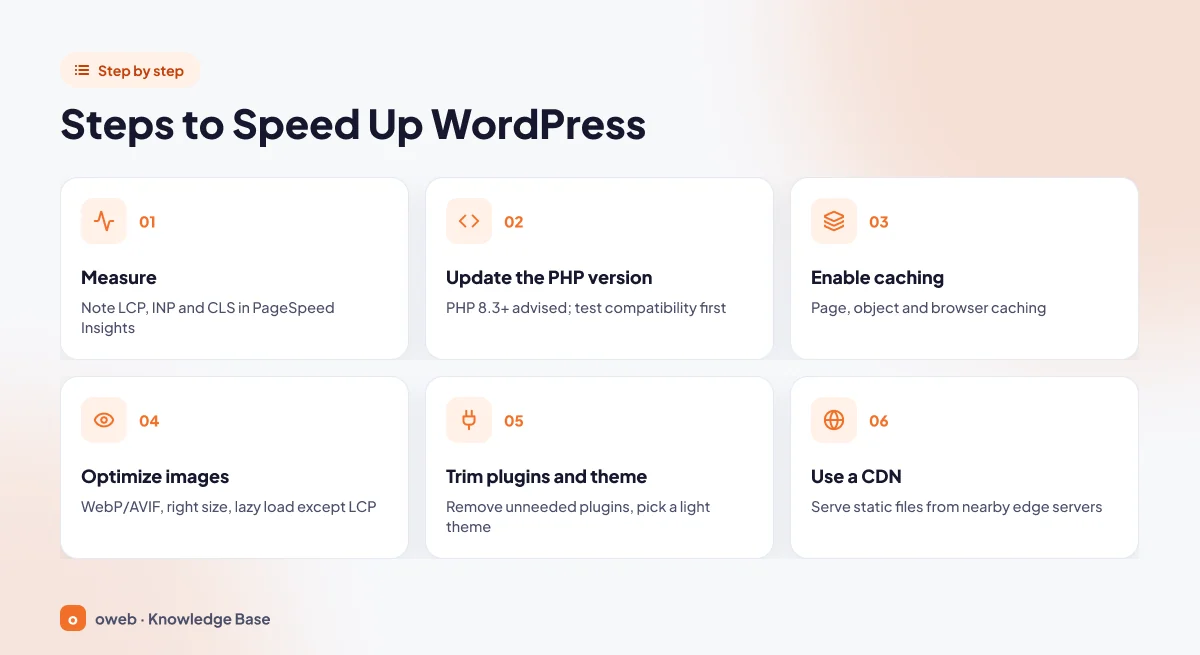
The steps are ordered from the simplest and safest to the most advanced. The first six steps shown in the image below are the fundamentals, and most of the gain usually comes from them. Steps 7-10 are fine-tuning.
| Step | Metric it improves most | Difficulty | Risk |
|---|---|---|---|
| 1. Measurement | Baseline for all metrics | Easy | None |
| 2. PHP version and hosting resources | TTFB | Easy | Medium (compatibility testing needed) |
| 3. Caching | TTFB, LCP | Easy | Low (dynamic pages must be excluded) |
| 4. Images | LCP, CLS | Easy | Low |
| 5. Plugins and theme | TTFB, INP | Medium | Medium (features may be lost) |
| 6. CDN | LCP, TTFB | Medium | Medium (DNS change required) |
| 7. CSS and JavaScript | LCP, INP | Medium | High (layout may break) |
| 8. Database | TTFB | Medium | Medium (backup essential) |
| 9. Compression, HTTP/2 and HTTP/3 | LCP | Easy | Medium (.htaccess errors) |
| 10. Fonts, Heartbeat, third-party scripts | CLS, INP | Medium | Low |
Before you begin, take a full backup of your files and database. If possible, try changes on a staging copy first.
1. Measure your current performance
Run the test in PageSpeed Insights on the mobile tab; Google evaluates the mobile result separately. For the homepage, a blog post and, if you have one, a product page, write down LCP, INP, CLS and TTFB if field data is available; if not, note the lab score along with LCP, CLS and TBT. You will compare every following step against this record.
2. Update your PHP version and review hosting resources
WordPress generates every page with PHP, so the PHP version and server resources are the foundation for every other setting. The WordPress.org requirements page recommends PHP 8.3 or higher, MariaDB 10.11+ or MySQL 8.4+, and HTTPS support.
As of November 2026, according to the php.net support schedule, support for PHP 8.2 ends on December 31, 2026; 8.3 receives security fixes only; 8.4 is in active support until the end of the year, and 8.5 until the end of 2027. PHP 8.6, released on November 19, 2026, is not yet listed in WordPress's compatibility table, so there is no need to rush a live site onto it. If your plugins and theme are compatible, 8.4 or 8.5 is the practical choice.
- Take a backup first, then update WordPress, your theme and your plugins.
- Select the new version in your hosting control panel; the steps are explained in the how to change PHP version and how to change the WordPress PHP version guides.
- Test the front end, the admin dashboard, forms and the checkout flow; if you see errors, switch back to the previous version.
OPcache should also be enabled. It keeps compiled script bytecode in shared memory, so PHP files are not recompiled on every request. You can ask your hosting provider whether it is enabled; Oweb customers can open a support ticket.
If TTFB is still consistently above 0.8 seconds with page caching on, unnecessary redirects removed and the database cleaned up, the cause may be a resource limit (CPU, RAM, disk). In that case you may need a more powerful WordPress hosting plan or a dedicated server; you can read about the differences in what a server is and the types of servers. No plugin can make up for insufficient resources.
3. Enable caching at the right layers
Caching means storing a result once it has been generated and serving it on later requests without generating it again. Each of the four layers stores something different:
| Cache type | What it stores | Effect |
|---|---|---|
| Page cache | Static copies of generated HTML pages | Pages are served without running PHP or the database; TTFB drops |
| Object cache (Redis / Memcached) | Database query results and transients (persistent, in memory) | Database load drops; effective on dynamic pages such as the admin dashboard, membership areas and ecommerce |
| Browser cache | Image, CSS, JavaScript and font files (on the visitor's device) | Files are not downloaded again on repeat visits |
| CDN cache | Copies of static files on edge servers close to the visitor | Distance-related latency and origin server load drop |
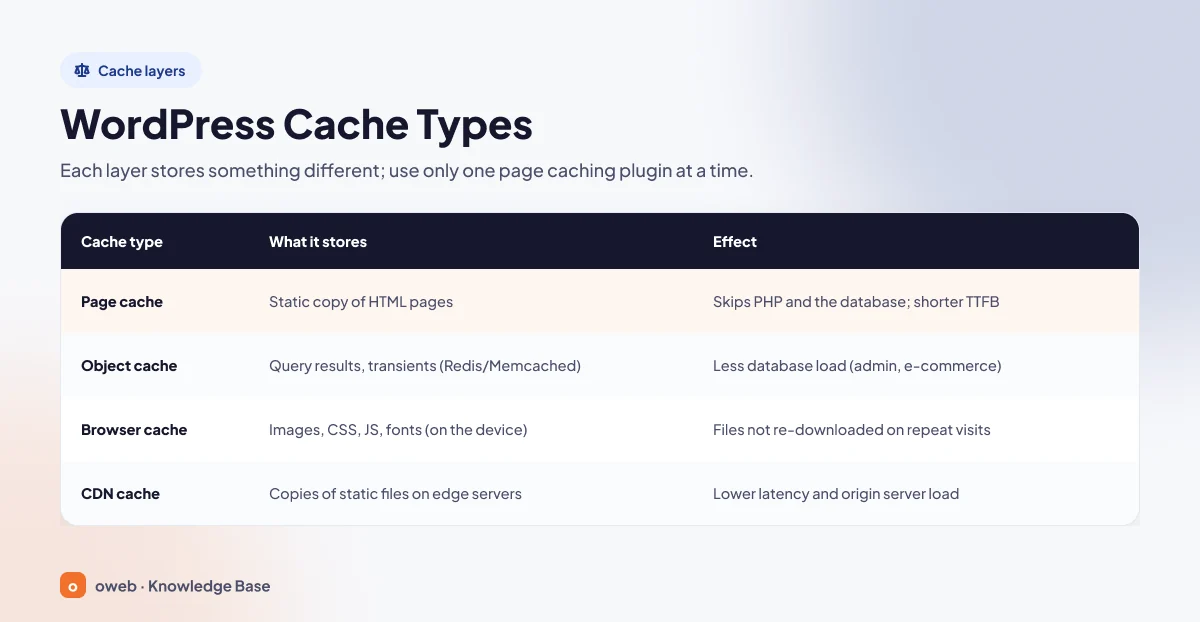
The first three layers are covered below; CDN caching is covered in step 6.
Page cache
The single biggest gain usually comes from here: a WordPress caching plugin stores static copies of your pages and serves them without running PHP or the database. The WordPress caching guide lists W3 Total Cache, WP Super Cache and Cache Enabler as examples. LiteSpeed Cache, on the other hand, only performs page caching on LiteSpeed server products or with the QUIC.cloud CDN; on other servers only its optimization features work.
- Cart, checkout and account pages, as well as logged-in users, should be kept out of the public page cache served to visitors.
- The
define( 'WP_CACHE', true );line inwp-config.phpdoes not enable caching on its own; it only makes WordPress load thewp-content/advanced-cache.phpfile created by the plugin.
LiteSpeed Cache settings: a safe starting point
If your server runs LiteSpeed, you can follow this order using the settings in the LiteSpeed Cache documentation:
- Deactivate any other page caching plugins first.
- On the Cache > Cache tab, check that Enable Cache is turned on (default: ON).
- Default Public Cache TTL on the Cache > TTL tab is 604800 seconds (one week) by default; most sites do not need to change it.
- Check that personalized pages such as cart, checkout and account are excluded from caching on the Cache > Excludes tab.
- Turn on the Cache > Object tab only if your hosting provider offers Redis or Memcached (default: OFF).
- Turn on Browser Cache on the Cache > Browser tab (default: OFF; default lifetime one year).
- Turn on the Page Optimization options one at a time, as described in step 7.
Object cache (Redis / Memcached)
WordPress's object cache is not persistent by default; the data only lives for the duration of that request. When it is made persistent with Redis or Memcached, query results and transients are kept in memory. The effect is most noticeable in the admin dashboard, on membership sites and on dynamic sites such as WooCommerce stores; on a small brochure site it is limited.
This requires a Redis or Memcached service running on the server; the plugin only connects to that service. Which one you use is usually decided by what your hosting provider offers.
Browser cache
Browser caching lets static files be stored on the visitor's device. On Apache, you enable it with mod_expires rules added to the .htaccess file:
# Browser caching (mod_expires)
<IfModule mod_expires.c>
  ExpiresActive On

  # Images
  ExpiresByType image/jpeg "access plus 1 year"
  ExpiresByType image/png "access plus 1 year"
  ExpiresByType image/gif "access plus 1 year"
  ExpiresByType image/webp "access plus 1 year"
  ExpiresByType image/avif "access plus 1 year"
  ExpiresByType image/svg+xml "access plus 1 year"

  # CSS and JavaScript
  ExpiresByType text/css "access plus 1 month"
  ExpiresByType text/javascript "access plus 1 month"
  ExpiresByType application/javascript "access plus 1 month"
</IfModule>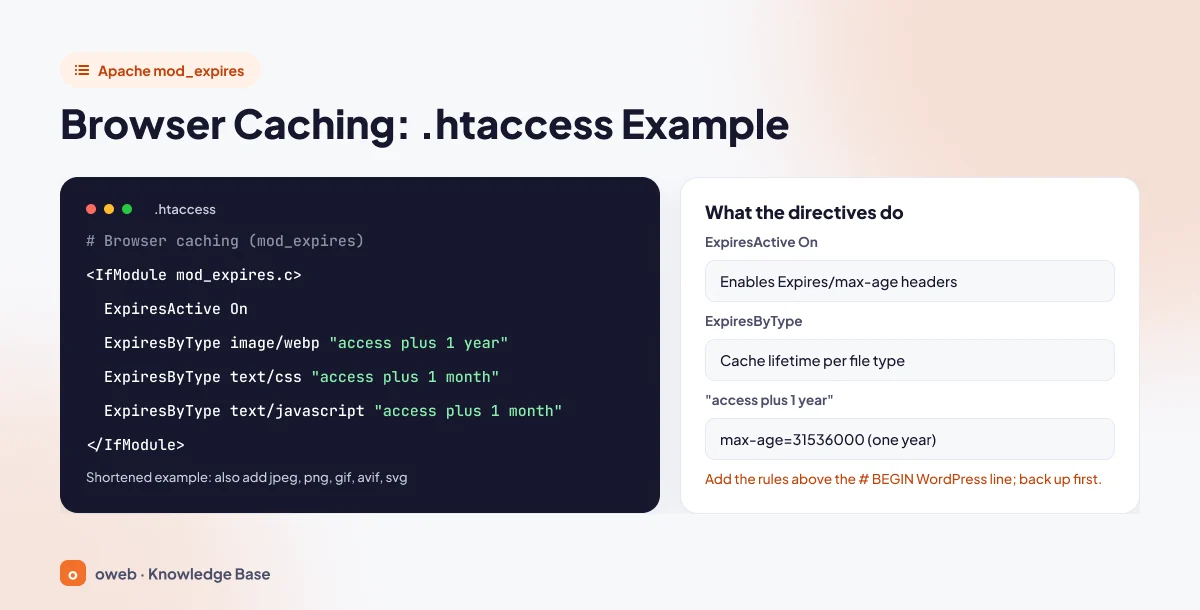
<IfModule mod_expires.c>: The rules only run if the module is loaded.ExpiresActive On: Enables generation of theExpiresandCache-Control: max-ageheaders (default: Off).ExpiresByType: Sets how long a file type is cached, counted from the time of access; “1 year” meansmax-age=31536000.
Add the rules above the # BEGIN WordPress line; WordPress rewrites everything between the two marker lines (BEGIN and END WordPress). ExpiresDefault was deliberately left out: it applies to every type, including HTML, which can cause visitors to see an old version of a page. WordPress adds a ?ver= version parameter to CSS and JS URLs; when the version changes, the browser downloads the file again. A CSS file you edit by hand without changing the version, however, may keep appearing in its old form for up to a month; likewise, upload any image you replace under a new file name.
Verify the result from an image's response headers: in your browser's Developer Tools, select the file on the Network tab and look at the Response Headers section, or use the command below. Images show cache-control: max-age=31536000 and expires; for CSS and JS files the lifetime is one month.
curl -I https://yourdomain.com/wp-content/uploads/example.webpIf the headers do not appear at all, mod_expires is not loaded or the server does not allow these directives in .htaccess (AllowOverride Indexes); check with your hosting provider. If the response already carries an Expires header (for example, one sent by a plugin or script), mod_expires does not change it. If they are missing only on WebP or AVIF files, the server may not recognize those extensions; add these two lines at the top of the block:
AddType image/webp .webp
AddType image/avif .avif
On a LiteSpeed server, the same job is done from the Cache > Browser tab described above. Nginx does not read .htaccess files; there, these lifetimes are defined in the server configuration, so on shared hosting check with your provider.
Download a copy of the .htaccess file before editing it. A single faulty line can cause a 500 error across the whole site; restoring the old copy via the file manager or FTP fixes the problem.
4. Optimize your images
According to web.dev, images account for roughly half of the data transferred on a typical (median) page. That is why image optimization is, on most sites, the most noticeable gain after caching.
Use WebP and AVIF
WordPress has supported the WebP format since version 5.8 and AVIF since version 6.5. According to the developer notes, WebP files are on average about 30% smaller than their JPEG or PNG equivalents, and AVIF files can be up to 50% smaller than a JPEG of the same quality. You can see what your server supports under Tools > Site Health > Info > Media Handling.
With default settings, WordPress does not automatically convert the JPEG files you upload to WebP or AVIF. For conversion you need the Modern Image Formats plugin from the Performance Team's Performance Lab project or an image optimization plugin.
Upload images at the size they are displayed
Uploading a 4000-pixel photo for an area that is 800 pixels wide is wasteful; resize the image to the largest size it will actually be displayed at. Every img tag should have width and height attributes, so the browser reserves space and the page does not shift.
Lazy loading and the LCP image
You do not need a plugin for lazy loading: since version 5.5, WordPress adds loading="lazy" to images that have width and height values, and since version 6.3 it also gives the image most likely to be the LCP element fetchpriority="high" and does not defer images visible on the first screen. If an optimization plugin also applies lazy loading to your hero image or logo, exclude those images; according to the web.dev LCP optimization guide, deferring the LCP image directly increases LCP time.
5. Remove unnecessary plugins and use a lightweight theme
What matters is not the number of plugins but what each plugin does: a single heavy plugin that loads scripts on every page can add more load than twenty small plugins. The WordPress optimization guide recommends deleting unnecessary plugins and using a lightweight theme.
- Delete plugins and themes you do not use; for WordPress security, this also shrinks the attack surface.
- Reduce plugins that do the same job down to one.
- Temporarily deactivate a plugin you suspect and measure the same page again.
Keeping WordPress up to date also improves speed: version 6.8 added speculative loading to core, and version 6.9 made classic themes load block styles only when they are needed.
6. Use a CDN
A CDN (content delivery network) stores your static files on edge servers in different geographic locations and serves them from the point closest to the visitor, reducing latency and the load on your origin server. When setting up a WordPress CDN, keep the following in mind:
- According to Cloudflare's default cache behavior, static files are cached based on their file extension; HTML pages are not.
cf-cache-status: HITshows that the file came from an edge server;DYNAMICis normal for HTML. - If HTML is not cached at the edge, a CDN alone may not lower the page's TTFB and may even increase it slightly; solutions such as Cloudflare APO serve the page itself from the edge as well.
- The CDN and the page cache are separate layers; purge both when you update content.
- Switching usually requires changing nameservers or DNS records; export a list of your current DNS records first.
7. Minify and defer CSS and JavaScript
The browser does not render the page until it has processed the stylesheets in the head and any scripts without a defer or async attribute. The Eliminate render-blocking resources warning in PageSpeed Insights describes exactly this situation. Heavy JavaScript is also one of the main causes of a high INP.
- Minification: Removes whitespace and comments; the risk is low, so it is the first setting to turn on.
- Defer: Runs scripts in order after the HTML has been parsed;
asyncdoes not guarantee order. - Reducing unused CSS: Effective, but the setting most likely to break your layout.
- Combining files: Less useful now, because HTTP/2 and HTTP/3 download many files in parallel over a single connection.
These settings are in the optimization section of caching plugins (Page Optimization in LiteSpeed Cache). Turn the options on one at a time; after each one, purge the cache and test the menu, forms and cart in a private window. If something breaks, turn that option off.
How do you improve INP?
When INP is high, the cause is usually JavaScript that keeps the browser busy for long periods. Remove heavy plugins and third-party scripts that add no value, load the rest with defer, and cut down the scripts that page builders, sliders and similar components load on every page. Because INP requires real interaction, track Total Blocking Time (TBT) in the lab and confirm the result in field data.
8. Clean up the WordPress database
As the database bloats, queries get heavier and TTFB increases. Three items stand out:
- Revisions: According to the WordPress revisions documentation, all revisions of every post are kept by default. The
WP_POST_REVISIONSconstant below limits the number of revisions stored; older revisions are deleted the next time the post is updated. - Transients: Temporary data with an expiry is stored in the
wp_optionstable by default, and expired entries are cleaned up only occasionally. - Autoload data: Made up of options loaded into memory on every request. WordPress recommends keeping this data under 800 KB; once the limit is exceeded, Site Health shows a critical warning. The excess usually comes from options left behind by removed plugins; when deleting plugins you no longer use, clean up their data too, and if you are unsure, ask your hosting support for help.
Add the revision limit to the wp-config.php file. Download a copy of the file first; write the line with straight quotes, before the line that loads wp-settings.php (before the “stop editing” comment near the end of the file). If the site does not load, restore the copy.
define( 'WP_POST_REVISIONS', 5 );Take a database backup first. If you have WP-CLI access, you can delete all expired transients at once with the wp transient delete command:
wp transient delete --expiredIf you do not have WP-CLI, the database section of your caching plugin (Database in LiteSpeed Cache) performs a similar cleanup.
9. Check compression and HTTP/2 and HTTP/3 support
When HTML, CSS and JavaScript are sent compressed, the amount of data transferred shrinks noticeably; Brotli usually produces smaller output than GZIP. Check the current state first: in your browser's Developer Tools, select a request on the Network tab and look at the content-encoding line under Response Headers; if it says br or gzip, compression is on.
If it is off and mod_deflate is loaded on Apache, the following rule enables compression via .htaccess. Because the AddOutputFilterByType directive is provided by the mod_filter module, the rule is wrapped in two conditions. Take a copy of the file first and, again, add the block above the # BEGIN WordPress line:
<IfModule mod_deflate.c>
  <IfModule mod_filter.c>
    AddOutputFilterByType DEFLATE text/html text/plain text/xml text/css text/javascript application/javascript
  </IfModule>
</IfModule>
After adding it, check the content-encoding line again; if the site returns a 500 error, restore the old copy.
HTTP/2 and HTTP/3 use the connection more efficiently; because HTTP/3 runs over QUIC, it helps especially on mobile connections with packet loss. Browsers use both only over HTTPS, and neither can be enabled via .htaccess:
- On Apache, HTTP/2 requires the
Protocols h2 http/1.1directive in the server configuration; on shared hosting, the provider handles this setting. - QUIC on LiteSpeed Web Server is enabled by default; a trusted SSL certificate and an open UDP port 443 are required.
- In Cloudflare, the HTTP/3 setting is under Speed > Settings > Protocol Optimization.
10. Optimize fonts, Heartbeat and third-party scripts
- Fonts: Following the web.dev font best practices, use WOFF2, reduce the number of families and weights, and consider hosting the files on your own server.
font-display: swapshows text immediately; if the font swap causes layout shift, try theoptionalvalue. If you create a subset, check that the special characters your content needs (such as accented letters) remain in it. - Heartbeat API: According to the Heartbeat API documentation, while the admin dashboard is open, the browser sends a request to the server every 15-120 seconds; autosave and post locking depend on it. Rather than turning it off completely, reduce its frequency; in LiteSpeed Cache, this setting is on the Toolbox > Heartbeat tab. After the change, check that autosave still works in the post editor.
- Third-party scripts: Remove analytics, advertising and live chat scripts and social media embeds that do not earn their keep; load the rest with
asyncordefer, and load embedded videos and maps withloading="lazy".
How do you reduce CLS?
- Give every
imgandiframetag awidthandheightvalue. - Reserve space on the page in advance for ads and embeds, so text is not pushed down when the content arrives.
- If the font swap shifts text, try
font-display: optional.
Re-measure after every change
The rule is simple: one change at a time. If you turn on ten settings at once, you will not know which one helped.
- Make the change and purge every cache layer.
- Open the page in a private window and check the layout and functionality.
- Test the same pages for mobile in PageSpeed Insights at least three times.
- If there is no gain or something breaks, undo the change.
Lab results reflect a change immediately; field data, however, covers the last 28 days, so the Search Console report and the top section of PageSpeed Insights improve gradually. You can tell a setting is in effect from these signs:
| Change | How to verify |
|---|---|
| Page cache | The Page Cache test on the Site Health screen; the x-litespeed-cache: hit header on LiteSpeed |
| Browser cache | cache-control: max-age and expires headers on a static file |
| Compression | content-encoding: br or gzip |
| CDN (Cloudflare) | cf-cache-status: HIT on a static file |
| HTTP/3 | h3 in the alt-svc response header |
Common mistakes when speeding up WordPress
- More than one caching plugin: Two page caching plugins try to manage the same pages, which can lead to stale content and a broken layout. The LiteSpeed installation documentation also asks you to deactivate other page caching plugins first.
- Over-optimization: Applying lazy loading to the LCP image, giving many images
fetchpriority="high"or preloading lots of fonts backfires. You do not need to chase a score of 100; meeting the Core Web Vitals thresholds is enough. - Turning on every CSS/JS option at once: When the site breaks, it becomes hard to find the setting responsible.
- Testing only on desktop and while logged in: Google evaluates mobile and desktop separately, and visitors arrive without being logged in.
Frequently asked questions
What should my PageSpeed Insights score be?
A score of 90 or above is considered good, but the real goal is to pass the Core Web Vitals assessment in field data. It is normal for the mobile score to be lower than desktop, because the mobile test simulates a fixed environment that is often slower than your own device and connection.
What is the best caching plugin for WordPress?
There is no single “best”; the right plugin is the one that suits your server. On a LiteSpeed server, use LiteSpeed Cache; on Apache or Nginx, WP Super Cache, W3 Total Cache or Cache Enabler are good choices. Whichever you pick, keep only one active. No single WordPress speed optimization plugin solves everything; the PHP version, images and hosting resources also determine the result.
Do too many plugins slow down WordPress?
What matters is not the number but the amount of queries, CSS and JavaScript each plugin loads on every page. You can see a plugin's impact by temporarily deactivating it and measuring the same page again.
Should lazy loading be applied to the LCP image?
No; deferring the LCP image delays its loading. Since 6.3, WordPress gives this image fetchpriority="high" and does not defer images on the first screen; if a plugin overrides this behavior, exclude the image.
Redis or Memcached?
Both provide a persistent object cache; for WordPress, what matters is which service your hosting provider offers. In LiteSpeed Cache, the method on the Cache > Object tab defaults to Memcached, and Redis can be selected as well.
Does HTTP/3 make a site faster?
It uses the connection more efficiently, especially on mobile connections with packet loss, but it is no substitute for caching and image optimization. In Cloudflare, HTTP/3 only applies between the visitor and Cloudflare; it does not affect the connection to your origin server.
Can you speed up WordPress without plugins?
Largely, yes. Upgrading PHP, resizing images before uploading, deleting unused plugins, and enabling browser caching and compression via .htaccess do not require plugins. Page caching, however, needs either a plugin or server-level caching.
What is TTFB and how do you reduce it?
TTFB is the time from the moment navigation to the page starts until the first byte of the response reaches the browser; it includes redirects, the DNS lookup, connection and TLS setup, and the time the server takes to prepare the response. To reduce TTFB, turn on page caching, update PHP, clean up the database and remove unnecessary redirects, in that order. If it is still over 0.8 seconds, review your hosting resources.
When does Search Console update after speed improvements?
Because the report is based on 28 days of field data, improvements appear gradually; the Validate fix action also starts a 28-day monitoring period.
What should you do if the site breaks after optimization?
Turn off the last setting you enabled and purge the cache. If you cannot log in to the admin dashboard, deactivate the plugin causing the problem by renaming its folder via the file manager or FTP. If the problem comes from a caching plugin, also rename the advanced-cache.php and object-cache.php files in the wp-content folder and remove the WP_CACHE line from wp-config.php. For a 500 error caused by .htaccess, restore the backup file. If none of this works, roll back to the backup you took at the start.
Conclusion
Improving WordPress site speed is not achieved with a single plugin but with steps taken in the right order: measurement, PHP and resources, caching, images, plugins and theme, CDN, then fine-tuning. If you re-measure after every step and undo what does not help, you can pass the Core Web Vitals assessment without breaking your site.
Server-side settings such as the PHP version, OPcache, Redis or HTTP/3 vary by hosting environment; if you are an Oweb customer, you can find out which ones are available on your account by opening a support ticket. The thresholds, versions and setting names in this guide are based on the official documentation at the time of writing (November 2026) and may change in later releases.
