


To set up email in Outlook, have your email address, password and your provider's incoming (IMAP 993 or POP3 995) and outgoing (SMTP 465 or 587) server details ready. Then open the add account screen in Outlook (File > Add Account in classic Outlook) and enter your address. If automatic setup fails, enter these details manually to finish adding the account.
In short: Outlook email settings at a glance
- Classic Outlook path: File > Add Account. For manual setup, check "Let me set up my account manually" under "Advanced options".
- New Outlook path: View > View settings (or File > Account info) > Accounts > Your accounts > Email accounts > Add account.
- Recommended encrypted ports: IMAP 993 (SSL/TLS), POP3 995 (SSL/TLS), SMTP 465 (SSL/TLS) or SMTP 587 (STARTTLS).
- The username is usually your full email address, and authentication must be enabled for the outgoing server.
- If you check your email from more than one place, such as a phone, a computer or webmail, choose IMAP; POP3 downloads messages to a single computer.
- Do not check the Secure Password Authentication (SPA) box unless your provider specifically requires it.
- The new Outlook for Windows syncs IMAP and POP3 accounts through the Microsoft Cloud; the new Outlook for Mac may offer a similar sync option.
The menu names in this guide are based on Microsoft's official support documentation as of November 2026; interface updates may introduce minor differences.
Information to prepare before setup
When Outlook cannot find your account settings on its own, it asks you for the server details. Writing these down before you start largely prevents abandoned attempts and errors caused by the wrong port. For Outlook's incoming and outgoing server settings, you need the following:
- Email address: For example, [email protected].
- Username: With most hosting services, this is your full email address. If your provider gives you a different username, use that instead.
- Password: The password of the email account. It is case-sensitive.
- Incoming mail server: The name and port of the IMAP or POP3 server.
- Outgoing mail server: The name and port of the SMTP server.
- Encryption type: SSL/TLS (implicit TLS) or STARTTLS.
This article uses mail.yourdomain.com as the example server name. Always get the actual server name from your email provider or hosting control panel, as it can differ from provider to provider.
Outlook IMAP, POP3 and SMTP settings table
The ports below are based on the RFC 8314 standard, which defines encrypted connections for email clients, and on the secure settings recommended by cPanel.
| Server type | Port | Encryption |
|---|---|---|
| IMAP (incoming) | 993 | SSL/TLS (implicit TLS) |
| POP3 (incoming) | 995 | SSL/TLS (implicit TLS) |
| SMTP (outgoing) | 465 | SSL/TLS (implicit TLS) |
| SMTP (outgoing) | 587 | STARTTLS |
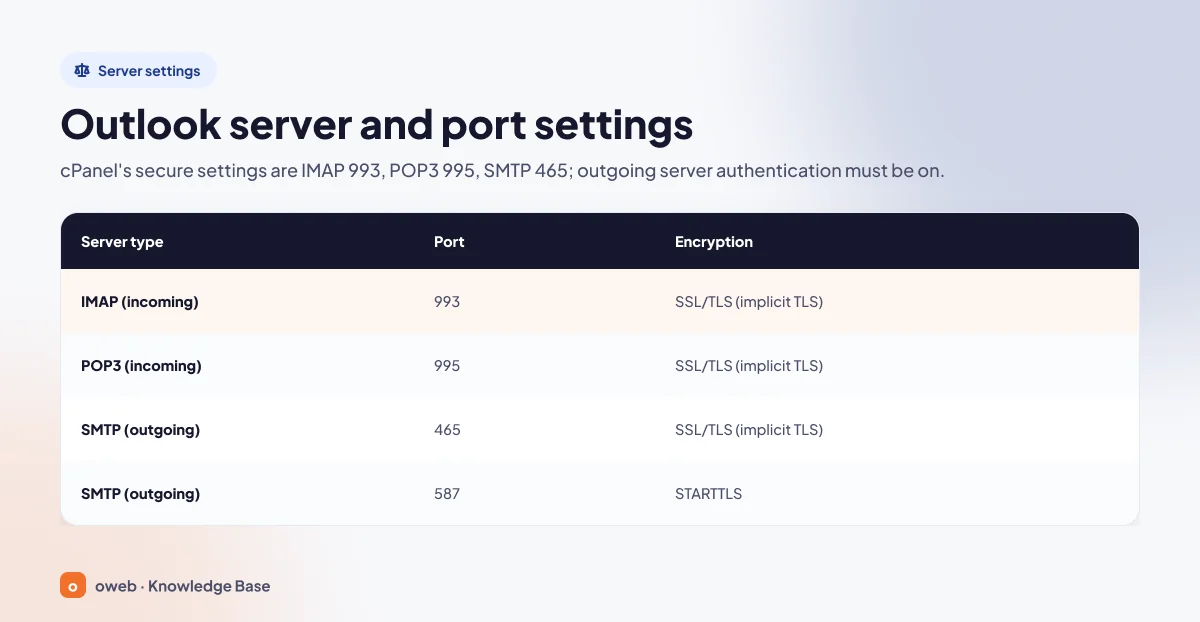
On ports 993, 995 and 465, the TLS handshake starts as soon as the connection opens, so your password and messages are encrypted from the very first moment. On port 587, the connection first opens in plain text and is then upgraded to an encrypted one with the STARTTLS command. RFC 8314 recommends supporting both 465 (implicit TLS) and 587 (STARTTLS) during the transition period; it notes that there is no meaningful security difference between the two when both are implemented correctly and TLS is enforced, and asks servers to give priority to implicit TLS when advertising the service. Ports 143 (IMAP) and 110 (POP3) used without encryption are not recommended; cPanel also lists them under its non-SSL settings and does not recommend them. When these ports are used without encryption, your password travels across the network in plain text.
Where do you find your server details?
If your hosting service uses cPanel, the correct details are listed ready to use in the panel. According to the cPanel documentation, the path is as follows:
- In cPanel, open the Email Accounts page in the Email section.
- Click the Connect Devices link next to the account.
- On the Set Up Mail Client page that opens, note the values under the "Secure SSL/TLS Settings" heading.
Depending on the status of the SSL certificate, the incoming server name on this page may be a name tied to your domain (such as mail.yourdomain.com) or the server's own hostname. Use whichever one is shown; changing this value can trigger a certificate warning. Your hosting provider may have disabled this screen; in that case, ask the support team for the details directly.
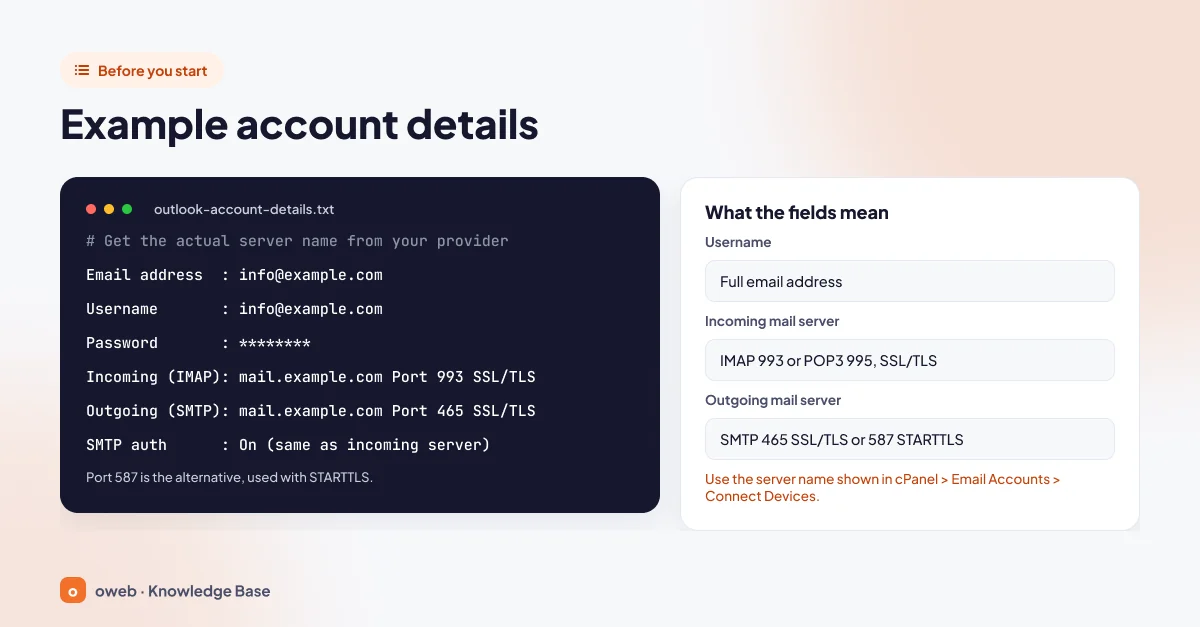
Before you start, we recommend collecting all the details in a single note like the one below:
Email address : [email protected]
Username      : [email protected]
Password      : ********
Incoming (IMAP): mail.yourdomain.com  Port 993  SSL/TLS
Incoming (POP3): mail.yourdomain.com  Port 995  SSL/TLS
Outgoing (SMTP): mail.yourdomain.com  Port 465  SSL/TLS
SMTP authentication: On (same details as incoming server)
If you do not have an email address yet, you need to create the account first; see our guide to creating a business email account for the steps.
Some older setup guides tell you to check the "Require logon using Secure Password Authentication (SPA)" box. SPA is a Microsoft-specific authentication method. Microsoft's troubleshooting page recommends leaving the "Require logon using Secure Password Authentication (SPA)" box unchecked if classic Outlook does not ask for a password when you add an IMAP account. If you are prompted for your password repeatedly, it advises checking that Caps Lock is off, that you entered your full email address as the username, and whether your password has changed or expired, and then updating the password in Outlook. Leave this box unchecked unless your provider explicitly requires it; otherwise Outlook may keep asking for your password or fail to connect.
Should you choose IMAP or POP3?
For a detailed comparison, see our article on the differences between IMAP and POP3; in short:
- IMAP: Messages stay on the server, and Outlook only downloads the messages you open. Read status, folders and sent items look the same on every device. If you use a phone, a laptop and webmail together, this is the right choice.
- POP3: New messages are downloaded to a single computer and are usually deleted from the server (this depends on Outlook's setting for leaving a copy on the server). Afterwards, messages are usually accessible only from that computer, and sent items are also stored locally. Even if a copy is left on the server, folders and read status are not synced between devices, so it is not suitable for multi-device use.
According to Microsoft, when you need to add an account manually using advanced setup, you will usually choose IMAP as the account type; IMAP is recommended if you access your email from more than one device. Choose POP3 only if you work from a single computer, your server quota is very low, or you deliberately want to archive messages locally. If you use POP3, remember to back up that computer regularly; if the disk fails, your messages may not exist anywhere else.
Where do you add an account in each version of Outlook?
There are four common versions of Outlook, and the add account menu is in a different place in each one. First identify the version you use, then go to the relevant section below.
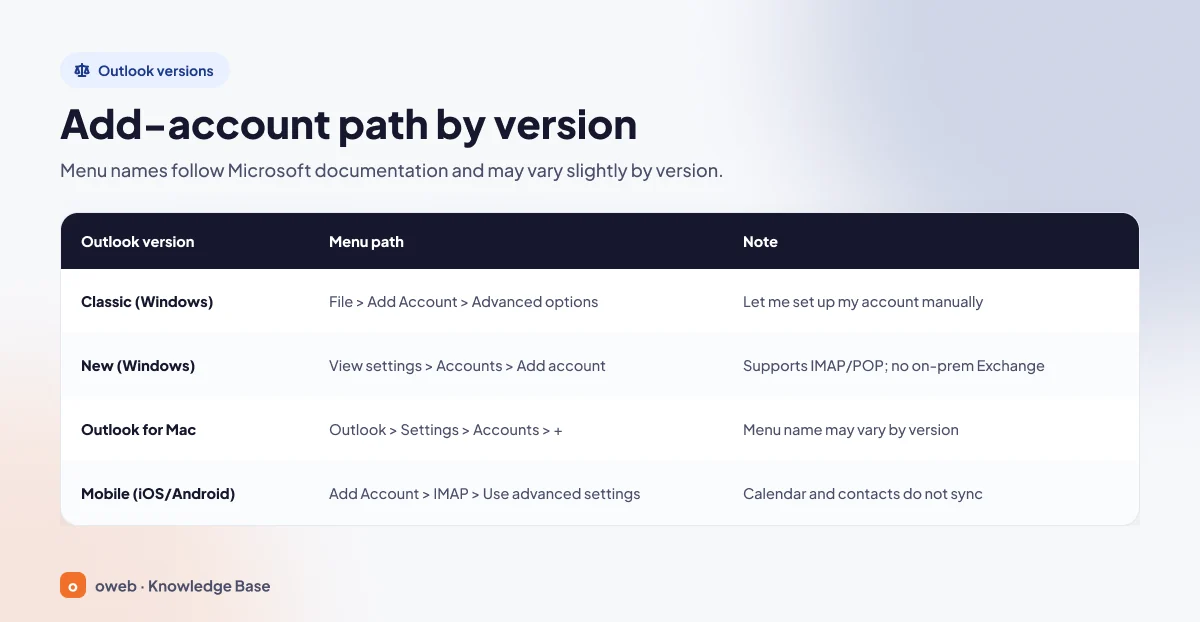
| Outlook version | Menu path | Note |
|---|---|---|
| Classic Outlook (Windows) | File > Add Account > Advanced options > Let me set up my account manually | Server details for IMAP/POP are entered manually |
| New Outlook (Windows) | View > View settings > Accounts > Your accounts > Add account | Gmail, Yahoo, iCloud, IMAP and POP are supported; on-premises Exchange is not |
| Outlook for Mac | Outlook > Settings > Accounts > + (add account option) | Some providers such as Gmail and Yahoo may ask you to grant access; menu names may vary by version and language |
| Mobile (iOS/Android) | Settings > Add Account > Add Email Account > IMAP > advanced settings option (menu names may vary by version) | Only email is synced; calendar and contacts are not |
How do you set up email in classic Outlook?
Classic Outlook is the Windows desktop app that comes with Microsoft 365 and Office suites. In this version, you can add an email account to Outlook in two ways: automatically or manually. The menu names below are taken from Microsoft's support pages; you may see minor differences depending on your version.
Automatic setup (the easiest way)
- From the File menu, select Add Account.
- Enter your email address and click "Connect".
- If prompted, enter your password, then click "OK" and "Finish" to complete the process.
Automatic setup relies on the autodiscover (automatic configuration) information published by your email provider. If the provider does not publish this information, or the information is incomplete, Outlook cannot find the correct settings; this is one possible reason why automatic setup fails on shared hosting. If setup fails, or Outlook adds the account as a type you did not want (for example, POP3 instead of IMAP), switch to manual setup.
Manual setup (advanced options)
For business email accounts, manual setup is the most reliable method because you decide the account type, ports and encryption yourself. Setting up business email in Outlook takes the following steps:
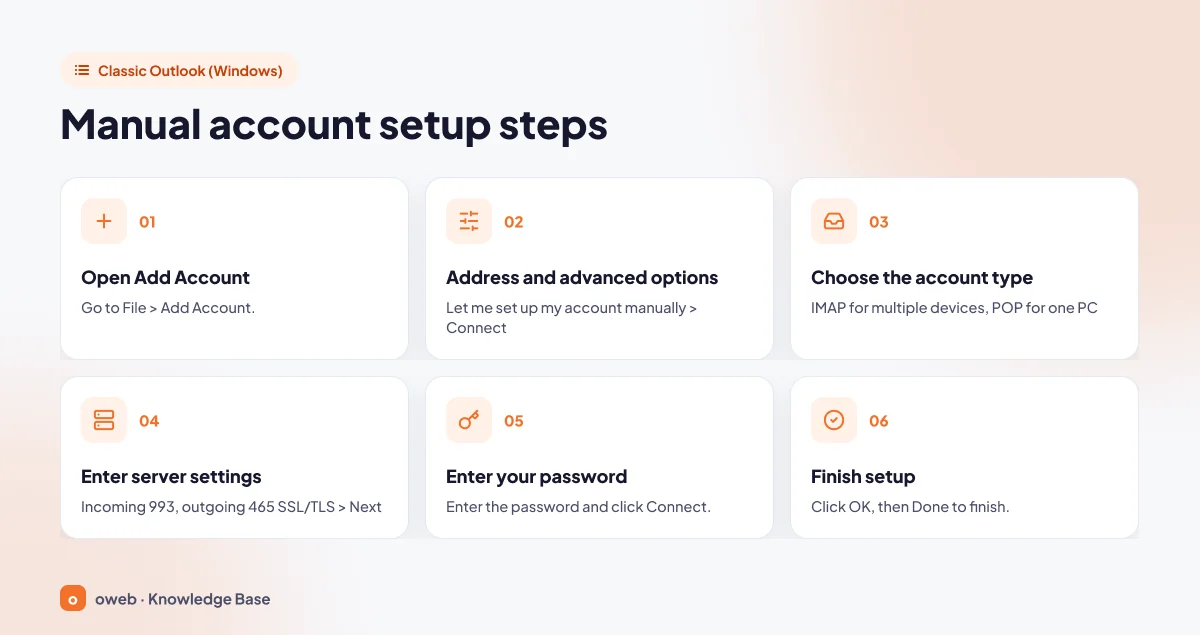
- Go to File > Add Account.
- Enter your email address, click Advanced options, check the "Let me set up my account manually" box and click "Connect".
- Select IMAP (or POP) as the account type.
- On the "Account settings" screen, enter the incoming and outgoing server details and click "Next".
- Enter your password and click "Connect".
- Click "OK" and "Finish" to complete setup. If you get an error, use the option to change account settings to correct the details.
Incoming mail server settings
In the incoming mail section, the IMAP settings should be as follows: enter mail.yourdomain.com as the server name, type 993 in the port field and select SSL/TLS as the encryption method. For POP3, the standard values are port 995 with SSL/TLS encryption. If a username field is shown (or later on the Server Settings screen), make sure your full email address is entered.
Outgoing mail server and authentication
In the outgoing mail section, enter the same server name for the SMTP settings; type 465 in the port field and select SSL/TLS as the encryption. If your provider recommends port 587, select STARTTLS as the encryption method. It is important that the port and encryption type match: if you choose 465 with STARTTLS or 587 with SSL/TLS, the connection will fail or time out.
Before sending a message, the outgoing server verifies that you really own that account and rejects the message if authentication is not performed. This rule prevents the server from being used by unauthorized people to send mail without permission (an open relay).
Control Panel and the "More Settings" window
If you are adding the account through Control Panel > Mail > Email Accounts, or working with the older-style settings window, the settings are split across tabs. In that case:
- Fill in the account type, incoming mail server, outgoing mail server, username and password fields.
- Click the "More Settings" button.
- On the Outgoing Server tab, check the "My outgoing server (SMTP) requires authentication" box. The option to use the same settings as your incoming mail server is sufficient for most hosting services.
- On the "Advanced" tab, enter the incoming and outgoing server ports and the encryption type.
- Click "OK", then test with "Test Account Settings"; if the test succeeds, click "Close", then "Next" and "Finish" to save.
Microsoft's support pages do not always use the same wording for the same option: the setup page says "Let me set up my account manually", while other pages may use slightly different wording with the same meaning, and in some versions the path appears as "File > Account Information > Add Account". If the wording on your screen is slightly different, use the option closest in meaning.
How do you add an account in the new Outlook?
The new Outlook for Windows replaces the old Mail and Calendar apps in Windows and has a different interface from classic Outlook. According to Microsoft's official instructions, the steps for adding an account in the new Outlook are as follows:
- On the View tab, open "View settings" (alternatively, File tab > Account info).
- Go to Accounts > Your accounts.
- Under "Email accounts", select Add account.
- Select the suggested account, or enter a different email address and click "Continue".
- If prompted, enter your password and click "Done" to finish. If automatic settings cannot be found, Outlook may ask for the server details; in that case, enter your provider's IMAP and SMTP values.
As of November 2026, the supported account types page on Microsoft Learn lists the following: Microsoft 365 work and school accounts (Exchange Online), Outlook.com and Hotmail, Gmail, Yahoo, iCloud, and other accounts that connect via IMAP and POP. Although older blog posts state that the new Outlook does not support POP, the current documentation includes POP among the supported account types. Exchange servers running on-premises, however, are not supported; in that case you will see the error "We couldn't reach the email server. Please try again."
The new Outlook for Windows syncs IMAP and POP3 accounts through the Microsoft Cloud (see the Microsoft Support article "Sync your account in Outlook to the Microsoft Cloud"), which means your account details and messages pass through Microsoft's servers. The new Outlook for Mac may also offer an option to sync through the Microsoft Cloud. If your organization's data processing or privacy policy (for example, under GDPR or KVKK) restricts this, talk to your IT administrator before setup, or use classic Outlook, which syncs data directly with the server.
How do you add an email account to Outlook for Mac?
To add an account in the new Outlook for Mac:
- Open the Outlook menu in the top menu bar and click "Settings".
- In the "Accounts" section, click the + button and choose the option to add an account (Add account or New Account, depending on your version).
- Enter your email address and click "Continue".
- Follow the on-screen instructions; if Outlook asks for server details, enter your provider's IMAP and SMTP values.
- Finish with the final confirmation button on the screen (for example, "Done").
With some providers, such as Gmail or Yahoo, you may be asked to allow access (Allow) on the provider's website; for general IMAP/POP accounts, your password and server details are usually enough. In older versions of Outlook for Mac, the path is Outlook > Preferences > Personal Settings > Accounts; to add another account, use the "+" button under Tools > Accounts. Menu names may look slightly different depending on your version and interface language. The new Outlook for Mac can also sync IMAP accounts through the Microsoft Cloud.
How do you set up email in Outlook on your phone?
On a phone, Outlook email setup follows almost identical steps on iOS and Android. On both platforms, only email is synced for IMAP and POP3 accounts; calendar and contacts are not.
iPhone and iPad (Outlook for iOS)
- If you are opening the Outlook app for the first time, tap "Add Account". If another account is already added, go to Inbox > Settings > Add Mail Account.
- Enter your email address.
- On the "Choose your email provider" screen, tap IMAP.
- Enter your password and turn on the option to use advanced settings (for example, Use Advanced Settings).
- Enter the incoming server (mail.yourdomain.com, 993, SSL/TLS) and outgoing server (mail.yourdomain.com, 465 SSL/TLS or 587 STARTTLS) details, then tap "Sign In".
Menu names may look slightly different depending on the app version.
Outlook for Android
- Open Settings in the app and go to Add Account > Add Email Account.
- Enter your email address and tap "Continue".
- Select IMAP or POP3 as the provider.
- Turn on the advanced settings toggle (for example, Advanced settings).
- Enter your password and the incoming/outgoing server settings, then tap the checkmark.
The Android menu names are taken from Microsoft's documentation; they may differ slightly depending on your app version and language.
How do you test your Outlook setup?
Do not assume your setup is completely correct just because the account was added. Receiving (incoming server) and sending (outgoing server) use separate settings; one may be correct while the other is wrong. Run these quick checks:
- Send a test message to yourself. This tests sending and receiving at the same time.
- Send a message to another address (for example, your personal email) and reply to it. This confirms delivery to external servers and receipt of mail from outside.
- If you use IMAP, open webmail. If a message you sent from Outlook also appears in the sent folder in webmail, folder sync is working correctly.
- Test your account settings in classic Outlook. The "Test Account Settings" button in the settings window opened via Control Panel > Mail tests the incoming and outgoing servers separately; green checkmarks indicate that the test was successful.
If your messages are sent but land in the recipient's spam folder, the problem is most likely not in Outlook but in your domain's DNS records. Our guide to SPF, DKIM and DMARC records will help with this. Remember to take a copy of your existing records before making any changes to your DNS records.
Common errors and how to fix them
Outlook error messages usually point to a single mistake in the settings. Try the fixes starting with the simplest and safest.
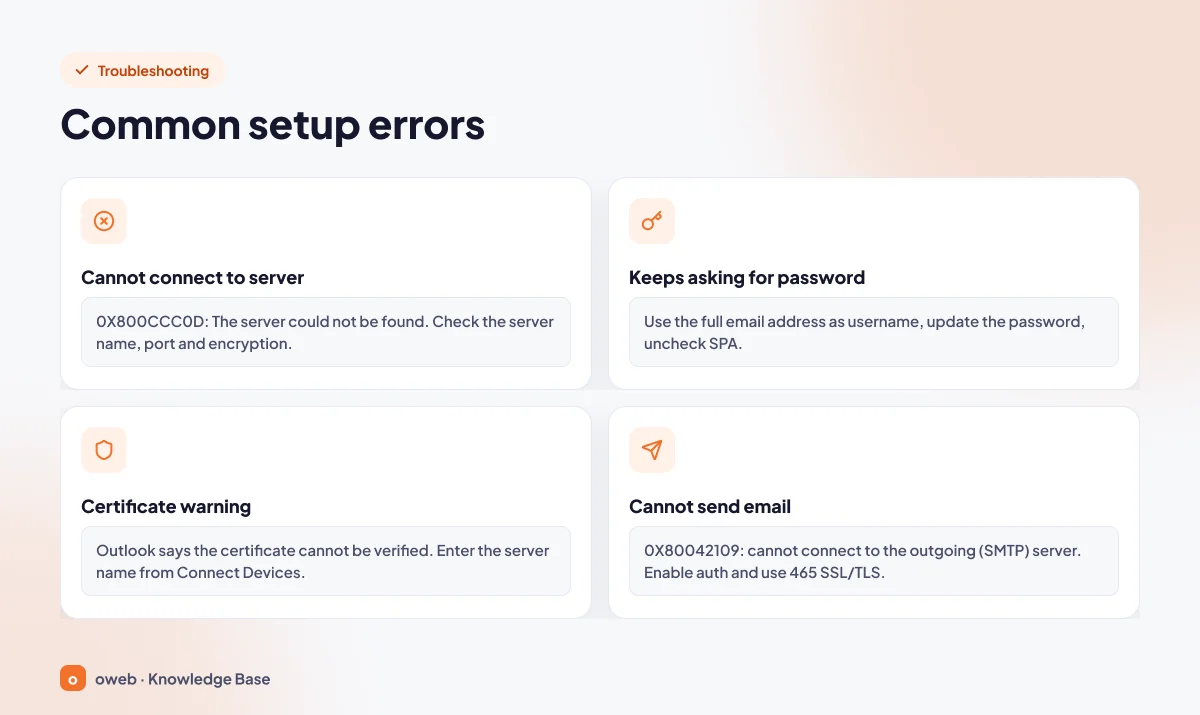
Outlook error codes table
The codes below are listed on Microsoft's page on sending and receiving problems. Microsoft only provides descriptions for 0x800CCC0D, 0x800CCC0F, 0x80042109 and 0x8004210A; the meanings in the other rows are based on general experience. Microsoft also does not give a separate fix for each code; the right-hand column summarizes what to check first.
| Code or message | Meaning | First check |
|---|---|---|
| 0x800CCC0D | The server could not be found | Typo in the server name, internet connection |
| 0x800CCC0E | No description from Microsoft; usually seen when a connection to the server cannot be established | Server name, port and encryption match; firewall or the antivirus email scanning setting |
| 0x800CCC0F | The connection to the server was interrupted | Network connection, antivirus email scanning |
| 0x80042109 | Outlook is unable to connect to your outgoing (SMTP) e-mail server | SMTP port, encryption, outgoing server authentication |
| 0x8004210A | The operation timed out waiting for a response from the POP server | Port and encryption, messages with large attachments |
| No connection could be made because the target machine actively refused it | The target machine refused the connection (Microsoft gives no further description) | Wrong port or server name, or the network blocking the port |
Microsoft published the 0x800CCC0E and 0x800CCC0F errors that occurred while syncing Gmail and Yahoo accounts in classic Outlook as a known issue, and marked it as fixed under the March 2026 updates. The issue title only mentions these account types; if you see the same code with your business account, the cause is usually in the settings, the network or the server.
Cannot connect to the server
Compare the incoming and outgoing server names, ports and encryption types one by one with the details your provider gave you. Common mistakes include a missing letter in the server name, entering 143 instead of 993, and a mismatch between port and encryption type. If the status bar shows "Working Offline", turn off offline mode by clicking the "Work Offline" button on the Send/Receive tab. Your antivirus software's email scanning (SSL scanning) setting can also break the connection; check this setting and consult the software vendor's documentation if needed.
Outlook keeps asking for your password
This loop is almost always caused by the server rejecting your credentials. Try the following in order:
- Enter your full email address in the username field.
- Remember that the password is case-sensitive; check the Caps Lock key.
- If you recently changed your password, update it in Outlook as well (File > Account Information > Account Settings > Server Settings).
- If the Secure Password Authentication (SPA) option is checked in the account settings and your provider does not require it, uncheck it.
- If two-step verification is enabled on your account, your provider may require an app password; use the app password generated by your provider instead of your normal password.
- If the problem persists, add the account again via Control Panel > Mail > Email Accounts. If you need to remove the old account, back up your Outlook data file (PST) first; with POP3 accounts, messages often exist only in this file.
Certificate warning (SSL certificate mismatch)
Microsoft describes this situation under the heading "Error: SSL Certificate Mismatch". The warning means that the server name you entered in Outlook does not appear in the server certificate's common name (CN) or subject alternative names (SAN). On shared hosting, this warning appears if no certificate is configured for mail.yourdomain.com.
The fix is to use the name listed in the certificate as the server name, that is, the value shown on the Connect Devices page in cPanel. If the certificate really is faulty, it is your provider who needs to fix it.
Do not accept a certificate warning and move on without knowing the cause. If the warning is ignored, the security of the connection cannot be verified; on a malicious network, your password and messages could fall into the hands of third parties.
Email not sending
If messages arrive but cannot be sent, the problem is most likely in the outgoing server settings. Make sure the "My outgoing server (SMTP) requires authentication" box is checked, and use SSL/TLS for 465 and STARTTLS for 587. Microsoft also recommends removing attachments larger than 20 MB and checking for messages stuck in the Outbox. For more causes and fixes, see our guide to the email not sending error.
If nothing worked
To start classic Outlook without add-ins (in safe mode), press Windows key + R to open the Run dialog and type the following command:
outlook.exe /safeIf the problem does not occur in safe mode, an add-in is most likely causing it. After that, you can try an Office repair, repairing your profile, or creating a new Outlook profile. Back up your PST files before any profile operations.
How do you change account settings in Outlook later?
You need to edit the settings when you change your password, when your provider updates the server name, or when you want to switch from POP3 to IMAP. First change the password at your provider (webmail or hosting control panel), then update it in Outlook.
In classic Outlook
- On the File > Account Information screen, select the account from the drop-down list.
- Open the "Account Settings" menu and select Server Settings.
- Make the necessary change in the "Incoming mail" or "Outgoing mail" section.
- Click "Next" and "Done" to save.
The same menu also includes "Account Name and Sync Settings", "Change Profile" and "Manage Profiles". Alternatively, you can use Control Panel > Mail > Email Accounts > Change. Because the account type cannot be changed from these screens, switching from POP3 to IMAP usually means adding the account again as IMAP.
Back up your PST file before switching from POP3 to IMAP; local POP3 messages are not moved to the IMAP account automatically. If you want to see your old messages on the server and other devices, move them into the folders of the new IMAP account, and only remove the old POP3 account after that.
In the new Outlook
When your provider changes the server details, the IMAP or POP3 account in the new Outlook may switch to a "needs attention" status. In that case, you usually need to remove the account and add it again.
Removing an account in the new Outlook deletes that account's offline cached content. The "Remove from all devices" option also removes the data in the Microsoft Cloud; calendars or other items that exist only in the Microsoft Cloud may be permanently lost. Back up this data before starting the steps below (for example, by exporting it to a PST file if your version supports it).
Once you have a backup, follow this path: on the View tab, select View settings (or Account info on the File tab) > Accounts > Your accounts > Manage next to the account > Remove; for non-Microsoft IMAP/POP accounts, choose in the dialog that opens whether to remove the account only from this device or from all devices. Then use Add account to add the account again with the new details.
How do you add a signature in Outlook?
A signature is the easiest way to show your contact details consistently in every message.
Signature in classic Outlook
- Open a new message.
- From the Message menu, select Signature > Signatures.
- Create a new signature, type the text, and choose which signature to use for new messages and replies.
Signature in the new Outlook
- Open Settings > Accounts > Signatures.
- Create a new signature with the option to add a signature and save it.
A short, mostly plain-text signature displays more cleanly in every email client. Menu names may vary slightly depending on your Outlook version.
Frequently asked questions
What should I enter as the username in Outlook?
With the vast majority of hosting services, the username is your full email address (such as [email protected]). Entering only "info" is one of the most common causes of repeated password prompts. If your provider gave you a different username, use that.
Should the Outlook SMTP port be 465 or 587?
Both are secure when used with the correct encryption. Port 465 is used with SSL/TLS, and port 587 with STARTTLS. RFC 8314 recommends supporting both methods during the transition period and asks servers to give priority to implicit TLS (465) when advertising the service; cPanel also shows 465 in its secure settings. If your network blocks one port, try the other, but do not turn off encryption in either case.
What is the Outlook IMAP port number?
The standard port for encrypted IMAP is 993, used with SSL/TLS. The encrypted port for POP3 is 995. When ports 143 and 110 are used without encryption, your password is transmitted in plain text, which is why they are not recommended.
Does the new Outlook support POP3 accounts?
According to the current list of supported account types on Microsoft Learn, yes; accounts that connect via IMAP and POP are supported. However, these accounts are synced through the Microsoft Cloud, and on-premises Exchange servers are not supported.
Can I add my Microsoft 365 account using IMAP?
For Microsoft 365 (Exchange Online) accounts, adding the account directly with automatic setup is usually the easiest way. POP/IMAP access for Microsoft 365 accounts may have been disabled by your organization's administrator; in that case, the account cannot be added manually as a POP/IMAP account.
What are the server settings for an Outlook.com account?
According to Microsoft's POP, IMAP and SMTP settings for Outlook.com page, as of November 2026 Outlook.com uses outlook.office365.com for IMAP (993, SSL/TLS) and smtp-mail.outlook.com for SMTP (587, STARTTLS), with authentication via OAuth2. POP and IMAP access is turned off by default; you can turn it on in Outlook.com under "Mail > Forwarding and IMAP". These settings apply only to Outlook.com accounts; for a business account on your own domain, use your provider's details.
I changed my password and Outlook no longer connects. What should I do?
In classic Outlook, enter the new password on the File > Account Information > Account Settings > Server Settings screen. In the new Outlook, enter the new password when prompted; if the account stays in "needs attention" status, back up your data first, then remove the account and add it again.
Conclusion
A successful Outlook email setup depends on three things: the correct server name from your provider, an encryption type that matches the port, and authentication with your full email address. If you use more than one device, choose IMAP, avoid unencrypted connections and unnecessary SPA settings, and understand the cause of a certificate warning before accepting it. Always take a backup before removing an account or changing its type. Keep in mind that the new Outlook for Windows syncs IMAP data through the Microsoft Cloud, and that the new Outlook for Mac may offer a similar option.
If you are looking for a professional email service for your domain, take a look at the Oweb corporate email page. If you are an Oweb customer and cannot resolve an error during setup, you can open a support ticket that includes the error message you received and the Outlook version you use; this information helps resolve the issue faster.
